Leaderboard


Popular Content
Showing content with the highest reputation on 21/04/21 in all areas
-
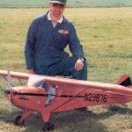
My latest, a Dupli Star a copy of Hanno's Supra Star that was never released in the .60 size. This one was scaled down to 63" span. Has all home cut foam wings, tailplane as well as foam front and rear decks. Glassed and painted.6 points
-
I’m now at the sorting/sanding stage before covering, time to put it together and check alignments etc. Here the differences between the Spanish/Yugoslavian variants become obvious. They’re for me the most interesting of the Hawker Furies.5 points
-
My flying pal, Mike, maidened his little Bristol M1 yesterday. Built from the Peter Rake plan/parts from Belair. Flew great. Detail and pilot to follow now he knows it's a good 'un.4 points
-
A few years back there was a Peter Miller Ballerina mass build. Just because I chose to build a 3/4 size one out of 2 & 3 mm Depron with just a touch of balsa for the spar flanges. Not quite faithful to the original plans but it did fly very well being ridiculously light. As it was smaller I named it the Petiterina. After a couple of years flying it was modified to have a exposed printed scale 9 cylinder radial in a shorter nose. Giving it an 'agricultural' look. Still going strong after 2 more years until 2 days ago when after a 15 minute flight for some reason all control was lost. It spiralled in from about 50 feet. The motor with the dummy radial pulled out the ESC bullet connectors as did the battery from the Deans. The wing is broken in two and the tail dislodged. With such a complete loss of control and power I assumed perhaps the ESC had failed so I simply plugged everything back together where it lay and it all worked! After 5 years use, not a bad life for a lightweight Depron plane, I decided to "retire" the bits but I do so hate to throw anything away particularly when built in 'original' Depron as it is no longer available. So first restore the dummy radial. Apart from gluing back several cylinders It also needed two cylinder heads and several push rods but easy to do as I have all the print files. Restoring the rear fuselage and tail plane is also easy but the rest of the fuselage will have to be new. I do have plenty of 5 mm grey soft EPS foam used under laminate flooring. Much more flexible than original 3 mm Depron but no heavier. So the original rear end grafted on to a new front. It follows the original fairly closely so the undercarriage and the battery hatch can be reused. The wing will be more of an issue as I don't have the Depron to restore the badly damaged right wing root. The grey 5mm EPS is just too flexible in such a high stress position so I fear the only solution will be to "loose" about 3" of the right wing, re-join it and accept that the dihedral break will off set 1.5" from the centre of the fuselage. ? Not concerned about the reduction in wing area as it has plenty of power and its original wing loading was well into the 'slow fly' class. Still work in progress and then I wonder why I have so many models to store!2 points
-
I use these 3D printed servo mountings2 points
-
Despite windy (15 - 18mph) conditions some nice flights with Spatty and this time I remembered the SD card!2 points
-
Well, thanks to colleagues at the pitch I've managed to get a few shots of the GTC, so I've cobbled together bits from a couple of different videos. Mix and match quality I'm afraid, but hopefully gives an impression. That huge wing lets it fly very slowly, I didn't need the flaps. Indeed when I tried them they had little noticeable effect. It can fly quite fast too!2 points
-
Thank you both, gents. @Martian > you're too kind, young man. Only trying to do my very best on this one. @Dwain Dibley. > you're totally right here... but then I shouldn't forget to look at my note... ? ? Cheers Chris Edited as I just saw this is the 5000th post ...2 points
-
Here is my RC converted baby chuck glider from Lidl. £3.99 for the glider. 105g AUW - a great little flyer and a bundle of fun for barely more than the cost of the electrics!2 points
-
Be careful sanding you wont need a lot off. On you first picture it looks bowed, remember the balsa sands away faster than the ply so keep checking that you are sanding flat. I have done a drawing it is exaggerated but should get the idea, don't take anything off the top1 point
-
Checked that John and it’s OK (I removed it then blocked and blew through it).1 point
-
Hi Jonathan, just checked mine it has 10mm down at the wing tip. You can check it by laying a straight edge on the top of the wing and aileron, then take the aileron to its down position and measure the distance. The only way to get more movement is to sand the angle to increase the gap, make sure you sand it flat if it bulges in the middle you will be no further forward.1 point
-
Well that's my thinking Colin. A forward move of the CG is the "safer" direction. It is easily achieved with a slightly heavier LiPo pack and involves no permanent changes so easy to undo if it doesn't work.1 point
-
Yikes, it gets small very quickly but then I guess it is not very big to start with! Well flown Ron in that wind (respect!) and thanks for sharing. I have just painted my Spatman so picture to follow shortly...1 point
-
Aha ! I put a wrap of masking tape around the servo , then hot glue in position . That way , if you want to re use the servo after say ........an incident . You just yank it out and pull off the tape to leave the hot glue on the tape . Is Yank OK ? Or should I have said "Native American of only the last 200 years , completely ignoring the wonderful original owners of that Northern Continent " (You've got to be PC these days you know, and I do try to stay current )1 point
-
No problem John. Send me a PM with address. I will find out how to do the customs form, but it might not be fast as I’m running busy.1 point
-
Just ordered the last one they had in stock! Many thanks Filmbuff for the tip.1 point
-
Tom, I used to own one of these, until a very misjudged maneuver resulted in a long high speed debris field. Motor destroyed, shame, but the exhaust survived. I think I have identified it, 37mm between centers, 3 mm bolts. Bit scraped, but not dented, and sound. Yours if you want it, no use to me, but, I’m in France, and I would have to find out how to negotiate the carriage of important stuff in this fractured world. coo, I’ve just found out how to insert photos.1 point
-
I think mine must have been what they call 'heavy duty' and maybe ott, but I was using it for an F3b model (a Valenta Dragon) and what used to be F3j, 3.5m RES woodie with aluminium spars no less. I did have a mini bungee of 1/8" square FAI rubber which I used to fling up a Talon.1 point
-
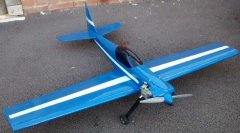
Well, yesterday's flight proved that 4S power is enough to fly the plane easily. However, it still climbs steeply under full power. The elevator with reduced throw is still sensitive even with 30% expo added. That might suggest the CG is too far back - though it is spot on where the plan shows it. The Condor does fly but not currently in the relaxed smooth fashion I was hoping for. So I will add some more down thrust and move the CG forward a bit (use higher C / heavier LiPo) and see if that improves things.1 point
-
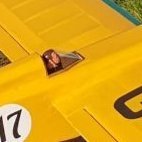
Hi to all, Nope, I didn't emigrate to Greece (yet). Albeit I had a nice 'off duty' last WE due to the Imola F1 GP. A mixed wet/dry race with a lot of captivating racing moments. In fact I don't even understand why there not more forumites getting part of our Fantasy GP contest. It's free and above all very fun to participate. ? Back to business with the Dog... The cockpit tub was glued into the fuse (with the dust removed), the acetate canopy as well, followed by the glass fibre frame. As I wasn't looking forward to this part of the build, I waited each part to be dry before adding the next one... All of it with Deluxe Superphatic. Very few welcomed outdoors dry moments allowed me to finally sand the primed fuse with a 600 grit and add the coat of yellow both sides of the fin. If I can avoid to forget the camera when driving to La Grotte, I promise to add some pics next time... ? Hakuna matata Chris BRU - BE / CTR Camera Control1 point
-
Currently I'm at the complete disaster stage with the nacelles . in order to set up the retracts I have to keep butchering what I had done before also I have no alternative than fit the lipos in the front portion of the nacelles more butchery so I feel the only way forward is to have a break and redraw nacelles with all the mods I have learnt meanwhile I am going to give the Anet 3d printer conversion to laser cutter the time instead . pic of the nightmare that is my workbench (all tidy now )1 point
-
I just can't believ he left in outside the car, many times !! How does he manage to drive ?1 point
-
Your insurers paid out 4 times for Tx left on top of a car? Wow!1 point
-
Thanks Colin. Tomorrow I am taking the model out again for more flights having made a few tweaks. Biggest one is a change from 5s to 4S power as the model really didn't ever need full throttle and climbed strongly at WOT. We will see how it works out in practice tomorrow.1 point
-
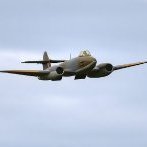
Well, pretty close to being done now. A few day's worth of spraying, and she's ready for servo mounting, control surface hinging, pushrod manufacture, and then programming and balancing. I might do a little light weathering around the gun ports, but I won't go too mad - I know they weren't used all that much.1 point
-
Maidened earlier this year, a World Models 80" Zero. Powered by an OS 160FX spinning an 18X8 Prop. Electric retracts fitted as well as some cockpit detailing and weathering. This was an old but NIB find and all of the covering had to be removed and re-done. An absolute peach to fly and land, provided flaps are used on landing.1 point
-
Thank you Dwain and you Danny. What’s changed is that I’m getting a couple of hours in on this on most days now, whereas before sometimes I couldn’t touch it for weeks. Today I’ve been working on the second wheel, using a Permagrit to get the hub disc shape right and finishing off with fine sandpaper and sanding sealer. I think it’s as far as I can go with this type of undercarriage, although when finishing off I will pay some attention to fairing the length of axle inside the wheels back to the legs. I’m onto the completion stages now.1 point
-
I used Fosters cans to sheet the top of the fuselage from the rear of the cockpit forward. I like a daily can of Fosters so the aluminium comes free. The gun troughs are aluminium foil from baking containers. The cowl is not aluminium.1 point
-
Really just waiting for the motor screws to arrive now.1 point
-
Forgot to post this picture of the maiden of my Sabre - in the sunny autumn of 2020. Its only flight so far as I took it out a couple of times before the lock down but it was never windy enough. That's the plane's designer helping out with an excellent throw. I have since modified the elevator to give it more throw, mine was lacking in the up department. That's all it needed though. Flew on rails and the flaps are really effective - so effective that when I deployed them it just landed! I will know to feed them in next time. There is a minute of video here too - its a bit of a dot as it was from a phone and sorry about the wind noise, I think it was about 40kn. 237405113_Sabremaiden.mov1 point