Leaderboard

Popular Content
Showing content with the highest reputation on 11/10/21 in all areas
-
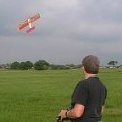
A great end to a very busy season yesterday chaps. Thanks for all the launches and laughs throughout the year.4 points
-
Got sent this by a clubmate. For some reason the video quality isnt brilliant but its all we have for now!4 points
-
P-38 works best on in-line cowls. As Ron said, for radial cowls it's the P-47 that is needed ?3 points
-
Evening all! As the UK wakes up to Monday morning, it's just after 11pm here in Whistler, B.C. on a Sunday night of the Thanksgiving holiday weekend. The temperature is hovering around zero currently... And now a few details from today/yesterday's race results; A low-scoring result today, John S tops today's scores with 137 points, ahead of Chris on 133 and John T on 127. Well done to today's top 3! In the overall table John S holds his lead over Chris and indeed increases it by 4 points. The only place changes today are Iqon moving up to 4th, pushing Glenn down to 5th. Next up is the US GP in two weeks time - don't forget your predictions!3 points
-
We've just tidied up this thread by removing the uninformed speculation it has attracted.2 points
-
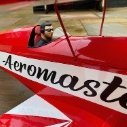
And now I will tell you that it flies beautifully. A little bit of right aileron trim and up elevator trim and it flies like my "The OHmen" but has a much faster roll rate. Unfortunately the ESC stopped working after the first flight. I still had radio but no motor. Sorry the pictures are not too good. There is a dial on top of my camera which is fairly new and it is too easy to move inadvertently.2 points
-
They think its all over!! It isn't now! A 6 month deficit of spare time has set me back a little and I missed the main event, but I'm pressing on.... It was great to see that stunning array of 16 Sabres at the Great Orme in September - I'm sure there must still be a few in hiding, along with mine. Closing the Loop Here's a general shot of the radio bay progress. The elevator pushrod is disconnected to show the closed loop operating crank - I like to take any strain off the servo bearings if possible. The take-off points for the cables (not yet attached) are +/-16mm from the pivot, to match the spacing of the holes in the rudder horns. The cable guide tubes are still free to slide back into place when I'm ready but I aimed to set them to the same spacing as the attachments to the crank, which I managed fairly well. I couldn't get the required rudder throw from the standard Hitec servo arms, so I've used one of these Hitec adjustable arms for the first time - it works a treat, and allows very fine adjustments to the throw (I prefer mechanical to electronic adjustments - it doesn't matter if I lose the radio settings then!). Blending In I'm fairing the fin with 1/2" triangular stock along the base of the fin, and will use thinner stock along the strake. I chose to keep the fin fat while I add the fairings, and then trim the trailing edge later to blend in with the rudder. The reason being so that I didn't lose any width from the fairings - on my photos they seem to be the full width of the tailplane fairing and then taper off towards the front. I hope I can achieve the correct rudder blending shape with this method. For the strake at the front of the fin I used 1/4" balsa. This leaves quite a step in front of the leading edge of the 1/2" fin, even after shaping the LE. The triangular fairing has to bend downwards and sideways at this point, so I applied many saw cuts underneath, and a dampening of the top wood, to coax it into shape while the glue dried. Again, I tried to keep the closed loop tubes +/-16mm apart, and they'll eventually be trimmed flush with the wood. I glued the fin strake onto the top stringers rather than onto the planking because I wanted to leave the last pieces of top planking until the last minute in case I needed to see inside to re-thread the cable guide tubes through the fuz. Having satisfied myself of an adequate cable routing, I then butted the top planks against the fin sides:1 point
-
Finally got around to getting the box of hole saws out (the ones I had when I was an apprentice!) and set to work with adding lightness! Not too fussed about the balsa ribs, but might have a go with the sharp tube technique for experience + a couple of ribs could do with a few more small holes in them. And the results are in ? Total weight saving 15% , with best weight loss of 21% and a couple that didn't tip the scales either way hence recorded a zero. Okay it only saved 42g overall, but with the thinner sheeting everywhere + the nacelle bulkheads (ply) can be lightened then an overall impact can be made and its worth the effort. If you want to continue following developments please search Focke Wolf Ta154 Laser build thread. PS thanks to all that have made positive contributions.1 point
-
So Laser might have run on their engines and need to up their production!1 point
-
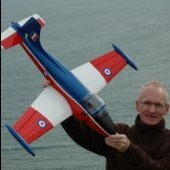
Here are some photos I took today after gluing on the canopy and gluing the pilot in . I still need to finish the canopy painting and put a slither of filler in. The Fuselage and wing painting is basically done now though. I ended up painting the tricolour on the tail as the decal looked a bit to “obvious “. Next step is hardware assembly and putting in the retracts. Finally after that I will add the wheel bay covers which need finishing and painting. Thanks for all the tips and encouragement all!1 point
-
Hello Andy Send Callie graphics in the states an email. Tell her the model and scheme you want. If you tell her the wingspan she scales the graphics accordingly. She does vinyl transfer type so it’s just the graphic that goes on (no borders etc). She did these for my Vulcan, designed, scaled, printed and posted to UK for £25 all in. The quality is exceptional and worth every penny example below…. All the smaller graphics are there as well if you look on the first pic She won’t post till you’ve seen a draft of the artwork and are happy Craig1 point
-
Thought that I had run out of grey paint but I found another can in the shed, yay! Sprayed all the upper surfaces but left the underside in primer to save weight. Pencilled on some rudimentary flying controls, flaps, slats and panel lines. Brush painted the wheels, canopy and gun barrels matt black (Humbrol 33). Was about to ice the cake with the supplied waterslide decals but the first one broke up, old age I suppose. I could scan and print what's left but they would be shiny, the centres would need to be cut out (tricky) and the colour would fade very quickly (non-genuine ink cartridges). Current weight without props but with the battery is 1,260 grammes. Not set the CG yet. The wing loading for the slope will be about 17 oz sq ft which is the same as my Phase 6.1 point
-
One cause of a battery going out of balance that hasn’t been mentioned is a poor connection somewhere in the balance leads (usually wear and tear of the connectors on the balance board). When starting the charge, I always check the cell voltages are somewhere near balanced. If they aren’t, then try re-seating the balance plug in the board. If that does the trick, it’s time to order a new balance board!1 point
-
I have to quote this one Keith, as I have witnessed pilots berate their radio gear a number of times when this occured. The Stall. A number of times pilots have claimed they lost control contact with the model when it was either a long way out or coming towards them. The weakest super sense with our sight, is depth of field and gauging the speed of an object, we are not good at it. Pilots were unable, due to their viewpoint, to see the model travelling too slowly. Before or at the stall, the surfaces reduce in authority, and it does feel like electronic control has been lost. As the speed of the model reduces, the sticks of the tranny feel mushy and soft.1 point
-
Klass Kote epoxy not cheap but is very good. Solarfilm Clearcoat is also very good. the former maybe OTT for the OP.1 point
-
Afternoon all! Just a veryquick update fro Whistler in B.C. before I go out for abike ride! First the results from today; Pos League Rank Team Manager Pts 1 1 0 Pitts Specials john stones 137 2 2 0 GASTON Formula Chris McG 133 3 8 0 teewrex John Tee 127 4 13 0 DMFC Racing Team Simon Webb 125 5 4 1 Igoronic racing iqon 121 6 6 0 Team Charles Picd Charles Pic 113 7 3 0 Essex Racing Tony Clark 111 8 10 0 Revers Racing Pete B 103 9 11 0 Norfolk Flyers Kevin Fairgrieve 103 10 5 1 Oyster f1 Glenn Philbrick 102 11 7 0 PSS Power Flyer 93 12 9 0 Torque of the devil Stu 92 13 12 0 The JP Specials johnpflyrc 87 And now the overall table as it stands after Turkey; os League Rank Team Manager Pts 1 1 0 Pitts Specials john stones 2277.0 2 2 0 GASTON Formula Chris McG 2228.5 3 3 0 Essex Racing Tony Clark 2015.5 4 4 1 Igoronic racing iqon 2009.5 5 5 1 Oyster f1 Glenn Philbrick 1997.5 6 6 0 Team Charles Picd Charles Pic 1974.5 7 7 0 PSS Power Flyer 1904.5 8 8 0 teewrex John Tee 1890.5 9 9 0 Torque of the devil Stu 1829.0 10 10 0 Revers Racing Pete B 1825.0 11 11 0 Norfolk Flyers Kevin Fairgrieve 1780.5 12 12 0 The JP Specials johnpflyrc 1646.5 13 13 0 DMFC Racing Team Simon Webb 1583.0 Comments to follow later this evening (tomorrow for all back in the UK!)1 point
-
As JM put it so well ? In your heart you know you want to put a 4* in it - for the sound ?1 point
-
I bench check with a wattmeter & tacho with every new set up but if I want to try a different prop at the field I just use the tacho to make sure that the revs are near the same or greater than prop I'm changing from. This ensures that the current is lower or hasn't changed significantly. When bench testing I also check the rpm/v (AKA Kv) using the tacho & voltage reading from the wattmeter. BTW I'm surprised no one has picked up that the definition of Kv in @Mike Blandford post on September 9th isn't the same as the definition in the link provided by @MattyB on September 24th. Matty's definition is the one commonly used for model motors but I believe Mike's definition, which refer's to the motor as a generator, is the correct one.1 point
-
I build them like that all the time?1 point
-
A single fish and chips will cost you £8.75 at my local chippy - hardly a cheap meal for a family now. What is often forgotten is that many of us have extra burdons on our incomes that simply weren't there even a few decades ago. Mobile Phone contracts, TV & internet subscriptions, Amazon & Ebay, TV home shopping and not forgetting Credit Cards. The crazy gambling sites that suck people in all from the comfort of their sofas. This can add up to several hundred pounds per month and IMHO does put a strain on many incomes. IFAIR, the only similar regular out goings back in the day might have been a few pennies a week for insurance to bury yourself and another few coppers for the never-never........ "five bob a week and let 'em have it out on the knocker" Fewer people had cars so no car insurance, Road Tax, AA or fuel and servicing costs etc - that of course changed as the 60s progressed. Our hobby today is cheaper than back in the day, but that is often negated by the expectation of buying more and diverse stuff on a regular basis driven by the web and other media. Many of us usually stuck with only a couple of models and often switched radio gear between them in times past and no ARTF to tempt you. Obvious, but difficult to compare meaningfully then and now as times were so very different.1 point