Leaderboard


Popular Content
Showing content with the highest reputation on 20/10/21 in all areas
-
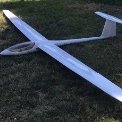
After a break last year I flew the TK4 more often this summer. Good practice helps with that model for safe flying. It's not too complicated due to good low speed handling, just a bit demanding because constant steering is necessary on start and landings. For me it's the perfect trainer for tail draggers. With the TK4 I took part at two model meetings, one in Switzerland/Huttwil and the other in Thuringia/Bad Langensalza. Very nice but rare is a meeting with other racers from the 1930s, especially in same size. Pictures below are with a Caudron 450 and from a very good friend the Miss Los Angeles. Timo4 points
-
I think we can safely say the O.P has had the question answered, and an informative debate about Wattmeters for good measure. We are going to close the thread now gents, it seems to have run it course.4 points
-
The Hunter did fly at the Ashbourne Scale Day although it tool a bit of rather drastic repair work to achieve it. After the skin repairs were completed testing revealed the duct was cracked in several places which caused the inlet area of the duct to collapse inward at full power. https://www.youtube.com/watch?v=kboAuM1_RJQ This required 3 separate local areas of the fuselage skin to be cut out, both top and bottom, to gain access the duct. Each duct crack had to be reinforced with one or more a printed patch repairs. This was the largest cut out. All together I used 16 patches before I was confident the duct would hold shape under full power. At the same time several areas of the duct had to be re glued to the supporting fuselage formers. With 100/100 hindsight the damage would have justified scrapping the whole airframe and doing a new build. Not that I have any intention of building another at the moment I have spent some time redesigning the inlet portion of the duct to significantly improve the improve the airflow and thus reduce the suction forces. Perhaps I should do a late mark version that had all the aerodynamic 'bells and whistles' added. You never know. ?2 points
-
Cowl is done covering is finished and tail servos installed. Glue the tailplane and fin is next then make and fit the U/C.2 points
-
I was under the impression that most modern 2.4 GHz receivers with twin antennae use diversity switching so that the antenna with best quality signal is selected. Both antennae are interrogated multiple times and due to the orientation of the model changing during flight, positioning the antennae at 90 degrees to each other ensures that at least one of them should be obtaining a signal . More info here Antenna diversity Chris2 points
-
While the equations are valid when all you have is a resistance, an electric motor (brushed or brushless) is NOT just a resistor, it actually has inductance (coil of wire) as well as the back emf due to rotation. Quite simply, if all the power from your battery is being converted to heat then your motor will rotate perfectly OK and drive the propeller without needing the battery, so just take the battery out and go flying! Mike2 points
-
Update on the Moth, all doping finished today, will be looking for a good day next week to paint it, forecast does not look good so far ?. Once painting is done, final assembly then test flight, nearly there............2 points
-
Got sent this by a clubmate. For some reason the video quality isnt brilliant but its all we have for now!2 points
-
Kit delivered today. Details here. Looking forward to next summer and hoping to generate some interest in FX-RES at my club. ? I thought I would try an electric version as we have a large flat field, maybe progress to slope soaring at the Hole of Horcum in the not too distant future.1 point
-
A gentleman in the USA, having seen my Big Guff photographed in flight, has offered me a Brown Junior Type D together with a coil, condenser and HT cable for the cost of the postage to my home. I've decided to take up his offer. The Brown Junior a 10cc side port petrol two-stroke was the first successful model aeroplane engine to be produced and was fitted to the original Good Brothers' Big Guff in 1938. I have never owned a "sparky," so bring a wealth of inexperience to the project. The closest experience I can offer is when I competed in Pre 65 motor cycle trials on a magneto equipped BSA Bantam! Consequently I have a number of questions. 1. What sort of battery is required? 2. Where can I find a wiring diagram? 3. The original plug and points system seems to work satisfactorily but I believe that modern transistorised ignition systems are available for these old engines. Where can one buy one and what advantages do they offer? 4. I am aware that the Brown Junior is not fitted with an R/C carburetter as fitted to modern engines but that it is capable of operating at a wide speed range by adjusting the ignition timing and fuel mixture. The Big Guff is currently fitted with a Laser 62 turning a 14 x 4 propeller and straight and level flight is achieved just above tick-over. I plan to adjust the engine so that it is turning over at 3000-4000 rpm which I guess is about the same rpm as the Laser throttled down, before releasing the model. Any opinions? 4. I would like to have a remote control throttle-cut so that if the engine was not developing sufficient power to allow take off I could abort the take-off before the model careered into the long grass. Is this possible? I am not expecting the engine for at least two weeks and doubtless will have further questions when it arrives. Happy Landings Gentlemen.1 point
-
The threads remain Jeff. We’ve plenty of room and they may help others in the future.1 point
-
Hi EarlyBird, Many thanks. That works fine Roger1 point
-
Also check the front bearing, I had an Irvine 53 start to run erratically and a new front bearing cured it, it could be that the bearing seal has worn and allowing air in.1 point
-
Yes probably right, but if I don't spend my time on it I will have to buy myself another plane to keep myself busy,,,?1 point
-
Thanks for all the advice, going to try running it this weekend on the bench.1 point
-
Not quite, most monitor the signal strength not the quality, and rather than constantly swap between aerials they swap when the signal strength (or in some cases the data quality) drops below a preset level, i.e rather than keeping selecting the strongest signal they only change once the signal on the current aerial drops below an acceptable level.1 point
-
I like the batteries! Modelers don’t throw anything heavy away! Gallon cans of extra paint, chunks of lead, steel, stacks of old magazines...I’ve used them all. ?1 point
-
I hope that list is still in your brain, 10 years down the line. You are pushing your luck. Your post mentioned toy planes. Now if it was serious planes, you would be constrained by a host of regulations, ignored by you. If it’s just a toy plane, does that not apply? Same chemicals You might be just careful enough to be on the just safe area the job. I have no idea of your ability, or knowledge of risk, or constancy, but you ignore standard industry advice. As I have said, you are over the age of consent. Your decision, your risk. But, if you wish to advocate that risk, please refer the risk taker to the industry standard advice. As I have said, I have lost friends to these things. No proof, no payout, but careful people, constantly messing with organic chemicals, as a living. Don’t endanger your existence for a toy.1 point
-
Last job of the day was to fit my chosen rudder horns from way back when that I dug out from the draw. I didn't use the supplied horns that were to be glued as I wasn't too keen to chop around the rudder as it's not that thick. Pleased with how that went.1 point
-
I ordered a P-38 from Motion RC EU last month. The model was delivered, with no charge made on delivery by the courier -where I'd seen such charges collected before and I thought the same. Then 24 hours later received an invoice from FedEx for VAT, Duty and a £12 handling charge for collecting those. I think there is a limit, below which the duty isn't payable, but the VAT will be -and probably that handling charge too.1 point
-
Sounds like DB might have a run on Hurricane kits at this rate ? I mean, you already have the engine....1 point
-
Some of us also have experience of a different type where use of components outside of their specified parameters has been gained by their continued use without problems plus a certain amount of know-how and the trusted experience of others.1 point
-
Wow - over 6 months since I last posted on this thread. Various family issues, including my wife having a stroke last September (now 95% recovered), house maintenance, and building my artist wife a new studio in the garden meant that I had very little time in the workshop. I have managed to finish the tail components and build three of the four wing panels. I just need to finish the fourth and then the centre section, and almost all of the woodwork will be complete. I should be able to get some uninterrupted workshop time over the next few weeks, so hope to make some significant progress. I'd like to get it ready for painting for when the weather improves and I can set up my outdoor spray booth (cheap Ebay 3m square gazebo). Some pictures of where I'm at - Tail slotted together to check fits - nothing glued yet of course. All pretty straightforward. There was a fair bit more headscratching over the wings. Flair published a set of notes on their website correcting some errors with the early batch of kits (of which this is one), including the fact that the printed plans are undersize by up to 25mm in some places. The notes say to go with the precut parts where you can and where you can't things will be around 1.5% undersize. Well, we don't want that do we? Lots of measuring and scaling from precut parts to the plan indicated that the plans were OK across the width but were indeed a fair way out on the length. I had already recalculated and redrawn the positions of the formers when I built the fuselage, so now I had to do the same for the rib positions and spar lengths etc. All part of the fun. The leading edges are 1/2 inch balsa dowel with 1/16 balsa wrapped round. With the soft sheet supplied and lots of soaking this worked better than I feared. The ailerons feature inset hinges made from CNC cut Tufnol or Paxolin, with a 1/64 ply leading edge. Upper and lower views of mostly complete lower wing panel, still lots of sanding to do. Finally, the obligatory trial fit of the lower wings. Yes I was watching the cricket at the same time. I've now got a Sky Q mini box in there so even better You will also see that the window is open and a fan in front of it as I've finally started to get sensitive to CA fumes. More progress soon I hope.1 point


.thumb.jpg.507e8e41f64a8a0ae8fbd699d456cbca.jpg)