Leaderboard


Popular Content
Showing content with the highest reputation on 02/11/21 in all areas
-
Thanks Richard. Much credit to you though for producing a very good kit. I've learned a heck of a lot during the build of this model. It's my third kit build and the first scale build. If I was starting the kit again the main thing I would do differently is to not use film covering. It's great for a quick finish but it makes subsequent detailing and weathering a bit more difficult. I suspect it doesn't add strength as much as other covering materials. It also imparts too much of a shine for a warbird - just my opinion of course! As for the actual construction I think I would try to think more before doing - there were a number of times when I jumped in and did things which I later realised I could have done better. But, overall, very pleased. I must say that this thread and Paul Johnson's tireless help was indispensable and, for me anyway, nigh on essential!4 points
-
My P51 had its maiden flight today, carried out by a clubmate who is a much more experienced pilot than me. All went well and the model is still in one piece! Jeff, the pilot's, comments were: - It was a bit over-propped (I'd used a 15 X 10 two-blade). He felt it needed a bit less pitch. - A lot of up-elevator trim was needed, probably because the CG was quite forward. No aileron trim needed. - It needed more aileron throw (it was set at 75% of the 15mm throw recommended in the instructions). - It was a beautiful flyer and easy to land. Next flight will be with a 16 X 8 prop and more aileron throw. Ultimately the 14 X 8 four-blader will be the one. It looked really good in the air I must say. I look forward to many enjoyable flights!4 points
-
I'm glad we have these threads . Let me tell you why . Generally speaking I can be quite passionately interested in a particular full size subject , usually from WW2 . I will probably consume every piece of information I can acquire . Lets , face it , to create a prototype from scratch is extremely time consuming , so I need to have a real fascination in order to carry me through . Now this can lead to a slight problem , of which I was reminded , when I saw Tim's "Princess Elizabeth " which so reminded me of my own cherished original . Because we builders must have this real passion and also have a very firm vision on how the model should be finished and detailed , to make it look exactly the way we want it . (Rather like the image of a character from a book , rather than the version dished up by the person that cast for the film version ) , we then end up not wanting to let go of a model . Consequently , I have models that have been repaired many times , because they came from inside my head and cannot easily be improved on in terms of my taste and desire . All of us on these build threads do this to a large degree . Now , this is not a criticism on anyone else , especially as we are the minority , but people who dont build traditionally , tend to grab things that go by to feed their hobby and understandably , don't immerse themselves in the model or its background . I have noticed this in many clubs and always feel there is something missing . As the majority of model flyers are purely Artf flyers , they must accept what is offered to them and dont seem to even consider altering the product or trying to tailor it to their own version . This may simply be habit , and of course , the excitement of "what is just round the corner ?" Perhaps I have not explained the observation very well , and I certainly dont mean to run down ARFURS , but I do feel that they are missing something that we builders enjoy , but cannot quantify .3 points
-
It's since flown Paul. I omitted to re-do the panel lines on the repaired bit, but it looks suitably battle weary now. I have one of Richard's Mustangs. I had to give up on the wings, but the fuselage is solid enough. I also have an R Wills carrier bag and it shall be raided for the remaining parts. We have the technology, we shall rebuild... This is the J-22 after it's (successful) maiden.2 points
-
Finally here's a short video of the P.1091 inflight ? Timo2 points
-
I added the stringers to the Hurricane last night, I used UHU por to stick them on the foam and PVA for the body.2 points
-
This is good advice, but unfortunately it's not always possible. On some ARTF designs the battery hatch seems to have been placed in precisely the worst position they could think of - for instance on my Sebart Miss Wind the hatch is unbelieveablely secured by a screw approximately 5mm behind the prop arc! Completely ridiculous, especially on a model expressly designed for electric power... I've re-engineered it with magnets, but if that hadn't have been possible the only options would have been an isolating plug as per @Denis Watkins post or a multi-layered throttle arming setup on the TX. Being an OpenTX user I have implemented the latter in addition to the magnet hack as after ~10 years on 2.4 with open source TXs I am more confident in that as a safety measure than an isolating switch; besides, I know sods law would decree I left the arming plug at home every time I headed to the patch! It's also a lot easier for me to implement and doesn't make an unsightly hole in the fuselage that would have required strengthening. I do accept that relying on a software solution is not for everyone though (especially if your TX functionality is limited), so go with whatever you feel comfortable with @Rich Griff.2 points
-
Hi all ! Here we go again... Not happy with the result of the lay-up , i decided to start over and get the fuse half out of the mould. Easyer said then done ! The pva didn't work out in some places as the fuse got stuck in the mould. I was affraid the mould was lost at the time but i got them separated in the end and got the surface clean again ! Wondering what happened , i did some testing and i found that after a few minutes spunging- on the pva , you have to use a new spunge...The pva starts to dry and it looks like it has no grip on the surface. Anyways it worked out the second time and again i'm ready to start laminating ! Working with the vacuum bag , i found another problem : The shape of the moulds make it very hard not to damage the bag. Therefore i made some foam blocks with liquid 2K foam around the outside of the moulds. Now all i need is to find some time to remake the first fuse half. Not easy as this will be a 8-10 hours session !! Pleas don't drop out of this blog , it may take a few days , but it will be rewarding as this is the main part of the airframe !2 points
-
Thank U all for the positive comments ! With my cheeks red i present U the fuse half for the ...bin. It's a story of trial and error i guess , in this case , an error ! x There's a lot of perfect area's but that's not enough ! Other and better !1 point
-
Thanks for the input appreciate it, Frank. Speaking as a dyed in the wool power flier I have much to learn!1 point
-
This is the talk by Rob Millinship. If you don't want to watch the whole thing, just watch from 10:00 about the control behaviour ?: Rob Millinship on the Bleriot XI The Bleriot is not far off being a single speed aeroplane, a lot like a free flight rubber model with a lifting tail. If you don't have a lifting tail, you are going to increase the wing loading and it will have to fly faster, as the wing is going to be doing all the work.1 point
-
Just about to start. First time I've built a jet aircraft. Got the Avro Avian on the go at the moment and hoping this will be a more "solid" aircraft.1 point
-
Thanks David, I worked it out at 3.5 inches so 4" seems good to me. The model is designed for Rudder only so I think this will be OK1 point
-
Hi gary. I have been quietly following so would just like to say what a Great build log its looking really good so far. Cheers Dan1 point
-
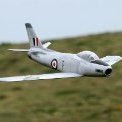
After the deluge over the past two days this morning was pretty calm although the field was all squelchy under foot so I took the opportunity to hopefully fly the Hunter properly. Only a short flight as I didn't want to strain the rather old 1800mAh 3s and a leaky boot meant one of my feet was getting wet! ? https://www.youtube.com/watch?v=jQhOl8fg2T8 Pale blue is not an ideal colour against such a sky (better in full screen mode) but it all went smoothly thanks in no small part to the gyro assist. ? Light and aerodynamic means it not only glides well but pretty slowly too. Finals and flair all power off.1 point
-
I remember reading in Prop Swing, journal of the SVAS (Shuttleworth Veteran Aircraft Society) that wing warping was not so much as roll control but wing leveling control, as mentioned by JD8 that these aeroplanes use rudder as a primary control.1 point
-
As above with the Old Warden Bleriot my model is flown rudder/elevator. In fact even the elevator is not used much with most flying being rudder/throttle. The model is over forty years old and is gently flown when conditions are right [ calm ] There are features on the model which clue to it having had wing warping at some time. One of the problems with the wing warping method of roll control is that it is not possible to have differential movement like with ailerons so adverse roll affect is easy to have. There are some video's of pilots of modern replicas getting into trouble because having learned on modern aircraft they are not used to the rudder being the primary control. I have considerably more Bleriot time than Rob then.1 point
-
Oh and don't forget ! Don't run it rich Warm up and tune as per Jon's recommendations Give it a good thrashing so no flying around at 1/4 throttle with it super rich Enjoy the sound of your little Laser ?1 point
-
Experience. Guesswork. The odd bit of measuring. Construction style makes a huge difference. Are you buying a foam wing? Will you cut strip wood yourself or pay up to get pre-cut stuff? I normally overbuy. It's cheaper to get too much and then use it a year later, than it is to buy too little and have to get a single sheet of wood posted, or worse yet, buy some of the 5x normal price guff that you find in generic hobby shops. I also tend to ignore plans a bit, and make parts from whatever I have lying around. Hobbycraft foamboard makes good ribs and formers in a pinch. Replaces most 3/32 or 1/8 balsa internal structure parts. B&Q 4mm ply can be used almost anywhere you see 1/8 or 1/4 ply called for (one thickness, or double it up). BTW 60" twin engine twin boom, I'd expect the wood bill to be well over £100 these days, possibly nearer £150 even. What plan is it?1 point
-
The problem with making your own one is making sure you can easily, and quickly, get to the sticks after hand launching on the slopes. I use one made by the same manufacturer as my transmitter. Not cheap, but very easy to use and well worth the cost as it means I don't have to stop flying because my fingers are numb.1 point
-
Although i have updated our instruction sheet over the years some of it is pretty old. To clarify your questions... How much oil to inject before running - None. I already ran it, its good to go. How often to lube the engine and rockers - Never. The fuel has oil in it and there is an oilway cut into the cam follower bush to push oil into the rocker cover. If the engine is inverted the rocker cover will usually fill up completely. This causes much hysteria for some reason. The only time it needs extra lube is if its been dismantled and cleaned and in that case you need to blob it on the conrod/crank pin. An oil enema up the breather nipple wont really help it due to the construction of the engine. The best way to keep it oiled up and in good condition is to keep flying it. Prop torque - Tight enough to not fall off ? There is no figure i can give im afraid. Wood props will tolerate less torque than nylon, carbon somewhere in the middle i suspect. Just tighten it up as you do for all your other engines and it will be fine. You didnt ask, but glow plug torque tends to cause more problems as folk go mad doing them up. You do not need a 2 foot torque wrench to do up a glow plug. Finger tight and then a slight nip. Its not a high tensile job! Beyond that, check valve clearance after the first hour of running and then annually after that (unless performance is declining). The biggest maintenance job is cleaning. If you nose over in the weeds dont just restart it and fly. Cowl off, engine cleaned, cowl cleaned, carb intake free of rubbish etc. All that dust and rubbish will get into the carb in the end so give it a good clean. Even a simple prop strike can throw dust and dirt into the cowl so focus efforts there1 point
-
Please, lets not pull this off topic with more discussions of how to secure batteries - if you want to entomb yours in plywood that is up to you ?, but those of us who have been flying electric a long time know that there is nothing wrong with velcro and a bit of foam packing done correctly.1 point
-
Rich The ESC is not damaged if the motor is not connected. It does a check to make sure the motor is connected correctly before it will 'arm'. With no motor connected it will just sit there doing nothing no matter what the receiver tells it to do. Many ESCs have a BEC (Battery Eliminator Circuit) built in which supplies a constant 5V power to the receiver and servos. It is completely independent of the speed control circuit so will operate as soon as the battery is connected. I am firm believer that the safest way to isolate the motor and prop (and everything else!) is to physically unplug the battery. I try to arrange that with all my designs this is readily simple to do without dismantling anything. My 8 currently flyable planes than have to be assembled the battery is installed and plugged in afterwards.1 point
-
If I may add another 2ct.: If you are used to Futaba, or another "canned mixer" system as @MattyBidentified it, you should ban the "Master/Slave" way of programming things from your mind. In OpenTX, the relations are more like "Supplier/Customer", where the customer is in charge and can select its supplier independently. In this way, the MIXERs are the customers, and they select their INPUTs as supplier. The term MIXERs is a bit misleading here, as it can also be a one to one relation with the INPUTs, as you can see in my pictures in an earlier post (and at the other end of the spectrum they can be a separate calculation line, to be used in turn as the input for another mixer). Max.1 point
-
Thanks Matty. That's another useful nugget! I had briefly considered a Futaba set, but not only are they eye-wateringly expensive, it's not particularly easy to see exactly what you get for your money. I would have to say; i'd be somewhat upset to find after spending a load of cash (by 'load' I mean more than for a reasonable OpenTX system) to find I have barely any more useable functionality that I have now. In any case, it would defeat the object of opening up useable and cost effective protocols. It is indeed an interesting and extremely valid point you make; if you want maximum functionality (or at least flexibility) at minimum cost, then OpenTX is worth serious consideration. Put in that context, the inevitable learning curve is just part of the price to be paid. I have not even considered the proprietary OS's such as ETHOS! The feel of the hardware is going to therefore become a major factor. Sadly, that's far less easy to try than it used to be. But given that I ma using pretty old gear, and the real world cost of a TX16 is relatively low, it may be a low risk gamble. Heartfelt thanks to all that have contributed to this thread. It really has helped to demystify this complex issue. Graham1 point