Leaderboard


Popular Content
Showing content with the highest reputation on 15/11/21 in all areas
-
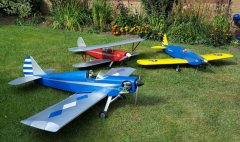
Ready for a test flight. ?3 points
-
Once again with the race being later in the day the Channel4 coverage is still underway, and has an hour and a bit still to run. I'll again make the assumption that anyone who is watching the Ch4 coverage and doesn't want to know the race results is NOT browsing the web at the same time! Hopefully they are totally engrossed in the race - as I was, watching it live. But if anybody is watching the Ch4 coverage, doesn't want to know the results, and is reading this, then ? STOP ? NOW! The results for our league today look like this; Pos League Rank Team Manager Pts 1 9 0 Revers Racing Pete B 143 2 12 0 The JP Specials johnpflyrc 137 3 13 0 DMFC Racing Team Simon Webb 136 4 5 0 Team Charles Picd Charles Pic 121 5 1 0 Pitts Specials john stones 103 6 2 0 GASTON Formula Chris McG 102 7 3 0 Essex Racing Tony Clark 99 8 8 0 PSS Power Flyer 98 9 7 0 teewrex John Tee 89 10 4 0 Igoronic racing iqon 88 11 6 0 Oyster f1 Glenn Philbrick 73 12 11 0 Norfolk Flyers Kevin Fairgrieve 72 13 10 0 Torque of the devil Stu 62 Today's top 3 all come from the bottom half of the overall table. On 143 points, Pete tops the results today. I am second on 137 points, with Simon just one point behind me with 136 points in third. Well done Pete and Simon! The overall table now looks like this; Pos League Rank Team Manager Pts 1 1 0 Pitts Specials john stones 2708.0 2 2 0 GASTON Formula Chris McG 2667.5 3 3 0 Essex Racing Tony Clark 2438.5 4 4 0 Igoronic racing iqon 2390.5 5 5 0 Team Charles Picd Charles Pic 2381.5 6 6 0 Oyster f1 Glenn Philbrick 2285.5 7 7 0 teewrex John Tee 2209.5 8 8 0 PSS Power Flyer 2200.5 9 9 0 Revers Racing Pete B 2198.0 10 10 0 Torque of the devil Stu 2092.0 11 11 0 Norfolk Flyers Kevin Fairgrieve 2032.5 12 12 0 The JP Specials johnpflyrc 1970.5 13 13 0 DMFC Racing Team Simon Webb 1916.0 No place changes at all in the table today, though Pete is now only 2.5 points behind Ade, who is only 9 points behind John T, and Charles is now only 9 points behind Iqon. We're down to the last 3 races of the season now, with Qatar next weekend. Don't forget your predictions!2 points
-
Thanks Ron Does the provenance of the sand matter at all? I'd imagine a nice clean, water-wet, quartz arenite, fine to very fine grained would be preferable. I wouldn't advise using Alberta Tar Sands- they would just exacerbate the situation. If you google "Alberta Tar Sands", then follow the text to Oil Composition, by-pass the mass chromatograms, which are probably only of interest to the mainstream oil sands enthusiast and cut right to the API and flash point of the oil in those sands that might help come to a decision. It would help the reader if you could post a link. Or alternatively you could write it down on a postcard and put it in a drawer for a few years. ;).2 points
-
Cox Stuka Rebuild1 point
-
The 120 4 stroke is too big in these. Mine used to go well on a Laser 100. Word of warning, when you plank the sides, build in a crutch, so the get built straying. Without, you get a twist. Nice flyer.1 point
-
I am pretty sure the repair shop gave that Stuka some new decals. I tend to agree that as the Cox ran on a prime and from a flick start at that, there was little fundamentally wrong with it. It looked like a reed valve Cox and once that gets gummed up it needs considerable care to rectify. The Stuka version is quite rare. In my loft I do have an original (1960?) P40 version that my Dad brought back from America along with a can of Cox 20% nitro fuel. No worries back then. Never flown. It 3 blade prop was used elsewhere.1 point
-
Hobby plastic sell the flexi hose for saito 4t glow motors for about £39. If £29 means it’s a result your happy with....why not Beaware that you don’t create any restrictions or back pressure issues. Keep at it ?1 point
-
Not heard of iGull before. Thats why this Forum is so useful and informative.1 point
-
“pilots head had come off and was rolling around by his feet.” At least you were able to get to him. A Pilot without a joystick in his open hand is all wrong ?1 point
-
My imaginary friend picked my team... That is why I am languishing at the bottom... Next year I will be back..I am not mates with him anymore! ?1 point
-
Nice job. Hope it flies as well as it looks - and having flown a good number of different Ohmen builds with variations in skills and design modifications which have all been excellent performers, I’m sure it will!1 point
-
Looks not only ready but really nice. I hope those doors open away from the model and no-one steps out of the rooms on each side of the corridor or you'll be building new wings ?1 point
-
? ? The wings and fin cause the drag and the motor creates the thrust the photo of the side elevation shows the motor below the wings, clearly showing the reason for your issue, in flight the wings are pushing back and the motor pulling forward making the nose pitch up. Judging by the size of the fin the ideal location to minimise this is for the motor to be slightly above the wing then a small adjustment of the down thrust will have a large effect. CofG comes into my logic as in flight the model rotates around this point so with the motor thrust line passing through the CofG there will be no rotational effect. I know it's just my logic but it's an approach that has put me on the right path to curing this issue. Once the thrust line is close to ideal moving the CofG can be used to fine tune.1 point
-
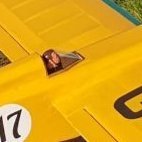
It is 80 - 90%, 1 or 2 seater depending on the Mk. It comes Bn'F (Buy n' fly) or self build kit, the realism of the pilot is up to the buyer. ?1 point
-
Centre of drag rather than CG is the issue.1 point
-
I think "cloth & ears" might be a more appropriate phrase.1 point
-
This topic is becoming hard to follow Just use a decent charger, set correctly, and stay with the equipment Or hook it up outdoors on concrete And you will not need a fire extinguisher1 point
-
No. The long answer is I didn't try as your thread are getting repetitive, long winded, tedious & IMO pointless1 point
-
There was a description of how the Lith-Ex fire extinguisher is supposed to work right back at the beginning of the thread, by the suspension of a fine vermiculite in water - the vermiculite supposed isolates the fire source and the water cools it. That description is repeated on the website. https://www.safefiredirect.co.uk/fire-extinguishers-equipment/fire-extinguishers/lithium-ion-battery-fire-extinguishers/firechief-500ml-lith-ex-fire-extinguisher.aspx There has been some skepticism expressed in this thread, but the video shown was quite convincing. Note that there are videos online which show lipos venting with flame whilst underwater. The main thing is to not get into a situation where you would need a fire extinguisher at all and there are sound protocols in place to mitigate against that risk. There are tens of thousands of modellers using Lipos quite safely around the globe and many millions of people using Lipo and Li-Ion batteries in their everyday lives without any specialist provision of particular types of fire extinguisher. Frankly it isn't worth worrying about whether you prefer to take advice from an e-flight retailer or from a fire extinguisher retailer. Personally I'm content in having a couple of ABC dry powder extinguishers to hand.1 point
-
I have the same view Don. At work I was trained to use extinguishers, what I learned was how ineffective they are and so in the event of a fire call the professionals and evacuate. Maybe as on that course was the only time I have ever touched an extinguisher says it all. Extinguishers are not cheap to buy and maintain and some modelers are on a tight budget. I can do without more rules and more equipment to cart to the pits. I have no problem with my club providing and maintaining extinguishers which I think is the right approach for a club to take. Extinguishers in the home is off topic but as we have strayed there somehow my view is the same walk away and call the professionals. Shed, garage or house burns down no problem I will stand back and watch thereby making sure I am around to rebuild.1 point
-
Assuming the experimenter is still with us, or seances really do work, “ is anybody there, especially anyone who a bit crispy”1 point
-
Hi all ! @ Chris :Thanks for following and for thrusting me with your car ! As i expected ,the next building session was a marathon ! With the fuse mould waxed , pva'd , painted i started applying 50gr glass followed by 100gr glass. The area's where the airex doesn't reach , i used a extra layer of 100gr (curves). Also the open edges and hatch openings get this layer for strenght. Next comes the airex foam layer. The pieces were cut upfront and soaked in resin.They are held in position with magnets(on the backside of the mould taped in place)and little bolts to atract the magnets. I use bolts so i can easely grab them and remove them to apply the next layer of glass.Before the glass gets on , i wetted the airex with enough resin so everything is connected well. The bolts return to their position now to keep everything in place.The glass is laminated thesame way as always with brush and roller.When happy with the result , a layer of perforated plastic comes next , again remove the bolts , get the plastic in place and return the bolts.Every inch must be covered to prevent the next layer(bleeder)to stick to the glass. The bleeder is needed to transfer the vacuum and to soak-up all the exess resin .To put on the bleeder ...the bolts are again removed but replaced by little flat pieces of metal(i used old wheel balancing weights).The bolts would get in the way for the vacuum bag. Finally , the whole gets in a large plastic bag , sealed on one side with rubber sealant,and sealed on the other side with a U shaped aluminium rule where a rubber band gets pushed in. This way i can re-use the bag. Slowly vacuum is applyed (in stages)to make sure the plastic bag reaches the mould everywhere. The vacuum presses every layer to the next and the resin is forced into the bleeder.The whole is left to cure overnight at 20deg and the morning after , everything is removed up to the top resin layer.I was very pleased with the result sofar.No wrinkles and everything seems to be connected very well. To see the end result , we have to wait until the two halves are joined and the moulds are seperated.... Next task is to trim the edges with a sharp blade and clean up the inside.1 point
-
I built an "Amelia" by Derek Woodward over lockdown. Plan is on OZ. Some people had noted a weak wing joint but mine has been absolutely fine. 320W on 3S 2200 and an 11.5 x 5 prop, AUW about 2.75lb. Flies beautifully. Slow and steady if you want, but nicely aerobatic if the mood takes you. One of the nicest flying models I have owned.1 point