Leaderboard


Popular Content
Showing content with the highest reputation on 13/01/22 in all areas
-
A little more done today. The process is shown on Youtube, just look for my page. Cheers Danny5 points
-
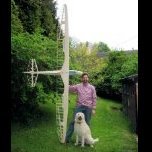
With the basic wing structure completed it was time to move on to the fiddly bits, ailerons and airbrakes. Oh how I dread the faff of fitting airbrakes! It's often a tight squeeze for the servo and the linkage, and choosing to incorporate hatches also adds to the workload. I did contemplate leaving them off but, with a small airfield to operate from, I like my gliders to have some stopping power. Although I'm still undecided as to whether or not this is a glider .......... Servo shoe horned in to the unusually small D-box and secured with hot glue, a hatch below allows access to connect the linkage: Brake at full deflection: Ailerons hinged with Robert style point hinges, wing tip profiling completed: Aileron and brake hatches, wiring complete leaving only the wing joiner tubes to be fitted, sanding and covering. Note also the hard points for the struts: Just for fun I thought I'd trial fit the wings, they went on fairly smoothly but I have some wriggle room if needed before I epoxy the brass joiner tubes in place, without the struts they are very floppy:3 points
-
Been bashing on with it. Fus stripes now painted on and the lettering and roundels added ready for the clear lacquer when the canopy and little man have been fitted. The pics show it at its current stage for weighing and a cg check. The tank, batteries and remaining servos have been simply stuffed in the front for this. Motor is angled to make the carb align with the tank centre. Obviously quite a few bits to add such as linkages but the weight as you see it is 13.5 lb, triple checked, and the cg is currently very slightly in front of the planned position, so quite relieved. If there is enough prop showing it should be no problem for the 180. Hoping for sub 15 lb in the end.?3 points
-
Just finished assembling the Eclipson 3D printed Pitts S12. Maiden tomorrow. 49" span 1.317kg 500W motor LW-PLA3 points
-
With our latest Mass Build project all wrapped up, a group discussion over a few pints of Tim Taylors Landlord had us thinking about a different way of building in an attempt to have some fun over the winter break and producing some exciting new PSS models to test at the start of the 2022 flying season. The focus was on a relatively small, cheap and quick to build scale model and we came up with the concept of the 48 Hour Build Challenge – ‘One Sheet is Plenty!’ The aim is simple – Using only a single sheet of high density foam board and a single sheet of balsa – each modeller will scratch build and finesse a scale R/C model fit for use on the slope within a 48 hour build window. The model must be representative of a full-size powered aircraft, and after the 48 hours are up it must be in a fit state to fly from the slope. The choice of subject, it’s size, scale and complexity are left completely up to you, your only limitation is the raw materials used for construction and the overall time allowed for the build! Typical R/C fittings and hardware can be utilised in the build as needed but the primary building materials must be limited to the foam and balsa sheeting! Work on the design concept, plans and preparation for the build can start now in advance – the 48 hour limit is solely for the build! Ideally the model would be a bespoke ‘Own Design’ creation but builders can also adapt an existing plan if that’s less daunting. As with the traditional Mass Build concept we’re all in this together and the aim is to build simultaneously over the chosen weekend of 5th and 6th March. We will run a pre-event Zoom call on the Friday evening for anyone who is keen to register and take part. The Zoom call will enable us to introduce our chosen subject matter and show off any drawings you may have already compiled to aid your build. The build itself will commence from 6am on the Saturday morning and will run until 6am on Monday 7th March. Monday evening we will aim to repeat the Zoom call to show off the fruits of our labour – no doubt with a well earned beer! For anyone wanting to take part who’s unable to match those exact timescales due to work or family commitments – please join us and pick your own 48 hour window as close as you can to the target weekend – we’d really like as many members to take part as possible! The aim is to bring all of the 48 hour build models together when we meet for our first event of the 2022 season on The Great Orme on April 9th and 10th. So that’s the plan – we’ve already seen a lot of interest in the concept and I think we should have a good collection of bespoke hand crafted foam models at the slope in April – who knows what types of PSS model it will generate!? Use the time now to choose your subject and get drawing/sketching so you can commence your build running…The clock will be ticking! If you would like to take part in the Zoom call at 8pm (UK time) on Friday 4th March please drop me an email to register and I will add you to the invite when it goes out – [email protected]2 points
-
Maidened it today and it really is graceful, having a stall speed of 17MPH. With the right battery it will perform all the aerobatics you would want for a slow flying model.2 points
-
Or are they a cheap (ha!), quick (haha!) fix (hahaha!) For too much traffic, a lack of cheap, clean, safe, direct, reliable mass transit networks and a decade of underinvestment in, and running down of, law enforcement?2 points
-
That flies really smooth!1 point
-
here is the video of the Mini Fun Bat. Don't forget you can download the plan for free. Steve1 point
-
I have the Windsock data books for both the SE5a and Sopwith Pup and they have full colour pictures of the different schemes as well as some original monochrome prints. Apparently there's a method of scanning the grey scale and coming up with the original colour (and some WW1 types are very colourful). However, it's far from accurate and is, at best, an intelligent guess. In any case, who's to say all the (say) reds were exactly the same shade from batch to batch - even modern wallpaper varies - if you need to buy an extra roll it's likely to look different from the ones you bought at the start. So there's no real answer. The shade of PC10 you choose is as likely to be as authentic as the next person's. For what it's worth, I used Flair Spectrum PC10 on the Flair SE5a I built over 20 years ago. It looks all right to me if you ignore its general tattiness!1 point
-
Well, that’s one engine where the crankshaft isn’t taking any thrust load on its front bearing Jon!1 point
-
Even without trying to reproduce a colour picture, lighting can make a huge difference in brown/green. I happen to like olive green trousers. Several times I have had to take them back as there is a version of the colour that is clearly nicely green indoors and is clearly an uninteresting mud in daylight. My scale (very sport-scale) is definitely wrong: it is in the current markings seen on the Shuttleworth example. We can go and see that, and it is currently brown. Mine is green because I prefer them looking green.1 point
-
I far prefer the sound, and smell, of IC. But I'm lazy, so this will be electric. The plan contains no suggestions at all about how to do it, so I'll just ignore that until I get there ?.1 point
-
RapicRC online1 point
-
for only 200 quid i would hang on to it and use it. if you sold it to fund a replacement engine it would cost you more so you might as well go ahead and give it a go. If the engine was worth north of 500, as i thought it would be, then its another story.1 point
-
Frank nailed it. All (as far as im aware) glow engines are measured in cui but petrol engines tend to be in cc. As for 2 strokes, we wont have any of that filth around here ? EDIT: Yep, that makes sense Frank. My old 45's have it on the backplate if i remember rightly but they are a fair bit bigger physically i think. I would like to get my hands on a saito 40 (a new one) at some stage as it looks rather compact.1 point
-
Yes and Yes1 point
-
MDS aero conversion1 point
-
Some more work achieved today on the tailplane mount which now all aligns and bolts up nicely into the rear fuselage. I still need to set the incidence of the tail relative to the wing but this will be done later after more work is completed around the wing-root. Tailplane has a pair of carbon rods for location dowels at the front and is held in place now with 2 x 5mm nylon bolts reacting against a ply load spreader towards the rear. Captive nuts into the ply housing - positioned here for the camera - they have since been reversed so the bolts pull them through the ply when loaded. All nice and square and secure. With this now fitted I'm hoping for a full rig photo this weekend if the weather is kind enough.1 point
-
Hi Chris, thanks for asking, easier if I show you. It involves crochet thread and a contact adhesive, in this case UHU-Por Seat beading Cheers Danny1 point
-
My Atom, ready for it's next flight, hopefully more successful than the last one. Traces of repairs everywhere, but not visible at some distance ?1 point
-
decided to do something different for a change. I got my inspiration from one I saw on the internet. the airfix kit I had lying around, bought 2nd hand for £4,the frame from Wilco's £5.50...total cost for the finished job £12. the spitfire shown was based at Biggin Hill in 1940,damaged by a ME 109,and the id transferred to another aircraft. you may like it or not....only a bit of fun. ken anderson...ne..1..supermarine dept.t1 point
-
here's my latest creation...an airfix MK.IA,made to look like the thank you NHS spitfire that did the flypasts of the hospitals last year.. ken anderson...ne..1..NHS dept.1 point
-
added another Airfix kit to the collection...a type D mustang...painted on the sprue and coated in wilco's satin varnish.....different I hear you think...…..some thing to do during lockdown.....cheap as chips. ken anderson...ne..1..lockdown dept.1 point
-
In Blue Peter style - Here's one I did earlier. Xmas 2012. Still have it, on a shelf above me. Built the odd plastic kit over a Christmas lull.1 point
-
the Spitfire now has its adversary to keep it company....a BF 109-E 4....circa 1940 also which took part in the BOB. ken anderson...ne...1..109 dept. Edited By ken anderson. on 23/12/2020 10:07:181 point
-
Great idea Ken! How about a 1/72 Queen Mary trailer, carrying identical painted sprues? Edited By Robin Colbourne on 14/12/2020 16:53:371 point
-
Batty is now back in the workshop where I will touch up the paint on the belly and apply a matt varnish to help with future wear. I will also apply some Velcro to the battery bay to help hold the battery in place as the straps I installed are a little bit wide. Other than that I think the black body and white wings is quite neat and so I’m not sure I’ll be adding any other markings for now. Although the Orange receiver I’m using has a gyro, I had it turned off for the first flights. With Batty safely back on the bench I will now set this up and hopefully this will help to take some of the nervousness out of the landings in future. Well I can’t believe it has taken me 6 months to finish but I am happy with the quality and have had great fun with the build. Thanks to Lindsay for creating such a funky plan, RCM& E for giving it away for free and to all those of you that have followed along and offered support and suggestions along the way, it has really been appreciated. Lastly, thanks to Jeffery for taking on the maiden and showing what Batty can do. Hopefully I can learn to make it do the same! Jeffery with Batty1 point
-
What an absolute load of rubbish, there are already enough idiots out there still clinging on to the old ways of castor (it may have its place with old engines) etc, but as manufacturers strive very hard to produce powerful, light and reliable engines some plonker does this. No doubt manufacturers (including Jon) could make your hair stand on end with some of the completely stupid and unsafe things people have done, but its best if its kept in the sin bin where it belongs. PS the manufacturer would never have designed/expected that level of vibration/stress and the likelihood of a component catastrophically failing with the prop coming off would IMO just be a matter of time.0 points


.thumb.jpg.77e29add7c1431e70c716c79b427fca9.jpg)