Leaderboard


Popular Content
Showing content with the highest reputation on 11/05/22 in all areas
-
So , wingribs ! How can you make wingribs for a moulded wing ?!?! There's no way you can mesure it with normal tools . You could close up the two shells , glue them together and cut the wing up in pieces at the location where you want a rib but that's to much work lost. To transfer the inside shape of a rib to wood or paper , i use a special comb , often used to transfer cutting lines on floor tiles It prooves to be very accurate and ideal for the job. You can only transfer one side at a time (upper and lower shell )and the bring the two lines together on paper. This is now done for every rib i want (10pieces) The paper ribs are then cut out and glued onto the wood. I used poplar ply 4mm wich is light but not as strong as birch ply. Birch is very hard to get here and the price is going trough the roof !! The wood is then cut with my old (1997) bandsaw The rbs cut this way fit extreme well with very little sanding needed ! After the fit , i made the holes for the tube and prepaired a spar for the outer part of the wing. wheather this is all strong enough , i have to guess and would be happy with comment of any kind ! Tomorrow i'll prepaire the space for the wing air brakes aileron servo , and wing tip tube. I hope these ribs will fit the second wing so i don't have to go through all this again !That will prove that the wings are symetric to one another !8 points
-
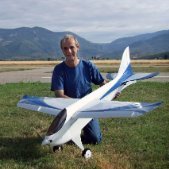
Covering now done and ready for final assembly. Stewart will be flying this one.3 points
-
Just received some rather nice vintage french motorsport graphics from a company called "I Say, Ding Dong" which I have used on an OD model which I am building. Very nice quality, very good range of sticker types (mainly motorsport related) as well as lettering, numbering etc. https://www.isaydingdong.co.uk/ourshop/2 points
-
I filmed a few aircraft on the RC line on Saturday. They will be posted to my thread here https://www.modelflying.co.uk/forums/index.php?/topic/36414-essential-rcs-videos Good to meet you @Ron Gray and thanks to others for sharing details of their models after they landed...2 points
-
After a little while, some more progress was made. Needs a set of wings. As yet undecided on foam vs built up.2 points
-
Three weeks later and I think I can now say that Smoke Trail is finally completed ? I had originally intended to do the windscreen in 3 pieces; both sides and the front section separately but realised that the front former edges were just too thin to allow a join so went with the one-piece option instead. It took a couple of paper templates to get the shape right before transferring the pattern onto some thin plastic salvaged from an Easter egg carton. A few bits of final trimming and then the screen was glued into place with RC Modeller's glue. The engine (Boddo Mills 0.5) with Kavan 7x4 prop was installed with a washer under each rear bolt to give some downthrust and the undercarriage refitted. My local postlady very generously provided a bag of assorted rubber bands to hold the wings and tailplane in place, ready for the photo session: Note that I've tweaked the colour balance on these 3 photos to get a more accurate representation of how the model looks to the naked eye. Smoke Trail weighs in at 189g (6.7oz) and balances about 1.5 inches back from the leading edge, just ahead of the spar. This would be an ideal position for an r/c model but is probably too far forward for free-flight (the plan shows it should be 1/2" further back) as the tailplane has a lifting section. Interestingly, we had a talk from FF scale guru, Andy Hewitt, at our club meeting last week (he's one of our members) and he said that he always balances his models in the 25-30% chord range and simply adjusts the glide with elevator trim. Comments welcome but I think I will try out a few test glides as is and only adjust the cg if I feel it is necessary. Of course, I've first got to find the mandatory long grass and a calm day for test glides, as it states in the Keil Kraft instructions... The other task is to track down some diesel fuel. I've got a tin of D2000 somewhere but as it's about 15 years old I suspect the ether is long gone. I called into Model Shop Leeds a couple of weeks ago and they were asking £25 for a litre of D1000 - a bit steep, I thought! I was hoping to pick some up at Old Warden at the weekend but was surprised to find none on any of the stalls. There's no rush, so it might be later in the year before I get chance to pick some fuel up at one of the shows (Southern Modelcraft list sport diesel fuel at a much more reasonable £10/litre). Anyway, all done now, and I'm happy with the result, even if it has taken 3 months to build a simple free-flight model ?. Next update when Smoke Trail finally takes to the skies!2 points
-
Here are my latest "quickie builds". Sometimes the wind is all wrong for our strip, so I go boating !2 points
-
We've just installed solar PV. 14 panels, inverter and 5.2 KWh batteries. The effect on our consumption from the grid has been astonishing, often down to 1 or 2 KWh a day, and we are heavy users, something like 11000KWh annually. I also run an EV. doing about 12K annually. I return on average 4.8miles/per KWh. The PV installation cost just over £11,000. I live in the south of England. My challenge is persuade my EV charging set up to allow me to charge during the daytime. For example on Monday early afternoon the panels were producing just over 4Kw over 3 of which were going to the grid instead of into my car ?. Prices of solar PV installations have dropped substantially. I first looked in 2008 8 panels on one roof only plus inverter, battery storage was still in the future £12,0001 point
-
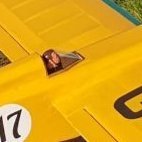
Not quite sure about that, but he does have a smile on his face. ? (he only agreed to do it on payment of a banana)1 point
-
No pawls or ratchets, these are used a lot in model helicopters for autorotation freewheels.1 point
-
Given that new builds apparently have to have an EV charger, I don't understand why the government don't go further and mandate they also have solar panels and storage batteries, where appropriate. This would probably cost less than £10k per house, negligible when new builds where I live start at around £400k. Surely that would significantly reduce the grid's average gas consumption?1 point
-
V2L (vehicle to load) and V2G (vehicle to grid) are super important technologies, but the industry seems to be very slow to roll them out. The only off the shelf option for V2G is are in Nissans which use the CHAdeMO charging std; that allows a lot more communciationbetween the car and load (necesary to protect your battery in the long term), but doesn't charge as fast. CCS (the most common fast charging std) doesn't have that capability by default, but it is possible to do as these clever Dutch types in Utrecht have proved. Get on with it manufacturers...1 point
-
A few more tasks ticked iff working towards skinning the wing underside. Paper servo wire tubes fitted and the servo mounts and hatches sorted. Also the canons/20mm guns needed some thought. I opted to make these from alloy tube with a M5 nylon bolt glued in the end. They fit through a larger short length of alloy tube which will be sanded back to the LE profile once the final front section of 1/4” balsa is fitted. An angled balsa block with a pronged t nut has been fitted to the inside of the inner spruce spar. When screwed in the guns are firm but have a little flex to mitigate against minor knocks. A further brass tube has been fitted inside the barrels to give the correct scale 20mm aperture of 4.4mm1 point
-
Yes, Poppet looks very much like Smoke Trail but I guess there's only so many ways you can design a high-wing cabin free-flighter! Nice model you have there, I bet it's great on those calm summer evenings. Thanks for the tip about fuel quantity. I need to get a small syringe for fuelling up.1 point
-
That is good news. The Ohmen is my stand by model too. I am waiting to get flying shots of a very similar model called "Hound Dog"1 point
-
Just a quick final update - I've got her flying a treat now! I think my initial difficulties were mostly down to correct set-up and trim. Thanks for all the help everyone.1 point
-
After hanging on the wall for nearly a year I decided to have another go with it or rather to see if I could get a bit more thrust and save some weight. A test rear motor mount retaining the same 2205 drone motor with a scale after body that reduces the nozzle to 95% of the FSA. It will use a 3 blade 3x4.5 'wide blade' prop rather than the 4 blade 3x3.5. The duct itself is rolled 3 mm Depron with printed joining pieces. It has a printed bell mouth. Overall this duct is some 20 g lighter than the printed. Not that much but every little helps. The difference in thrust is remarkable. https://www.youtube.com/watch?v=pWhRDJSJNsY On a 4s it delivers close to 250 g thrust using 10A (149W). It certainly passes my 'blow the door shut' test. The ESC can be changed for a 30A 6s version if required. ? This is so much of an advance over the previous arrangement I will simply substitute this duct slightly extended into the HE 162. It appears the coarser pitch prop is much betterable to handle the effect of the long duct. No guarantee but I might yet get the Depron HE162 to fly. ?1 point
-
Its coming along really nicely. Cheers Danny1 point
-
Good to see Jon’s Sea Fury a few posts back. Mine has bee getting some regular flights now and Is proving to be a beautifully balanced model to fly perfectly matched to the 360v1 point
-
Important Points of Attachment. Or, bits that attach other bits to the fuselage pod.1 point
-
With the super easy parts out of the way lets make a start on the fuselage pod. Again all should be self explanatory but please respond if you have any queeries.1 point
-
That didn't take too long to cut out from 1/4" balsa, taper with a razor plane and sand off the corners. It was then glued in place with balsa cement, with the glue fillet smoothed in the corners with a brushload of thinners, as per the fin, earlier. A quick splash of dope then it was covered with tissue to match the fuselage.1 point
-
Built by master aero-modeller Chris Golds over 20 years ago and in storage ever since. He was also a jet pilot of various full size aircraft including the English Electric Lightning and an accomplished aviation artist. He's enjoying retirement now so hoping he gets to see this vid of his creation flying again.1 point
-
So, a bit more on the fuselage. The front hatch was a bit of pain and I'm not super happy with the fit, but it'll probably be ok. Just waiting for some model-lite filler. I want to get the fuselage as near as possible to complete before I move on to the wing. Still undecided on foam vs built.1 point