Leaderboard


Popular Content
Showing content with the highest reputation since 19/03/24 in Posts
-
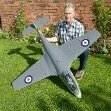
As with the Fw190 , I will probably send a return envelope out to those that showed interest in the Tempest . I realise that some may have changed their mind , and anyway we are not quite ready to press go on the production line , but I need to know rough numbers . I dont want to send letters to those no longer interested so here is a list of those that expressed interest so far . Rather than PM me at this stage , perhaps if you just click like if you still want one , it will come up at the bottom . Dave B1 Ron Gray Martin Collins Leccy Flyer Andrew Exton Jonathan S Grumpy Gnome Glen Philbrick Peter Atkins Ace Chris Walby John Timmis Graham Bowers Murat Alan Hilton Roger Bird Dave Naylor Goose is the Hero Nigel Whitgar Piers Bowlan Nick Cribbs David Holland 2 David Davies Don Fry Bucks Boy Chris meek Concept 2 Flyer Rotten Row Chris Clementson John Britton .26 points
-
Quick update, I am now out of hospital in an amazing rehab centre , and am now doing loads more physio and they have lots of incredible specialist equipment including an exercise bike that has electrodes that you attach to your weaker limb that fire in time with the rotation of the pedddles to encourage your less good limb to relearn it’s role! I am so lucky to get a place here, as sometimes people wait weeks, but I got in last week only about 2 and a bit weeks after my stroke. That is ke, as apparently the early days after a stroke are when you have the best opportunity to improve.21 points
-
Great day ....... mission accomplished. 4 flights today. Quite strong crosswinds across the runway so not taking off in the usual manner. Slow start to get the steering straight allowing for the wind. Gradual increase in speed, rear end lifts then apply more throttle and elevator .....up and away. Learning to compensate the ailerons in order to keep the plane flying straight ( circuit wise ) albeit with the model at a 45 degree attitude due to the wind. Two windy but decent flights ..... then the wind all but disappeared. ..... then the fun began..... flight 3 ..... good take off, some decent circuits then my 5 minute alarm sounded ....... let's try lining up the approach ... all going well ...... let's just go for my first landing ....... no problem... a little hard as I had not flared out well enough but no dramas, no damage ..... and we are down. Flight 4 .... more of the same ... successful take off ...... some decent circuits ..... and a better softer landing. Much better. A little jolt of over steer when I landed but corrected with no issues. Definite progress. I would have appeared to have completed the whole loop today twice from start to finish ......... over the moon and finished today on a huge high. I'll sleep well tonight. Toto15 points
-
For the last three years I have been trying to teach my Belgian mate Frans both how to build how to fly. He's built a Ben Buckle Junior 60 and a Radio Queen but I was on the point of suggesting that he had a few sessions with another instructor when he went solo this morning for the first time on the Radio Queen! The weather was perfect, he flew the first two flights with me on the buddy box but I did not have to intervene at all from take-off to landing so I persuaded him to go solo on the third flight which he did. We had a beer afterwards to celebrate the occasion! 😆13 points
-
Just completed this and ready for maiden at the weekend as weather looks more promising here in the north east. It is Miss Lizzy, a Peter Miller plan from RCME September 2005. I am surprised how long I have had this squirrelled away, I always liked the look of it as well as the earlier smaller Tequila Sunrise. Since stashing the plan away I have swapped to electric only so I have converted this by making the space between F1 and F3 into a battery bay which has plenty of room for a 3S 5000mAh battery and cut a hatch into the top of the sheeting. Other changes are swapping the u/c to a small carbon fibre unit, 3D printing the cowl and moving the tailplane servos to the rear to offset the battery weight. The pilot and windscreen are also 3D printed. It all comes out to 4lbs 1oz including the battery and with 525W of power it should have good flight performance. ps, I have just gone back and checked Peter's build article (RCME Miss Lizzy build article) for the weight and that states 4lb 1oz, exactly the same as I have achieved with my electric conversion. Just curious if the quoted weight is with or without fuel, mine is in flying condition including the battery weight (13oz).13 points
-
Didn’t you read the small print? You may only purchase the next kit if you can prove that you have built either the FW190 or the Tempest. Failure to do so renders your order invalid. Please note that any monies hereto forewarned in lieu of dispatch of the next model will be forfeit and you will not be entitled to receipt of a refund because that’s the price you pay for being a smart arse and for trying to jump the progression. If you feel that these terms are unjust and an infringement of your rights as a human being, tough coz them’s the rules and if you don’t like them you are quite welcome to take it up with ‘the boys’, best of luck there.12 points
-
It's taken quite a while but finally I was able to maiden my Sea Hawk at last weekend's PSSA meet at the Great Orme. The launch went well (thanks to Harry Twist) and she was soon climbing away, in fact I had to feed in a considerable amount of down trim in order to maintain level flight but much of that may have been attributable to the strong winds we had over the course of the weekend. I did find it to be quite sensitive in both pitch and roll for my liking but managed to limit that with my rate switches. I didn't get to attempt a proper landing because I had a moment of complete disorientation and ended up making an enforced belly flop landing into some gorse. Amazingly no damage was incurred other than a broken pitot tube! I was VERY lucky! Since returning home I revisited my CG calcs and found an error meaning my CG was further back than I thought at around 7% static margin so I have now added another 50g in the nose to bring it forward by 10mm and giving a 10% margin. Hopefully that will make it a little less twitchy in pitch for next time. I have also upped the expo on the ailerons and elevator too for good measure. Hopefully we'll have favourable conditions for our return to the Orme next month and I'll get to fly her again Here's a couple of photos for the record: Launch photo courtesy of Phil Cooke:- In-flight photo courtesy of Dave Gilder11 points
-
Some photos just edited from our first PSSA event of 2024 this weekend (13/14th April) upon The Great Orme, Llandudno. High strength SW winds resulted in a lot of good flying over the two days and a big attendance as always after the Winter break. Link embedded in the image.11 points
-
The very limited flying over the winter means I need to get in some practise with EDFs as I hope to get the rather "extreme" Douglas X-3 flying. The better my flying skills are the less likely it will might not get any more damaged that it already has been. I decided to fly some of my EDFs that have spent most of last year "hanging on the wall", quite literally. First was the 50mm EDF DH "Swiss" Venom although on this occasion it was flown without the tip tanks. 44" span, it is a Depron job and light at 520g but with a 1300mAh 4s and a clean airframe it is no slouch. Those twin booms are delicate so a belly landing needs concentration and accuracy. Next calm day it was the exact opposite. The Depron Douglas Skray . 36" span and a similar weight to the Venom but with over twice the wing area. A gentle slow flyer but like all delta the drag rises rapidly in any sort of manoeuvre. Flown bank and yank nose drop in a turn is pronounced. Pull too many g and it almost stops flying! Next was the Hawker Hunter F6. 50 mm EDF 33" span and made entirely from 5mm XPS sheet (no balsa or carbon!). At 385g a bit heavier than the Venom although not quite as fast but flies very nicely. Decorated as a Black Arrow of 111 squadron who managed to loop 22 of them together in formation. Today late on (17:20) the weather improved considerably so it was the turn of the P1052 better known as the prototype swept wing Sea Hawk, Still a "portly" Sea Hawk fuselage with a modest power 55mm EDF. Like the Hunter made entirely from 5mm XPS sheet This was my second Hawker, the first was a Sea Hawk. I made a better job of the complex bifurcated inlet and exhaust duct so it had more thrust from just a 1500mAh 3s. Two were built. One still exists at IWM Cosford. The other was modified with a bit more thrust but broke up trying to go supersonic in a dive. The test pilot did not survive. Hopefully at the next calm day I will be able to try the Douglas X-3, again and be a bit better prepared to not break it.11 points
-
Model finished ..flys really nice with the os90 four stroke ..rudder is needed in turns ,but feels very smooth and predictable11 points
-
And today I stood up under my own power and can now transfer between bed and chair without the hoist on a natty trolley-like contraption they call the re-turn https://www.directhealthcaregroup.com/app/uploads/return_product_brochure_uk_12pages_1505_low-10.pdf11 points
-
Tail feathers on nice and straight , plus provisional canopy fitted (yours and mine will be clear )11 points
-
Have a reply from the BMFA and Andy was a great help .It is going to be sorted now .The Flying Club Committee are on safety grounds going to enforce no flying on Kart racing days and thosee members that do not like that will be told maybe they should find a different club to fly at We might lose a few members but at least we will still have a flying club10 points
-
Its all about creating a model that looks far more detailed than it really is . That suits these two entry level kits because they are supposed to be quick build, no fuss models , but that doesn't mean they have to look ordinary . Im still waiting for exhaust stacks before I call it a day . Also got to give the rudder an impression of fabric covering .10 points
-
Final piece of the jigsaw on this build - I decided to gather my thoughts in a video review. Not done one of these before, and there was a lot of annoying background wind noise, but production values aside it's an accurate reflection of my thoughts about the kit - its' design, the build experience and of course how it performs in the air. It's quite long, so if you just want the highlights - I think it nailed the brief almost perfectly. I'm impressed!10 points
-
A chap I once new worked at an electronics firm that had closed. He met an former colleague in a pub and the were discussing work when a young chap butted in and said You old blokes would be lost on modern game players, what did you lot do for fun! The colleague replied. We invented the machines for morons like you to play on!10 points
-
Anyway , putting her rather inconclusive opinion aside (I suppose the written report on Monday will give more away ) , I thought it would be an opportune moment to bring the two 1944 protagonists together . I think we have achieved what we set out to . ie a pair of quick build , easy to fly warbirds to honour the brave pilots of both sides and give an opportunity to show that a built up model can offer everything that an ARTF can , with the extra bonus of self satisfaction (and an element of smug superiority , if I might be so bold , your Honour)10 points
-
Finally back on the Blenheim, the longest build blog in living history i think now, but i am getting close. Quite a few reasons for delays but the bottom line is some other projects both model, work and home are out the way and with our flying field more suited to paddle boarding I might as well crack on. A few changes have been made including a further decision relating to the wing panels and fixing. I have now finally made a decision and re cut the wing such that the centre section and nacelles are fixed permanently to the fuselage and the outer panels now attached just aft of the nacelles. sounds like a massive job but was actually a straight forward amendment and just makes life easier in so many ways. The wing fillets have now been blended which now looks so much better, next job is really to start on some surface detailing, fit glazing, mold the rear turret and then deal with general installation of radio and engines so there is definitely light at the end of the tunnel. Photo shows wing cut and bonded to the fuselage with aluminium tube spars but pre filling and fettling of the wing fillet, see how horrible that looked! Lindsay10 points
-
Yes well, you're both just bitter because unlike me, you're not one of the exclusive members , like what I am . Any way , putting that behind me, here are some quick shots of the Tempest awaiting the next stage . Decals will be the next job . Looks angry doesnt it ? Pity nobody every put a sharks mouth on .10 points
-
Field waterlogged? No problem, take up waterplane flying! Here's a few pictures from our regular flying session at Kitridding Farm on Wednesday. Many thanks to clubmate Mark Newburn for the excellent photos.10 points
-
The little girl had recently attended a funeral and was looking very thoughtful as she came into the kitchen. "Mummy ..." she said "is it really true that people come from dust and return to dust?" "Yes Darling, that is true. Why do you ask?" The little girl looked very serious as she replied: "Well I've just looked under my bed, and I reckon somebody's just coming or just going."9 points
-
Well the Hurricane fix up is finally completed. Applying the markings by airbrush and CNC cut vinyl masks took forever, with six colours and three mist coats of each, cleaning the brush between each coat. I'm quite pleased with the results, which worked fine with just a few wee glitches. With that done I set to with adding some panel lines, using my favoured method of HB pencil, accentuated with light grey water soluble artist's pencil prior to a little light weathering with pencil dust applied with the fingers and some localised aluminium dry brushing. Finally locked all that in place with a mist coat of matt WBPU varnish applied with the airbrush. Got the model all dialled into the transmitter today, added the radio antenna wire, set the control throws and sorted the velcro seatbelt for the 3s1p 3200mah pack. Add the prop and spinner for a final check of CG and with the battery in place and secured that is spot on, as per the plan, with no additional ballast needed. Just need the weather for a maiden flight now -and the bench is clear. 😎9 points
-
All of the small additions from the prototype have been recorded in the files for cutting the kits . Phill the Kit cutter is grumbling about having to actually make some , but that is entirely normal . Green Graham has been finishing off the drawing so we are very close now . I might do two batches in a series of say two weeks . Ideally those that are actually going to lead the charge and are ready to start , could you please pm me . Those that are happy to watch the other get a couple of weeks head start , sit on your hands . Here are a couple of pictures of the great Guru in action . Its not all work though .9 points
-
If the end of I.C lasts as long as the threads discussing the end of I.C, most of us will be long gone before it happens.9 points
-
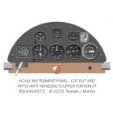
Hi Folks, I'm still creeping along! 🙂 Had a bit more of a fiddle in Fusion and drew up an instrument panel to print to go with the pilot. I also lifted some photos of instruments from the web and photoshopped them into the correct sizes. I am fortunate to have a laser cutter at work so used that to cut them out to fit into the dials. Bit of paint and some clear nail varnish to gloss up the dials and its good to go. I am very pleased how it turned out!!! 😃 Getting to some small changes on the wings now. I wanted to add the small bulges where the wheels sit at the leading edge of the wing root. Time to break out the blue foam and frothy Gorilla glue to fill gaps then shaped and finished with light weight filler (Screwfix One Strike). I have also added the fillet that runs along the bottom of the exhaust area out of scrap as to me it looks a bit bare in that area to me without it. Next on the list is to get the wings covered, then I will add the wing fillet before covering the fuselage. That all for now. I am really enjoying this build and am looking forwards to getting her finished and up in the air!!!! Cheers, Simon9 points
-
The build of my FW190 progressed well thanks to all who have shared their builds and learnings, especially to Ron for his videos.. Here is a sneak preview. It still requires weathering, panel lines, decals etc.9 points
-
I remember the good old days when Snap, Crackle and Pop came from my breakfast cereal, not my body.9 points
-
I'm not sure this is classed as funny ?9 points
-
Got a delivery of sticker paper for the inkjet at the weekend, so the last few markings are now done to "complete" my FW190 - for now. Topped off with a coat of matt varnish (aerosol spray) after deciding not to do any more weathering - not sure my attempts were adding anything, and possibly going backwards! For now I'm going to enjoy flying it until the retracts addendum becomes available - and at that point (assuming I've not crashed it beyond repair...) it'll be back to the build table to fit the undercarriage. SO pleased with how it looks in the air - did a big half loop today before rolling back out and diving down along the strip and it looked absolutely brilliant. Dead chuffed for a first build.8 points