

John Rickett 102
-
Posts
237 -
Joined
-
Last visited
-
Days Won
10
Recent Profile Visitors
1,267 profile views


John Rickett 102's Achievements
324
Reputation
-
The extra bits have now been painted and attached to the cowl. This is as far as I can get until the engine has been returned from repair. With the uncertainty about how long it would be to get a replacement crankcase, if there was one of the imperial thread type to be found during the Laser Engines clear out, the decision was taken to get one of the experienced LMA machinists to clean up the damaged front face and, if necessary, fit a shim to make good again. Should a replacement crankcase eventually be found, it could still be used. The model will now gather dust again for a while but with the weather now more suitable for painting its on with the next project...........
-

Covering undercambered wings. Dennis Bryant SE5a.
John Rickett 102 replied to Albert Ace's topic in Scale Matters
Fabric cement is made especially for attaching fabric to a structure. Available from the light aircraft suppliers, LAS or Skycraft. Brush it on where ever you want the fabric to stick, then brush through the fabric to adhere - it won't peel away, even after shrinking with heat or dope unless you want to reposition, in which case its associated thinners will release it easily. If you buy fabric cement you will also need the thinners as the cement is quite thick initially and needs different thinning ratios for coating the structure and for brushing through the fabric. It is purpose made for polyester fabrics and nylon. It may not provide the greatest of adhesion with pre-coated fabrics like Solartex or Diacov as the adhesive layer will form a barrier to brushing through. -
Well chaps, as much as I don’t like repairing, the earlier damage didn’t warrant discarding of the model so thought it best to try and do an acceptable job prior to selling. Selling has been the intention for some time as it takes up valuable space. Over the years the model has been flown intermittently – I’d rig it, fly it and enjoy the ease and grace but because, once rigged, it’s the only model I can get in the van and then occupy a lot of space in the shed, it’s had an alternating frequent flyer, hangar queen, type of life. The model is over 25 years old, one of the earlier one-piece wing types. Eddie Stoker, when he bought the company recognised that being able to break down the model into smaller, easier to rig pieces was the future, but this one pre-dates that. It also has Mick Reeves (handed) flat wire rigging, which improves the structural strength so will withstand quite high G forces, not that’s what the model was intended for, this though only adds to the rigging time. Do you think a bit of weathering or patina would look more realistic – it is only a sport model after all?
-
After a protracted wait, the weather eventually decided to cooperate in providing suitable painting conditions. The cowl was given a couple of coats of 2K primer, rubbed down and then KlassKote colour applied. The colour had been mixed from other standard tins, fortunately some of the paint from the earlier restoration had been saved . The difficult bit was mixing the (Part B) catalyst so that the dried paint had the same sheen as the rest of the model - I wish I had written down what I did earlier. After 4 attempts (and 3 rubdowns) this will have to be near enough. The radiator shutters, rockers and exhaust should be easier as there isn’t a requirement for matching. Everything will be in 2K paint to resist glow fuel attack.
-
I think that's the way Ron, an old fashioned letter is more likely to get attention than an email - whether there's a reply is another matter!
-
I've written a letter to AGC Sales asking for the rectification plan. In the first instance, I'd suggest each owner does the same. The contact address is on the Laser Engines website which is still active.
-
Thanks Ron and Martin. Yes that's where I read about the inline engines - I must try to stop speed reading when searching!
-
Thanks Ron, I read in one of the earlier posts from Jon that product support was being limited to the 200i and wondered what that meant, that post seemed to have disappeared. Hopefully when the dust has settled the situation will become clearer.
-
Ron, I got a 200i for a project which I've had for about a year but still unrun. Can you please advise what the fault is and is it in all of them?
-
MORANE SAULNIER A1 1/3 scale
John Rickett 102 replied to Steve Fox's topic in Build Blogs and Kit Reviews
Steve, That's good news. A quart is a quarter of a US gallon = 946ml, so near enough to a litre when estimating how much you'll need. I would strongly suggest getting fabric cement and its reducer (thinner) from the supplier if they have it, its purpose made for the job so will make the task of adhering the covering so much easier. Ask if there is an instruction sheet for the fabric cement - to tell you how much thinning is required for initial application and then adhering the covering. The instructions are unlikely to be on the can, so best to know the start points for thinning before lashing on the stuff! If stored correctly, dope will not deteriorate in the can over many years. Fabric cement, or at least the stuff I use, will discolour in the can over time but is still useable. -
Satisfied that the cabin interior parts would go through a doorway with sufficient margin, attention was paid to making the doors. With multiple curves, the challenge was how to make them to hold the correct shape, yet be light and strong. I first considered making a mould and laying them up in fibreglass, removing all but the frame afterwards. I’m sure this could have worked but I wanted a way of building in a rebate for the glazing. There may be other suitable methods but I settled on making them out of laminates of ply having first proven that the ply would bend sufficiently and then hold its shape and that the corners could be made strong. The frames couldn’t be more than ¼” wide otherwise the result would look clumsy. A couple of test pieces were made up as in the pictures 0.9mm ply once wetted and allowed to soak for 10 minutes then laid up in 3 strips over a suitable former, will hold its shape. By overlapping alternate corners, the strength is as high as it needs to be. No attempt has been made to force the joint to destruction, but in pulling at it as if it were a wishbone, satisfied me that this type of joint is more than adequate. The doorway former was made form scrap bits, covered in parcel tape or Sellotape and clamped into position. Each side has a curve to some degree. It was then a case of adding the ply strips and slowly building up the layers. There are 6 pieces to each layer with 6 layers required to get to the desired thickness. With each strip being wetted the drying time takes longer so is quite a slow process...but we're getting there.
-
MORANE SAULNIER A1 1/3 scale
John Rickett 102 replied to Steve Fox's topic in Build Blogs and Kit Reviews
Steve, As you're using Koverall, which is heat shrinkable, you do not need to use a shrinking dope. A shrinking dope will carry on shrinking long after its dried - possibly for months, albeit at a much reduced rate, however it can cause warps to materialise which weren't there when first covered. Non-shrinking dope will still cause the fabric to shrink but not by very much. Having already tautened the fabric with heat, the dope is there to fill the weave and make the fabric air-proof. Koverall has quite a loose weave compared to other polyesters so may need a few coats of thinned dope to completely fill the weave, The thinning doesn't reduce the effectiveness of the dope, only the viscosity. Your model is quite large and you're going to need more than normal modelling size cans, I'd say at least 1 litre of dope. I suggest you contact one of the full size restoration companies in NZ, of which there are a few, and ask where they get their supplies from. You could also ask where they source fabric cement from, this is purpose made for the job of covering. -
Steve, its easy to detach a shroud from a plug. There is a small plastic tab holding the shroud onto the plug, a flat blade screwdriver inserted at the back will lift the shroud from the plug. The tab is only on one side which will be at the top if you lay the cable as in the picture. It will snap back on afterwards.
-
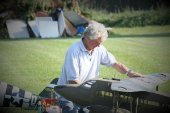
While having to wait for decent painting weather for two other projects, I thought it therapeutic to progress the cabin interior. With Beryl looking a bit more life-like with some colour in her cheeks and with a new completed control column to grasp and straps to keep her in position, it was time to prove that she and the tanks could all be fitted through the doorway. Major surgery was required on her feet (her ankles had to be removed) to clear the obstruction of the radio tray, even so as the butchery is low down below the instrument panel, I don't think it will be very visible. Beryl didn't say a word. I doubt a four-point harness would have been fitted originally but to my mind its in keeping with a perilous record attempt and its all that holds her in the seat.
-
With there being no damage to the exhaust headers and as the whole model is firmly in the ‘sport’ category, the headers were used again in a similar position as before. The exhausts should exit the cylinder heads (if there were any) but these were just put as low down on the rockers as possible. Having only used a few layers of glass cloth, the walls of the rocker covers came out at 0.5mm thick which provides little support for the exhaust stubs. Small pieces of 1/8” ply were added to support the joints, I thought this prudent as its likely the exhausts could be used as handles when removing the cowl, so didn’t want too much flexing and eventual breaking of the fibreglass bits. All the main components have been completed now so it’s a waiting game for the weather to improve to get on with painting.

