Steve Jones 2 Posted October 1, 2013 Share Posted October 1, 2013 After the success so far with my first autogyro- RCME Panther, I was advised the next logical step was a pusher and no better model to learn the black art craft than Rich's RPG. This thread is intended not to be a 'how too' more a documented account of my build as it progresses. I will build 2 at the same time... It doesn't take twice as long. Hopefully others will find it informative and maybe provoke discussion Quote Link to comment Share on other sites More sharing options...
Richard Harris Posted October 1, 2013 Share Posted October 1, 2013 Steve, You will like the simplicity of the RPG, it is a cracking flier despite being an oldish design. Here is me flying the prototype in 2008 , this was my first pusher design as there was nothing about at the time. Rich Edited By Richard Harris on 01/10/2013 22:40:31 Quote Link to comment Share on other sites More sharing options...
Big T Posted October 2, 2013 Share Posted October 2, 2013 Is it the V2 woodpack you are building Steve or the V1 SLEC? Edited By Big T on 02/10/2013 14:53:01 Quote Link to comment Share on other sites More sharing options...
Richard Harris Posted October 2, 2013 Share Posted October 2, 2013 Tim, It is the MKI version that I sent Steve which is the original and was the first that Traplet had,the V2 version is the newest Traplet version and the MkII was the 2 bladed version. The difference being the blades slowly improved as I experimented. The last one I did was the RPG 700 which is a lighter , wider, longer and more shapely version designed to easily get in a 4 s Lipo. This one uses basically my Panther type blade and a slightly different mounting plate. Power to weight ratio is at least 1:1 as it climbs like a love sick angel and pulls loops with ease. Rich Quote Link to comment Share on other sites More sharing options...
Steve Jones 2 Posted October 2, 2013 Author Share Posted October 2, 2013 Oh there you go, did not know there variations... Some progress, the boring bit....cutting out... Nearly 2 sets done. Looking forward to the build and so far I might deviate by adding steering on the nose wheel and maybe a little shape to the flat sides with some false formers etc.... Quote Link to comment Share on other sites More sharing options...
Foamie Dave Posted October 2, 2013 Share Posted October 2, 2013 Sounds like a great thread, I'll be watching ..nice one Steve!! Quote Link to comment Share on other sites More sharing options...
Steve Jones 2 Posted October 14, 2013 Author Share Posted October 14, 2013 So, progress a little slow due to other distractions, some update pics of the build so far... Tail boom support with double blind nut & Servo mounts with screw reinforcement First body partially assembled Motor mount boxes, one partially built showing the captive nuts Base of the mast with servo mounts Mast glued inplace on the body and the boom supports added - make sure they are straight and the boom is a sliding fit !! When your in the mood, why not make 2 !!! Thats it for now - off to try and get the super glue off my fingers Quote Link to comment Share on other sites More sharing options...
Bo Söderblom Posted October 16, 2013 Share Posted October 16, 2013 Where can I buy a plan to the RPG? Quote Link to comment Share on other sites More sharing options...
Andy Nash Posted October 16, 2013 Share Posted October 16, 2013 Posted by Bo S�blom on 16/10/2013 09:33:07: Where can I buy a plan to the RPG? Hi Bo Ask Richard Harris. Just send him a PM mate. (see above 01/10/2013) He designed this great pusher autogyro so he is the best man to ask. Regards Andy Quote Link to comment Share on other sites More sharing options...
Bo Söderblom Posted October 17, 2013 Share Posted October 17, 2013 Richard Harris, how much is a plan to the RPG Mk 1? [email protected] Quote Link to comment Share on other sites More sharing options...
Richard Harris Posted October 17, 2013 Share Posted October 17, 2013 Try HERE Quote Link to comment Share on other sites More sharing options...
Bo Söderblom Posted October 17, 2013 Share Posted October 17, 2013 I like better the Mark 1... Quote Link to comment Share on other sites More sharing options...
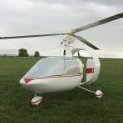
Andy Nash Posted October 17, 2013 Share Posted October 17, 2013 The designer Richard (in blue) with my RPG. Sorry for the picture but I can't add them from my album. A better picture can be seen there. Not blurred! A very good designed pusher autogyro, and enough space to get a pilot fitted. Regards Andy Edited By Andy Nash on 17/10/2013 13:37:44 Quote Link to comment Share on other sites More sharing options...
Bo Söderblom Posted October 18, 2013 Share Posted October 18, 2013 Thanks for the picture, Andy. I will make mine red too.. Quote Link to comment Share on other sites More sharing options...
Bo Söderblom Posted October 18, 2013 Share Posted October 18, 2013 Rick, I can buy a V2 if it's easier.. Quote Link to comment Share on other sites More sharing options...
Bo Söderblom Posted October 18, 2013 Share Posted October 18, 2013 Rick, I can buy a V2 if it's easier.. Quote Link to comment Share on other sites More sharing options...
Bo Söderblom Posted October 18, 2013 Share Posted October 18, 2013 Rick, I can buy a V2 if it's easier.. Quote Link to comment Share on other sites More sharing options...
Steve Jones 2 Posted October 31, 2013 Author Share Posted October 31, 2013 So, its been a while but a little more progress. Time spent on the head assembly and the nose wheel. Some small changes from the plan spec, I used 3mm birch ply not Liteply for the hhead mounts on the mast. The moving parts where as with my Panther, laminations of 2mm ply, 1/4 scale hinges and a removeable hinge pin made from wire. Astro gearboxes screw to the top plate with the captive T nuts inside, making removing easy if required. Main hinge ia 5mm piano wire and double collets. .... Dont forget the cross pinning with cocktail sticks to secure the hinges and glue As for the nose wheel, although the plan is fixed I have opted for steering. This is my take on things, all made with a silver soldered tiller arm. Removal of the leg is with the upper collet which will be hidden in the nose when complete. Dont forget the turns in the leg (handly SLEC wire bender) to give some spring with those not soo smooth landings Again the servo will be higdden in the nose with a short arm. Will need to fit a z wire to protect the servo gears Finally I added some extra bulkheads at the front and a second one behing the sevo to brotect it from the main battery trying to come forward.... Quote Link to comment Share on other sites More sharing options...
Andy Nash Posted October 31, 2013 Share Posted October 31, 2013 She is looking good Steve. I used a metal geared servo (MG995) in the front of mine. I needed to as my landings are not always ideal! Regards Andy Quote Link to comment Share on other sites More sharing options...
Big T Posted November 10, 2013 Share Posted November 10, 2013 Steve, Having built 4 RPG's can I offer a couple of tips? The RPG is an incredibly strong construction. I spiraled my first one in nose first from 50 feet and it bounced!!! However here are a couple of tips, take 'em or leave 'em, up to you I found it difficult to get the hang angle right on my first 2 (remember RH likes a rearward cg LOL) so on the third and fourth I fixed and carved the balsa nose to shape. I then cut it off, fixed a captive star nut into f1. I then hollowed out the balsa nose and filled it with lead, drilled a hole in the middle and bolted it onto f1. I adjusted the lead to suit. This will probably be needed on yours as you have the steering servo at the front therefore restricting how far forward the battery will go although the nose gear will be extra weight. Make the top deck removable to make changing batteries easier (been done by others as well) Make the tail feathers out of depron (saves weight at the back) Go with an alloy rear undercart not the wire frame which I found too rigid. Go with a 4s set up Anyway it's up to you matey. BigT Quote Link to comment Share on other sites More sharing options...
Steve Jones 2 Posted November 10, 2013 Author Share Posted November 10, 2013 Cheers Tim Always willing to listen and learn from others experiences. 4s is already on the cards, yes the hang angle, cog positioning and the motor offset look a bit of a challenge. Bit like helis, correct set up is everything. I was planning to make the nose detachable. Not sure if it will be ready at the weekend, concentrating on the second Panther. Will keep you posted Quote Link to comment Share on other sites More sharing options...
Steve Jones 2 Posted December 2, 2013 Author Share Posted December 2, 2013 So , Progress has been a little slow, some great flying at Old Warden and a maiden of the second Panther (thanks Rich!!). Here at the latest pics for the build. Servos, nose wheel and main U/C done ...... The second one is a little behind in the build but getting there..... One reason its taken a while is the next pic ... If I see another blade !! . I know I said I like carving... And finally for now, a look at the blades on others machines at OldWarden showed my Panther blades were flat. Enthusiastic use of the razor plane on the balsa produced a straight back section which is wrong. The Panthers fly but maybe I am loosing potential lift. These ones I tried to maintain a curve and hopefully they will be better... Steve Quote Link to comment Share on other sites More sharing options...
Steve Jones 2 Posted December 17, 2013 Author Share Posted December 17, 2013 So , here we go with the completion of the first.... In the end on the nose I decided not to fix but make removeable - allowing access to the nose leg if there are issues or heavy landings etc. Fixings are location pegs and magnets Snaps on quite well Here is the finished article, the scheme is not original but a fitting respect to a great man no longer with us.... Power will be 4s with a 13x6 elec prop.... Not sure about the potential pilot yet !! Quote Link to comment Share on other sites More sharing options...
john stones 1 - Moderator Posted December 17, 2013 Share Posted December 17, 2013 exit stage left looks great Quote Link to comment Share on other sites More sharing options...
Richard Harris Posted December 18, 2013 Share Posted December 18, 2013 Steve, Nice work, that covering looks immaculate. I do like the nose cone idea too .It certainly makes a difference with a little more soft balsa on the underside and a bit more time with the sanding block. Rich Quote Link to comment Share on other sites More sharing options...

Recommended Posts
Join the conversation
You can post now and register later. If you have an account, sign in now to post with your account.
Note: Your post will require moderator approval before it will be visible.