Steve Jones 2 Posted January 17, 2014 Share Posted January 17, 2014 So, 2 Panthers down, 2 RPGs with 1 flown so far and now the Project which really excites me - A Gemini .... Scale has always been my thing and over the last 12 months of discovery on the 'Dark side' , THIS is the model which has really caught my eye. Hope Rich does not mind but here are the pics of his first ...to spur me on Again this thread is to post progress and is not intended to be a 'how too'... The previous threads on this model do that much better than I can...... Oh yes another target... to build and fly at Winterton Auto flyin, first week of july ... No pressure then ! Steve Edited By Steve Jones 2 on 17/01/2014 20:59:21 Quote Link to comment Share on other sites More sharing options...
Richard Elliot Posted January 17, 2014 Share Posted January 17, 2014 I'm sure you will enjoy the Gemini build Steve, not a straight line in sight! . I learnt loads when I built mine, I think it's one of Richs' cleverest designs . Hopefully that will mean there will be four of them at Winterton, it would be nice them all up at once. Edited By Richard Elliot on 17/01/2014 22:17:28 Quote Link to comment Share on other sites More sharing options...
Big T Posted January 31, 2014 Share Posted January 31, 2014 Excellent news Steve, I really love mine on a calm summers night it's a real floater. A real candidate for Tissue and Dope! Big Tip, ask Rich E to post some pictures of how he did his tail feathers, wish I had done mine the same, it's a brill mod! Edited By Big T on 31/01/2014 11:01:15 Quote Link to comment Share on other sites More sharing options...
Steve Jones 2 Posted January 31, 2014 Author Share Posted January 31, 2014 Cheers Tim, Rich if you have some time some pics and words would be appreciated Steve Quote Link to comment Share on other sites More sharing options...
Richard Elliot Posted January 31, 2014 Share Posted January 31, 2014 Steve I built mine pretty much to plan, but after a chat with Rich just after he built his, I made my rudder full depth and put the horn under the level of the tail plane. The tail plane halves are a tight push fit into the holder and secured with cocktail stick pushed through tight holes drilled from the top....you can just see them in this pic This makes removing them for transport really easy...a good job as they are a tad fragile Hope this helps Rich Quote Link to comment Share on other sites More sharing options...
Big T Posted January 31, 2014 Share Posted January 31, 2014 Great pics rich, have you got a new camera? Steve, that's the tip!!!! Quote Link to comment Share on other sites More sharing options...
Richard Elliot Posted January 31, 2014 Share Posted January 31, 2014 No Tim, same as the ones I sent you....you must have cleaned your eyeballs! Quote Link to comment Share on other sites More sharing options...
Richard Harris Posted January 31, 2014 Share Posted January 31, 2014 Hmmm, I thought I altered the plan? must take a look. The original idea created too much friction and made the rudder sluggish, there was also a drawing for the tail end (I think) that I sent Rich? These files are all on my old computer which young Debs has borrowed! Rich Quote Link to comment Share on other sites More sharing options...
Steve Jones 2 Posted February 8, 2014 Author Share Posted February 8, 2014 Well its been a while, distractions of a couple of Mantis Autos.. A little progress so far, plenty of cutting out and hardly a straight line in sight.. The cutting out is fiddly but the reward is a structure which just slots together. A splash of glue and real fast progress Quote Link to comment Share on other sites More sharing options...
Big T Posted February 28, 2014 Share Posted February 28, 2014 Ah the memories are flooding back!! Another suggestion Steve, before you box in the back end beef up the undercarriage mounting plate. I didn't and mine came loose so I had to cut the planking out and re do it. Quote Link to comment Share on other sites More sharing options...
Steve Jones 2 Posted February 28, 2014 Author Share Posted February 28, 2014 Sure thing Tim, I was thinking the same as the legs are so long for the looks the lever ratio does not work in the models favour - and my landings. A little more structure here will I am sure be bettter with too much weight penalty. Rich E let me fly his a couple of weeks ago - was fantastic and looking forward to mine Steve Quote Link to comment Share on other sites More sharing options...
Roy Hill 3 Posted February 28, 2014 Share Posted February 28, 2014 Am I cracking up or what? I can't find any way of procuring the plans. Will some-one please help a very frustrated builder? Roy Quote Link to comment Share on other sites More sharing options...
Roy Hill 3 Posted February 28, 2014 Share Posted February 28, 2014 Am I cracking up or what? I can't find any way of procuring the plans for the Gemini. Will some-one please help a very frustrated builder? Roy Quote Link to comment Share on other sites More sharing options...
Steve Jones 2 Posted February 28, 2014 Author Share Posted February 28, 2014 Roy the plans are not issued , only partially done. You will have to twist Rich H arm Steve Quote Link to comment Share on other sites More sharing options...
Roy Hill 3 Posted March 1, 2014 Share Posted March 1, 2014 Steve, Thank you. Roy Quote Link to comment Share on other sites More sharing options...
Roy Hill 3 Posted March 1, 2014 Share Posted March 1, 2014 I think that the 'Autogyro' bug has bitten me but I need the help of the experienced folk on this forum. I can obtain some plans for a 40 inch rotor machine but I want to enlarge it to about 60 inch. What pit-falls await me and how do I get round them? Is it a feasible project? Happy Landings, Roy Quote Link to comment Share on other sites More sharing options...
Richard Harris Posted March 1, 2014 Share Posted March 1, 2014 Roy, I have had no problems enlarging models, infact, just like fixed wing they seem to fly better the larger we go. I would go for it!! The first video is one of my first successful flights with an autogyro in 2008, the model is a DAG designed by Dave Surace from the USA. I then enlarged the plan by 150%, added a few mods to take the extra loads , rounded off the fuselage and made a fully sprung U/C. It ended up with a 75" span being pulled along with an asp 91 four stroke, it is still flying well today though is starting to show its age a bit. Here was one of its first flights. Keep is up t date with your project. Rich Quote Link to comment Share on other sites More sharing options...
Roy Hill 3 Posted March 2, 2014 Share Posted March 2, 2014 Thanks for that, Rich. Brilliant! That has given me the inspiration needed. I'm now toying with the idea of enlarging your 'Panther' design by 150%. That should be a 'Whopper'. I will use your plan and build log. Happy Landings, Roy Quote Link to comment Share on other sites More sharing options...
Steve Jones 2 Posted March 2, 2014 Author Share Posted March 2, 2014 A little more progress, repair to the uncanny distracted me. Some time spent on the head The same method from my Panther, slightly modified from the plan in as much as I make the hinge pin from a wire. This allows the top of the head to be separated - handy in the event of a crash and the need to replace only one hinge assembly. Also shown are the M3 captive nuts for the gearbox. Mounting the gearbox is simply with 4 M3 bolts rather than screws into the wood alone. Makes removal so easy..... Once filled in with basla looks OK On to the tail assembly with the balsa mount assembly. Mounting of the depron fins is then so simple - they slot in and can be changed if required - just like the balsa chuck glider idea - so simple but brilliant !! Fins in place, they will not be glued but pinned incase they need changing While that is drying, back to the fuselage and u/c mounting..... Steve Quote Link to comment Share on other sites More sharing options...
Big T Posted March 3, 2014 Share Posted March 3, 2014 Nicely done Steve. Good move with the sticks, I should have done that. Quote Link to comment Share on other sites More sharing options...
Big T Posted March 3, 2014 Share Posted March 3, 2014 Posted by Roy Hill 3 on 02/03/2014 09:44:12: Thanks for that, Rich. Brilliant! That has given me the inspiration needed. I'm now toying with the idea of enlarging your 'Panther' design by 150%. That should be a 'Whopper'. I will use your plan and build log. Happy Landings, Roy Roy, have a look at page 36 of the Panther thread. Dave built a big PANTHER **LINK** Quote Link to comment Share on other sites More sharing options...
Roy Hill 3 Posted March 4, 2014 Share Posted March 4, 2014 Hi Big T. Thanks, yes I saw that. Awesome. I think that it is a bit too much for my humble skills. I've enlarged the plans by 150% and as soon as I get started, I will post some pictures and words. Happy landings, Roy Quote Link to comment Share on other sites More sharing options...
Roy Hill 3 Posted March 7, 2014 Share Posted March 7, 2014 Hello Richard H and all other gyronuts, having had the plans for the Gemini enlarged to 150%, I am presented with a couple of questions and I would value your expert guidance! While I understand that the length and width of components are 150% larger, does the thickness of the component also increase by the same amount or is it a case of just beef it up a bit? When it comes to constructing the rotor blades and rotor head, do they also increase by 150% in all dimensions?I have a Tornado Thumper rated at 2880 Watt and a Hacker X80 ESC, (both from a previous successful project). I'm not too familiar with this new-fangled electrickery business, so will that combination be under, over, or about man enough for the job? Once the work bench is clear I will calculate the timber requirements and 'get cracking'. Happy Landings, Roy Quote Link to comment Share on other sites More sharing options...
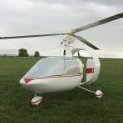
Steve Jones 2 Posted April 7, 2014 Author Share Posted April 7, 2014 Its been a while, distractions with another couple in the Mantis and the Whippit. Latest pics... Steve Quote Link to comment Share on other sites More sharing options...
Richard Elliot Posted April 8, 2014 Share Posted April 8, 2014 Very nice Steve. Your motor looks a lot lower than mine, I have about 75mm from the top of the undercarriage to the motor centreline....might be worth a quick check before you start carving that Cowl! Quote Link to comment Share on other sites More sharing options...

Recommended Posts
Join the conversation
You can post now and register later. If you have an account, sign in now to post with your account.
Note: Your post will require moderator approval before it will be visible.