Steve Houghton Posted May 11, 2014 Author Share Posted May 11, 2014 Wing Seat F10 and F14 (laminated from 2 x 1/8 sheet) added. F10 stands well proud of the wing seat, so will need careful trimming. The wing is slightly off perpendicular anyway, so I shall adjust this with F10 trimming. Lower Nose Sheet Rear Fuselage Top Deck I made up the fin and strake first, to use to set the width of the slot in the deck while I was pinning it into place, then quickly removed the fin so that it wouldn't be glued in permanently. I noted that Andy Blackburn recommended additional support for the deck behind F6, but I can't see where the problem is yet. If the deck does sag I shall investigate further. I was relieved to find that the fuselage remained straight after removal from the jig, despite the dissimilar grades of balsa in the two sides. This may be another reason why some notable builders have decided not to use the Traplet plan pack! Tail Reinforcement Following the designer's lead, I have fitted 3/16 x 1/16 spruce spars into the fin and tailplane. These are 20mm ahead of the hinge lines, because I intend to fit a rudder and need room for the hinges to slot into the balsa. I also cut off the fin and tailplane tips and replaced them with cross-grain stiffeners. The fin stiffener goes down to the top of the rudder. Edited By Steve Houghton on 11/05/2014 15:21:04 Quote Link to comment Share on other sites More sharing options...
Phil Cooke Posted May 11, 2014 Share Posted May 11, 2014 Great progress in this update Steve - good to see you back at it with gusto!! Quote Link to comment Share on other sites More sharing options...
Steve Houghton Posted May 11, 2014 Author Share Posted May 11, 2014 Thanks Phil, I'm inspired by the other late starters, but I can't match the building speed of Matt. If I don't complete in time, I may bring her along 'raw', or partially covered. Nose Block I'm diverging from other builders and am building the nose block off the plane to ease the shaping process. I've seen others using the profile templates in situ, but was put off by the numbers of blocks that would need cutting. I'll post pictures if it works out, otherwise will revert to plan 'B' ! Quote Link to comment Share on other sites More sharing options...
Steve Houghton Posted May 21, 2014 Author Share Posted May 21, 2014 After another delay caused by illness within the family, I'm trying to press on again. It's looking very unlikely that I shall have a flyable model for the Gt Orme. However, I intend to go down trying! I shall restrict the blog to anything that differs significantly from other bloggers. Nose Block As planned, I made the noseblock off the fuselage by laminating horizontal layers pre-shaped to the plan profile. The battery recess needed 2 and a half sections to be cut back. All glued together and the parts fitted nicely. To guarantee alignment with the battery tube, I made a card template to fit inside the tube and guide the noseblock into place before gluing. I also shaped the side profile before gluing, but I have no photos of that. Wing and bolt Reinforcement 1/32 ply plate over balsa filler for the top bolt support. Light glass fibre cloth applied along the joint with PVA. Andy recommended a 1/2 inch strip, but I erred on the cautious side by fitting a 1 inch wide strip. Wing Dowel Due to the dowel hole mis-alignment in F4 from the plan pack, I raised the dowel a little higher and drilled the hole deeper into the wing. Others have elongated the hole in F4, but I preferred a snug fit. I applied two more strips of glass cloth round the dowel to provide additional support to counteract the higher placement in the wing. Quote Link to comment Share on other sites More sharing options...
Steve Houghton Posted May 21, 2014 Author Share Posted May 21, 2014 Elevator Joiner On to the bit I was dreading. I never seem to be able to bend wire straight, let alone join pieces together in a straight line. However, this worked remarkably well and I was delighted with the result. Two pieces of 16swg piano wire bent in the vice, and tack-glued together with thick Cyano - yes, I know I said I wouldn't use it, but I have to say that it worked incredibly well. Although the joint looked fragile, it held together right the way through the process. However, I crimped and drilled the brass tube before fitting over the joint, so that I wouldn't break it apart. The brass tube was then filled with 5-minute Zap and slid over the joint to complete a very pleasing job. A quick squeeze with pliers was applied when the epoxy was nearly set, to ensure physical contact between the tube and the wires. Rudder Details I haven't fitted the lower fuselage sheet yet, until I have installed the radio and glued the snakes. To reduce the unsightly rudder appearance a little, I cheated and made the rudder 1/8 inch lower than the true outline, to bring the horn closer to the fuz. I further lowered the empennage by using a press-on ball link on the bottom of the horn Next job will be to install the radio and check the rudder throw before gluing in the snake. My calculations show that the rudder throw will be huge with the current hole in the horn. I know I could reduce the throw at the TX or on rates, but I may just move the snake out a little - it's currently 15mm from the centre line, but I estimate I shall need approx. 20mm horn length (from fus c/l) to get a throw of 19mm each way. Any shorter and I shall be able to 3D it! Quote Link to comment Share on other sites More sharing options...
Andy Blackburn Posted May 22, 2014 Share Posted May 22, 2014 Ah ha! Hadn't thought of a ball-link. Thanks! Quote Link to comment Share on other sites More sharing options...
Andy Meade Posted May 22, 2014 Share Posted May 22, 2014 I'm rudderizing mine too, thanks for the photos as I'm nearly at this stage Quote Link to comment Share on other sites More sharing options...
Steve Houghton Posted May 22, 2014 Author Share Posted May 22, 2014 Andies, Nice to hear from other rudderizers (I like the term!). I thought it would be useful to share rudder details. I started with Andy' B's recommended measurements for snake position and then realised the snake exit would be rather steep. Hence, I sought to lower the angle as shown. I'm working on the radio installation now, but having made a mount for the RX (Spektrum AR7000) up against F4 I can't fit the switch on F4 as well. I shall post some photos when I have resolved the issues. Steve Quote Link to comment Share on other sites More sharing options...
Phil Cooke Posted May 23, 2014 Share Posted May 23, 2014 Good progress Steve, putting the R/C gear in must mean the airframe is all but compete... I hope you can get this covered and flight ready in time for the weekend in Llandudno! Keep peddling, we are watching!! Quote Link to comment Share on other sites More sharing options...
Steve Houghton Posted May 23, 2014 Author Share Posted May 23, 2014 Hi Phil, There's still a fair bit to do on the fuselage. I was holding off doing the bottom sheeting until I had finalised the snake runs and the r/c location. Should have that all finished later tonight. I find the installation part tedious, so I wanted to get it done sooner to make me feel I was making progress. The wing is complete bar tip tanks - I'll fly without them if necessary. Just finished the ailerons last night. The remaining work is therefore: Fuselage rear lower sheeting; then final fuselage shaping, including tailpipe. All the block work around the air intakes and underwing fairing. Cockpit floor, canopy, and pilot. I also need a battery, probably a 2/3A 4.8v 1600mAh, which I prefer over AA cells. I feel a trip to Barnstormers coming up! I was planning on a painted camouflage finish, probably the G-PROV South Arabian airforce version, but I think it will have to be a simpler film finish now, with as few colours as possible (although I'll try not to copy yours). Half term next week - I've taken the whole week as leave from work, although two days are assigned to a family trip to York for my daughter's school project on the Vikings. The rest of the time will be mine - day and night if necessary!! Reminder to self: start next year's mass build earlier - any ideas yet, Phil? Steve (not giving up without a fight dept....) Edited By Steve Houghton on 23/05/2014 09:17:15 Quote Link to comment Share on other sites More sharing options...
Andy Meade Posted May 23, 2014 Share Posted May 23, 2014 Good on you Steve I'm pretty much at the same point as you now by the sound of things, not looking forward to all the carving with the intakes and such. I'm keeping it easy and going for XM424 - all silver with some little yellow stripes. Just over a week left - plenty of time! Quote Link to comment Share on other sites More sharing options...
Steve Houghton Posted May 23, 2014 Author Share Posted May 23, 2014 Andy, It's comforting to know others are in the same panic boat as me! I have carved most of the fuselage, apart from the bottom rear and the tailpipe. I'm not sure whether to spend time with templates to get the accurate cross sections or just go planing with wild abandon! I think the only critical part is the nose section where the canopy has to fit. I did think about the simple silver scheme, so will have to pore over this and other options available. Good luck with yours. Quote Link to comment Share on other sites More sharing options...
Steve Houghton Posted May 27, 2014 Author Share Posted May 27, 2014 Hi, Just letting you know I haven't given up yet. I'll post photos if there's time, but the build is substantially finished. Spent a frustrating day yesterday making the air intakes - 3 hours to make, and 4 hours to fettle them into symmetrical shapes from all views! To save time on the scheme, I have chosen G-BKOU, which I think was formerly XN637. It has very little in the way of markings, which should help in a speedy finish. Steve Quote Link to comment Share on other sites More sharing options...
Andy Meade Posted May 28, 2014 Share Posted May 28, 2014 That looks very nice Steve, hope the build is going well? Just started covering mine last night - oh the sins a bit of covering highlights! Apparently my tanks are not very round, nor very smooth. Ah well, at least they are plug-in and can be remedied at a later date. Quote Link to comment Share on other sites More sharing options...
Steve Houghton Posted May 29, 2014 Author Share Posted May 29, 2014 Hi Andy, Sounds like you're one step nearer than I am. I shall start covering tomorrow, or is that today - the midnight oil is well and truly burning at the moment! A rapid recap on recent events: Radio Installation As mentioned above, I find this tedious, so have got it out of the way. I also postponed fitting the bottom deck of the fuselage until I had completed it and fitted the cables. I finally decided to put the switch behind the RX, making a mount out of 1/4 balsa topped with 1/16 ply to hold the screws. Will fit a wire through the fuselage later. Satellite RX will be fixed with double sided tape. I have prepared the balsa with a few thin coats of PVA. Roll Your Own (Jet Pipe, that is!) Taking Rez's tip about the jet pipe diameter being near to a D cell, I decided to use rolled 1/32 ply for mine. Soaked the ply in water first, although it didn't help much as it sprang open when released from the bands. To hold it together I epoxied a couple of 1/32 ply plates outside the ring, banded it to the battery to dry, and that did the trick. Trimmed to shape before fitting. The finished article, not yet smoothed into final shape. Quote Link to comment Share on other sites More sharing options...
Steve Houghton Posted May 29, 2014 Author Share Posted May 29, 2014 Tailplane Rear Piece I wasn't sure how to embed the elevator torque rod into the rear part without gluing it solid, so I made a couple of scrap prototypes first. I haven't seen much discussion of this tricky part of the build. The final method was to groove the rear piece a little deeper than needed, to give the rod somewhere to hide away from the glue. Then greased the rod with Vaseline, but not too much that it squeezed out of the slot, and then gently placed the rod into the slot. With a shaking hand I applied a thin smear of epoxy along each edge of the slot and brought it into contact with the tailplane, already pinned down. Then brewed a cup of Taylor's Tea and hoped for the best! Thankfully, it all held together and the torque rod moved. Quite a relief. I suppose the Vaseline will gradually soak into the wood, and we'll wait and see what effect that might have! Glue the Tailplane Unlike others, I like to have the tailplane glued in place before covering as I like to see it aligned properly before proceeding further. So, I connected up the snake, with lock nut and Loctite thread lock on the clevis, and dosed the tailplane seat with Aliphatic. Here's the finished product, also showing the final shape of the ply jet pipe. Incidentally, I had the same problem as Andy B in not having enough wing incidence, so I also used a tapered plate of 1/16 balsa to lift the TE of the tailplane slightly - thanks for the tip, Andy. You can just see the plate in this shot. Wing Facings After building the under wing fairings I faced the fronts with 1/32 ply to protect from knocks and ensure the wing sits squarely against F4. Must get some sleep now - mad covering day tomorrow! Quote Link to comment Share on other sites More sharing options...
Phil Cooke Posted May 29, 2014 Share Posted May 29, 2014 Looks very nicely built Steve, really like the jet pipe and the shape you have achieved at the back below the tail. Looks like you are nearly there - I hope your 'mad day' covering goes well and you can complete this on time for the event this weekend!!! Quote Link to comment Share on other sites More sharing options...
Steve Houghton Posted May 29, 2014 Author Share Posted May 29, 2014 Thanks Phil, Two days off work now, plus Saturday (I can't be at the Orme until Sunday), to get it finished - it is 'just possible' but it will be tight. I did try to find a suitable bottle neck for the jet pipe, similar to yours, but didn't succeed. Quick breakfast now, then back to the workshop. Quote Link to comment Share on other sites More sharing options...
Mark Kettle 1 Posted May 30, 2014 Share Posted May 30, 2014 Any joy with the build Steve? Quote Link to comment Share on other sites More sharing options...
Steve Houghton Posted May 31, 2014 Author Share Posted May 31, 2014 Hi Mark, I'm not sure 'joy' is the appropriate word, but certainly progress is being made. The wing is covered, and 2/3 of the fuselage is done. I had to go and pick a scheme with a very tricky wavy centre line, didn't I? I also have never covered a model with so many curves, and have found it very frustrating. Still left to complete: fit pilot, seats and canopy. two more pieces of film at each end of the canopy cover fin, strake, rudder, elevator, ailerons. shape and cover the tip tanks. make aileron pushrods. weigh and balance. Then it will be finished. I won't have time for any of the markings, but I'm hoping to have a flyable model. Onwards and upwards....the night is still young!!! Quote Link to comment Share on other sites More sharing options...
Tim Mackey Posted June 1, 2014 Share Posted June 1, 2014 And he did..... Nice to meet you at last Steve Quote Link to comment Share on other sites More sharing options...
Steve Houghton Posted June 2, 2014 Author Share Posted June 2, 2014 Hi Tim, Yes, I made it, with the final R/C installation being done at 3am on Sunday morning! Thanks for the launch, Tim, and for the pre-wind entertainment with your electric models whilst the rest of us were soaking up the sun. It was good to meet one of the icons of the modelflying forum and general slope Guru. My face is suffering today - forgot the sun cream and my family are making the usual 'ripe tomato' jokes. I shall post more photos in due course, but it was really nice to meet all the people who contributed to the mass build, the blogs, and of course the PSSA members. Thanks to all for a great day, and for arranging a bit of wind in the closing stages. Well done, Phil, Matt and all the others involved. Steve Quote Link to comment Share on other sites More sharing options...
Tim Mackey Posted June 2, 2014 Share Posted June 2, 2014 LOL, don't mention the sunburn mate - I was the laughing stock of the assembled masses at dinner, and my family and "friends" took no prisoners either LOL Quote Link to comment Share on other sites More sharing options...
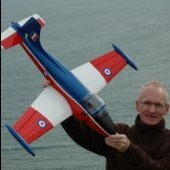
Steve Houghton Posted June 2, 2014 Author Share Posted June 2, 2014 Tim, Glad to hear I wasn't the only one caught out by the sun. My family, who came to watch the event, had all dosed themselves with factor 30, but I was too anxious about the maiden flight to think about my welfare - the model seemed more important! Build Completed, but Not Finished Although the model is not completely finished, I did manage to get it into a flyable state in time for Sunday, as reported by Tim. The build is completed all bar the tip tanks (didn't need them for flying), and the finish is completed apart from the markings. Here are some shots taken before the maiden at the Orme yesterday - sorry about the stray grass!. I don't know why my canopy steamed up. One or two others did too, but most didn't - what's the secret, chaps? I was quite pleased with the finished jet pipe. I'll try to take some more close-ups later. I spent a week's modelling budget on a sheet of Chrome coloured Profilm - not cheap, is it? However, it really sets the tail end off nicely. Jet Provost Compound This was taken in the morning, with 15 JPs, but I think two or three more were added to the squadron later in the day. At this point we were still wondering whether the wind was ever going to arrive, but it did eventually. Quote Link to comment Share on other sites More sharing options...
Mark Kettle 1 Posted June 12, 2014 Share Posted June 12, 2014 I like your blue and red colour scheme Steve - have you added any more to the decoration? Quote Link to comment Share on other sites More sharing options...

Recommended Posts
Join the conversation
You can post now and register later. If you have an account, sign in now to post with your account.
Note: Your post will require moderator approval before it will be visible.