Steve Houghton Posted June 13, 2014 Author Share Posted June 13, 2014 Hi Mark, Congratulations on your Innovation award, by the way! I haven't progressed with the finish yet, as I am catching up on household jobs that were postponed durng the mass build. My family was very tolerant in allowing me to abandon them whilst I completed the build, but now I'm attending to domestic duties, including buying a puppy, as pleaded for by my 9-year old daughter for a year or so! However, the tip tanks are now fabricated and just need trimming to a push-fit. This might have been easier before covering the wing tips, when I could have made minor adjustments by sanding the tips instead of the inside of the cut-outs in the tanks. I also had a minor repair to do to the nose and fin, after my inverted 'arrival' in the pilot's area during the fly-in. My apologies to any pilots who were startled by the arrival, but it's all part of the fun and spontaneity! I think Dave Gilder suffered something similar with his Bronco. Having chosen the blue/red civilian G-BKOU with few markings because I thought I might finish it before the 1st June, I found that the rest of the scheme was more complex than I thought. The two parallel colours down the fuselage sides required the use of a paper template to assess the curves, which were transferred onto the red and blue film edges, after applying an over-wide white band underneath. The tip tanks, however, are blue on top, red below, with a central white band. Not quite sure how I'll do this yet, while trying to pull the film around the compound curves. Probably start with the white band again, allowing a small 1/16 overlap as per Andy Blackburn's re-work on his dayglo, and then butt the red and blue so that they just overlap the white. May still need two red and two blue pieces to go round the curves. I now feel I should convert G-BKOU back into its former identity of XN-637. The colour scheme is the same, but with roundels and a few more characteristic JP markings. I'll try to make my own markings with inkjet printable sticky vinyl. I was hoping to have it done in time for the Ribble Valley PSS event on 22nd June, but that remains to be seen! Edited By Steve Houghton on 13/06/2014 13:49:26 Quote Link to comment Share on other sites More sharing options...
Mark Kettle 1 Posted June 13, 2014 Share Posted June 13, 2014 Busy then - keep up the good work. Quote Link to comment Share on other sites More sharing options...
Andy Blackburn Posted June 14, 2014 Share Posted June 14, 2014 Hi Steve - not sure whether you've done the tanks yet but I was wondering whether you'd considered either: Using a denser white film (Profilm or Solarspan, for example) and adding the white stripe last, but from three separate strips - thin top and bottom strips that can be bent to the right profile and a middle "filler" piece. Cover the top and bottom completely and then mask off and paint it (prymol/wire wool first for solarfilm/profilm, obvs) Personally, I'd consider option 2 - might be a bit easier. Edited By Andy Blackburn on 14/06/2014 08:00:46 Quote Link to comment Share on other sites More sharing options...
Steve Houghton Posted June 15, 2014 Author Share Posted June 15, 2014 Hi Andy, Thanks for your further suggestions. I have now done the basic covering of the tip tanks, but that was before your suggestions so I did it the hard way. Tip Tank Covering Here is my progress so far, all using Solarfilm. I have left the front tips unfinished while I ponder how to represent the navigation lights. I was aiming for a 5mm wide white strip so I first applied a 9mm wide white strip along the outer faces, wrapping it round the back a little, and then did the same for the inward faces, with very little overlap at the back. I used the reliable 'eyeball' method to make sure it was approximately straight! I then cut a 2" wide red strip with a basic straight edge, but I cut a slight curve in each end until it dry fitted the tank without too much twisting. I then tacked the straight red edge along the outer face of the tank with about 2mm overlap onto the white. By careful heating and stretching I managed to wrap a single red piece all the way round to the inward face. However, there was no way I could cut a straight edge onto the inner piece so I trimmed it slightly short and then applied a thin red strip to tidy up the edge. I repeated the process with the blue, leaving a 5mm white strip before tacking it into place on the outside and wrapping it round to the inside. The finished result is passable, but certainly doesn't qualify as good. One tank has a slightly wider strip than the other. I haven't shown the inner edges as they are a little wobbly! A different view showing the unfinished front tips. A close up of the slightly better tank! For the fronts, I will either wrap a black cone of film around and then paint it, or use smaller coloured film cones for the lights and then finish with a thin black film strip around the back of the nav light. Either way, I'm sure it won't be easy to make a circular line around the tank. Any suggestions for this bit would be welcome! Quote Link to comment Share on other sites More sharing options...
Steve Houghton Posted June 15, 2014 Author Share Posted June 15, 2014 Receiver Battery Finally for tonight, a few retrospective shots of my RX battery. I always like to see other people's installations, as these offer many gems of wisdom in a sometimes difficult area, so here's some more of mine. My final AUW before balancing was 26.5oz. I was thrilled with that until I realised I needed 2.5oz of nose weight to balance the CG at 60mm from LE. A total of 29oz. The covered tip tanks will add another 1oz, for a final total of 30oz AUW. I had already decided to use a 2/3A 4.8v battery rather than AA as it is slightly heavier at 91g compared with 85g for a typical AA 4.8v pack. I also hear that they can deliver current better than AA without dropping their voltage. Component Shop delivered a couple of packs in next to no time. The 2/3A is wider and longer than AA, but thinner, and it still fits into the JP battery box. I never know the best way to secure nose weight, so I shaped a flat piece of lead round the front of the battery, added a little foam to fill the battery box, and wrapped the package in tape. The lead is poking out to the right. To hold it all in place at the front of the battery box I just cut a long rectangle of sponge rubber and relied on friction to hold it all inside the tube. I may make it more secure in future, but I did this in a hurry at 2a.m. on the morning of the Fly-in at the Orme, with somewhat bleary eyes! The plug and socket was secured with a retaining clamp because it was buried inside the tube. This all held up for the three flights I had at the Orme. I hope to give a flying report soon, but it's too late now. Quote Link to comment Share on other sites More sharing options...
Phil Cooke Posted June 15, 2014 Share Posted June 15, 2014 Those tip tanks look the business Steve - well done - very nice stripes!!! I just used gloss Humbrol Enamel for the lights, hand painted up to a circular line I'd drawn with permanent marker onto the tip tank by dropping the nose of each through a 12mm circle template. Quote Link to comment Share on other sites More sharing options...
Steve Houghton Posted June 15, 2014 Author Share Posted June 15, 2014 Hi Phil, I admired your tanks and lights when I saw them up the Orme. I like your idea, especially the circular hole for marking the line around - I wouldn't have thought of that. Thanks Quote Link to comment Share on other sites More sharing options...
Mark Kettle 1 Posted June 15, 2014 Share Posted June 15, 2014 Those tanks are looking good. Great work Steve. Quote Link to comment Share on other sites More sharing options...
Steve Houghton Posted July 17, 2014 Author Share Posted July 17, 2014 Graphics After a little delay I am getting round to finishing the JP graphics. I decided to have a go at doing my own, although I have found it daunting trying to work out the size of each item from photos. The professional graphics companies really earn their dosh when they do this (as I've never bought any, I assume they do this, rather than relying on the customer to specify sizes?). I used MS Powerpoint for all the design work and printed onto PPD inkjet paper, which I think I came across in one of Dave Gilder's threads. I bought PPD's sample pack with 5 sheets each of clear, white glossy and white matt films: XN637 As stated earlier, I have decided to revert the proposed G-BKOU scheme back to her military reg of XN637 which she has worn since 2008 and which is more interesting to look at. I managed to produce these letters, using MS Sans Serif font, which seems to (almost) match my subject. I cut the A4 vinyl into A5 sheets which were big enough for each set. I haven't decided on the best size for the smaller lettering, so printed several sizes to keep my options open: The roundels and fin stripes were straightforward, but I had a colour dilemma. The blue should match the top of the fuselage, for which I used the nearest standard solarfilm colour that is a little paler/greener than true roundel blue. So, do I use 'true blue' or 'match the fuselage blue'? Probably the latter, to give better colour harmony. Estimating the font size for the yellow rescue bands was hard, but it will give the right impression even if it's not spot on. The hardest bits were the DANGER - canopy jettison markers, but I got there after much trial and error, and using 2.4 and 4 point fonts. Again, I did two sizes - the smaller ones are more accurate to my measurements, but the larger ones look better because I think I made the white fuselage stripes a little too wide and so these need to be bigger to match. The blue squares were my attempts at colour matching, using various shades of pure blue or with a touch of green, to see how it came out on the printer, which differs slightly from the screen colours. Now I just need to find time do do some cutting and sticking. For the letters I shall cut round them individually but keep small tabs joining them to maintain the spacing, and cut these off after sticking in place. Quote Link to comment Share on other sites More sharing options...
Mark Kettle 1 Posted July 17, 2014 Share Posted July 17, 2014 Wow - Steve nice looking decals, will make the JP look 'top dollar' , how much do the creative sheets cost to buy? Quote Link to comment Share on other sites More sharing options...
Steve Houghton Posted July 17, 2014 Author Share Posted July 17, 2014 Mark, Current price is £10.74 for the 15 sheet sample pack. I also bought a can of fixative spray for another £7.00. There is currently a buy one get one free for £23.74 on the 20 sheet packs of glossy film. Not cheap, but a pack should do many models. Once you're on their mailing list they send special offers every week for various discounts, but I've managed to resist so far. Please note I haven't stuck these on the JP yet, so I have no experience of their durability. Steve Quote Link to comment Share on other sites More sharing options...
Mark Kettle 1 Posted July 17, 2014 Share Posted July 17, 2014 Ok cheers for that info - Quote Link to comment Share on other sites More sharing options...
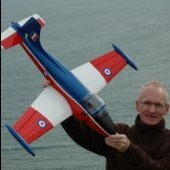
Phil Cooke Posted August 27, 2014 Share Posted August 27, 2014 Steve, Hope you don't mind me adding this shot of your finished JP to your build blog, it flew really well at the Lleyn and looked superb now you've added the decals and details - great stuff! Quote Link to comment Share on other sites More sharing options...
Steve Houghton Posted August 27, 2014 Author Share Posted August 27, 2014 Thanks very much, Phil. Your flying shots are outstanding. I still have a little more finishing to do, like the jet intakes, wing walkways, nose lights etc., but at least it looks more like a real JP now. PPD Sticky Vinyl I said I would report on the outcome of using the PPD ink-jet printable sticky vinyl. The white vinyl used for roundels and fin stripes is extraordinarily sticky - I mis-placed the tail stripes and when I peeled them off it lifted the entire Solarfilm beneath it. Must bear this in mind if I ever want to remove Solarfilm deliberately! The clear vinyl seems less sticky, and needed firm pressure to seal it around the edges. Time will tell whether it stays put. It seems to have been successful so far, although I suspect some of the colour will rub off the lettering, despite having treated it to a couple of coats of sealing spray. It was rather tedious cutting around the lettering as I didn't want a visible border. I can see the appeal of laser cut letters now! Quote Link to comment Share on other sites More sharing options...
Steve Houghton Posted April 16, 2016 Author Share Posted April 16, 2016 Non-Drop Tanks Since I can't be at the Great Orme this weekend, I shall console myself with a brief update to the JP. I have always been concerned that the friction fit on the tip tanks would lose their grip one day. I have been using double sided sticky foam pads to ensure they stay attached, but I thought a permanent solution using magnets would be better. Being a frugal modeller, I used a magnetic lapel badge left from a business exhibition I attended. These are available on the web for around £12.00 for a pack of 10 badges - £1.20 for a pair of magnets, as opposed to typical prices of £2.50 to £3.00 a pair from model suppliers. The steel 'mating' strip can be prised off the front pate quite easily, for use as the mating surface in the tanks. The magnets need hacking out with a strong knife. Under the plastic they are joined with a steel strip that needs cutting and filing away. This was easy enough, but left a pile of iron filings sticking to the magnet - lots of fun trying to remove them! A magnet was embedded into each wing tip with epoxy: The steel strip from the front of the badge was cut into two parts, and one embedded into each tip tank: I'm very pleased with the outcome. One tank 'snaps' into place since the friction fit was a little loose. The other just seats comfortably without a snap, but I checked that the wing tip and the tank did mate properly first. Quote Link to comment Share on other sites More sharing options...
Mark Kettle 1 Posted April 16, 2016 Share Posted April 16, 2016 Good saving that. Steve. Quote Link to comment Share on other sites More sharing options...

Recommended Posts
Join the conversation
You can post now and register later. If you have an account, sign in now to post with your account.
Note: Your post will require moderator approval before it will be visible.