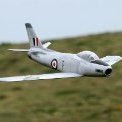
Martin Gay Posted July 25, 2019 Share Posted July 25, 2019 Welcome to the first build blog for the PSSA Mass Build 2020. This model is being built to confirm that the production cut files are correct after incorporating the adjustments from the independent Beta build. One thing that I did notice when flying the prototype model during the Lleyn event is that my old eyes struggled at times to see the Sabre in its aluminium colour scheme against the grey sky/sea. For this reason the colour scheme above is going to be used on this aircraft. Before any "scale police" make comments about it - yes I know that the full size aircraft depicted uses a 6-3 wing which is slightly different to that shown on the plan. However, I am comfortable with that! Quote Link to comment Share on other sites More sharing options...
Martin Gay Posted July 25, 2019 Author Share Posted July 25, 2019 The parts are all cut out and confirmed to be correct! Quote Link to comment Share on other sites More sharing options...
Martin Gay Posted July 25, 2019 Author Share Posted July 25, 2019 Wing Jig assembled. This allows the correct dihedral and washout to be easily built in. The prototype wing was built in one piece, whilst the second, and this third, wing have been built as two separate entities which will be joined together later in the build. Two smaller wing panels certainly makes construction a bit easier at this stage. Quote Link to comment Share on other sites More sharing options...
Flyer Posted July 25, 2019 Share Posted July 25, 2019 Watching with interest! Quote Link to comment Share on other sites More sharing options...
Alan Gorham_ Posted July 25, 2019 Share Posted July 25, 2019 Well that's the colour scheme I was going to use for mine well and truly stolen! Martin, I've got 3 PSS models pained green/grey camo upper surfaces and I have to say they are hard to see in cloudy conditions. Even allowing for your jaunty yellow bands I wouldn't say that is a high vis scheme... Anyway, crack on and show all us mass-builders how it goes together! Quote Link to comment Share on other sites More sharing options...
Martin Gay Posted July 25, 2019 Author Share Posted July 25, 2019 Al, that is the advantage of doing the first build - you get first choice of the colours! I may have to think about using dayglow yellow for the X's. Quote Link to comment Share on other sites More sharing options...
Alan Gorham_ Posted July 25, 2019 Share Posted July 25, 2019 Fair enough, can't argue with that logic. It will be fine on a day with sun and blue sky anyway. I'm still planning to use a camo scheme on mine. Quote Link to comment Share on other sites More sharing options...
Martin Gay Posted July 26, 2019 Author Share Posted July 26, 2019 First up - the parts to build the wing jig! Quote Link to comment Share on other sites More sharing options...
Martin Gay Posted July 26, 2019 Author Share Posted July 26, 2019 These parts get assembled to form the building board. I added some triangular stock to the joints to make certain that the jig was square and solid! Quote Link to comment Share on other sites More sharing options...
Martin Gay Posted July 26, 2019 Author Share Posted July 26, 2019 After the glue had dried I made sure that everything lined up with the plan. (Note: the keen eyed amongst you all may see that plan used is an earlier version and does contain a few differences to the one that you will be using). Quote Link to comment Share on other sites More sharing options...
Martin Gay Posted July 26, 2019 Author Share Posted July 26, 2019 The wing skins were made up from medium to medium hard (my personal preference as I usually end up poking my fingers through a softer skin!). At the moment the left and right wing skins have not been joined at the centre line - this will happen later in the build. Quote Link to comment Share on other sites More sharing options...
Martin Gay Posted July 26, 2019 Author Share Posted July 26, 2019 The position of all the ribs, spars, false leading and trailing edges are marked onto the inside of the skins and the lower spars added. On this model I have used hard 3/16" x 1/4" balsa - it has proved to be more than strong enough on the prototype model which was skinned with lightweight fibreglass. If you are going to film cover the model then I would consider using some straight grained spruce for the spars. Quote Link to comment Share on other sites More sharing options...
Martin Gay Posted July 26, 2019 Author Share Posted July 26, 2019 The wing ribs are cut slightly over length to allow for chamfering them to match the wing sweep at both the false LE and false TE strips. The spar slots also need to be angled to match the sweep. I seemed to be spending more time sanding the ribs to match the sweep angle than I did in actually gluing the parts together. However, it does allow for good, strong glue joints. Photo shows a trial fit of the ribs onto the lower wing skin and spar. Quote Link to comment Share on other sites More sharing options...
Martin Gay Posted July 26, 2019 Author Share Posted July 26, 2019 Top spar and shear webs added, after more slot sanding. since I used medium hard 1/16" balsa for the wing skins I was able to use the offcuts from that part of the build to make the shear webs. yet again more sanding was required to angle the ends of the webs to fit the sweep angle. Photo shows it all glued up with the false LE and TE fitted as well. Quote Link to comment Share on other sites More sharing options...
Martin Gay Posted July 26, 2019 Author Share Posted July 26, 2019 Next up was the addition of balsa blocks into the area that the flap and aileron hinges would be fitted to reinforce those areas. Quote Link to comment Share on other sites More sharing options...
Monz Posted July 26, 2019 Share Posted July 26, 2019 Really excited for this one, can't we start the MB a bit sooner? Pleeeeaaasssee!! Quote Link to comment Share on other sites More sharing options...
Tim Mackey Posted July 27, 2019 Share Posted July 27, 2019 Nice work so far Martin 👍🏻 PS: Anyone thinking of this one, I assure you she flew a treat when I had five minutes on the sticks at the Lleyn. Quote Link to comment Share on other sites More sharing options...
Phil Cooke Posted July 27, 2019 Share Posted July 27, 2019 A reminder that Sabre plans and short kits can be ordered from August 1st - by emailing me at [email protected] and registering your participation and requirements - I'll then forward all orders to G&M models who will request more details from you directly for the invoice. Quote Link to comment Share on other sites More sharing options...
Mark Kettle 1 Posted July 27, 2019 Share Posted July 27, 2019 Looking forward to this Martin. Quote Link to comment Share on other sites More sharing options...
Peter Garsden Posted July 29, 2019 Share Posted July 29, 2019 Sounds interesting again. I am in for the build plan Phil and kit of parts. Incidentally chaps I should be starting a Jet Provost 1.5metre blog soon - not to distract of course as if I am not finished, I will start this one and side line the JP. Quote Link to comment Share on other sites More sharing options...
Martin Gay Posted July 29, 2019 Author Share Posted July 29, 2019 The second wing has been completed to the same stage, so onto the fuselage construction. Checking the fit of F15 at the rear end. This is one of the "Gotchas" on this model. It is very difficult to retro fit F15 after the rear formers are glued up!All looking good. Quote Link to comment Share on other sites More sharing options...
Martin Gay Posted July 29, 2019 Author Share Posted July 29, 2019 At the front end all the other formers are checked for fit and fettled with a sanding block, if required. F14 is fitted through three of the formers - again another "Gotcha" if it is forgotten. Quote Link to comment Share on other sites More sharing options...
Martin Gay Posted July 29, 2019 Author Share Posted July 29, 2019 The plan calls for balsa keels 1/8" x 1/4" for the rear half of the fuselage. These can be a bit tricky to bend properly so two pieces of 1/8" square can be used as they will follow the curve easier. I chose to cut some slotted keel pieces from 1/8" sheet instead. It takes a bit longer but locks all the formers in tight! Edited By Martin Gay on 29/07/2019 14:49:10 Quote Link to comment Share on other sites More sharing options...
Martin Gay Posted July 29, 2019 Author Share Posted July 29, 2019 3/16" balsa stringers added to tie all the formers together. These are not structural items, so a softer grade of balsa could be used. Then the fun (planking) starts. Edited By Martin Gay on 29/07/2019 14:49:42 Quote Link to comment Share on other sites More sharing options...
Martin Gay Posted July 30, 2019 Author Share Posted July 30, 2019 Here is a messy photo from the prototype build that shows the fuselage stringers and the original F1. Quote Link to comment Share on other sites More sharing options...

Recommended Posts
Join the conversation
You can post now and register later. If you have an account, sign in now to post with your account.
Note: Your post will require moderator approval before it will be visible.