The trouble with today’s ARTF culture is that flyers who’ve never built a model from scratch don’t know how to repair their aircraft when they crash or damage them. As a result, too many people are spending money unnecessarily replacing broken models which, for just a few pounds, could be put back into the air. For the price of a cheap ARTF it’s possible to buy the handful of tools and materials necessary to repair any number of expensive ARTFs.
FIRST AID
Enjoy more RCM&E Magazine reading every month.
Click here to subscribe & save.
This month, we’re going to discuss ways to repair the sort of damage that results from a minor crash, starting with what you should do immediately after your model has ‘arrived’. The first thing is to pull out the proverbial bin liner and retrieve every splinter of the wreckage you can find, as the pieces may be useful as patterns from which to make new parts. When you’ve done that, drain the fuel tank: if you have fuel dribbling over bare, broken wood you won’t be able to glue it back together very well. For the same reason, you should wipe the model clean of any oil and exhaust residue.
Don’t bother examining the wreck at flying field – it always looks far worse just after the crash. Instead, leave it in the workshop for a couple of days and then look the model over while you remove the radio and engine. Before putting the engine to one side, clean off any dirt, paying particular attention to the carburettor intake. If you find that dirt has gone down it, the best thing is to remove the backplate, carb’, silencer and head, and flush them with running water. Then dry and oil the engine before reassembling it.
ASSESSING THE DAMAGE
What I call ‘minor’ crashes generally take one of three forms. The first is the flying-into-a-tree sort, which tends to produce crushed leading edges and possibly broken tail surfaces. The second involves landing either on rough ground or a ploughed field, either of which can crack or break the fuselage. Actually, even a simple heavy landing can wipe the undercarriage off an ARTF these days! The third type involves a bit more energy, such as, say, cartwheeling down the runway. This will often break the tail surfaces and possibly knock the wing loose, which may in turn tear out the wing-bolt plate and break the dowel that locates the front of the wing. If the model uses strip ailerons, the aileron horns will sometimes rip through the side of the fuselage, too.
Whichever type of minor crash it is, however, none of the damage is particularly difficult to repair, and in every case your post-accident examination should involve removing the covering around the affected areas. This will allow you to see clearly just how far the damage extends, and to look for cracks, splits and loosened joints well beyond the obvious points of impact.
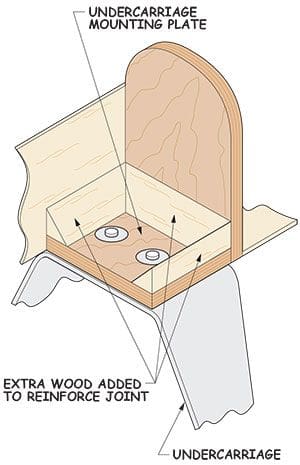 Fig.1
Fig.1
IS IT VITAL?
While you’re doing this, try to relate the damage you find to the working structure of the model. Some of the parts that you may have to repair, remember, will need to be able take heavy loads, others will only be subject to a small amount of stress, while there are those that aren’t stressed at all.
In full-size aircraft, these different types of structures are classified as primary, secondary and tertiary. In the model world, primary structures include fuselage sides, engine mounts, spars, and some of the sheeting. The tertiary structures are things like fairings, wing tips, many of the wing ribs, and some of the rear formers. The secondary structures, of course, are those that fall between these two categories.
Clearly, primary structures must be repaired completely so that they can again take the loads that they were intended to carry. For safety, secondary structures should be repaired to the same standard, but tertiary structures only need to be restored to their original shape.
Whatever type of structure you’re repairing, though, remember that the aim is to restore strength and shape without adding excessive weight. A good repair, then, doesn’t mean slapping great big bits of ply over the breaks!
Right, let’s have a look at the methods you can use to heal the cuts and bruises of a minor prang.
UNDERCARRIAGE MOUNTS
In ARTFs, one of the most common types of failure is in the undercarriage, which can be torn out by a heavy landing, particularly if it’s of the bolt-on dural variety. The usual cause – apart from the aforementioned arrival – is a lack of glue and / or a limited gluing area around the mounting plate, which is then pulled out of the fuselage.
If the plate didn’t damaged the fuselage sides as it departed, then the repair is begun by removing the metal undercarriage from the plate, cleaning off any residual glue, and checking that the fit of the plate in the fuselage is still close and firm. It isn’t enough, though, to simply glue the plate back into place, as the next ‘arrival’ will only pull it out again; you need to add some reinforcement. This is relatively easy to do after the plate has been glued back, provided that you can get at the area around the plate on the inside of the fuselage. Otherwise, you’ll have to add the reinforcement before gluing the plate into place.
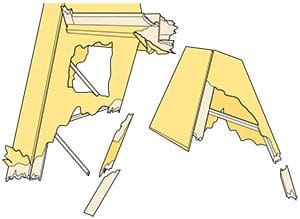
Fig. 2 – Broken tail surfaces are a common form of damage.
The reinforcement itself calls for nothing more than extra wood around the edges of the plate. Figure 1 shows triangular material being used, but as triangular stock is often soft wood, it may be better to use square-section hardwood. If you have to glue the wood to the plate before fitting it to the model, then cut it to length so as to give a slight overhang. That way, it can be sanded back to create a perfect fit. Close-fitting joints, remember, are always stronger than gaps filled with glue!
While the additional gluing area that this extra material provides makes the attachment point stronger, you must be careful not to make the plate assembly too strong. Excessive reinforcement will only mean that, come the next incident, instead of limiting the damage caused by breaking cleanly, an over-strong mounting plate will just pass the stresses on to the next weak point, which probably means the main fuselage structure!
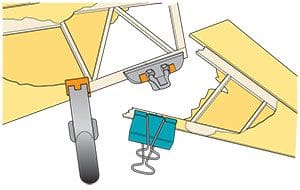
Fig. 3 – Use clamps to hold everything flat while the glue dries.
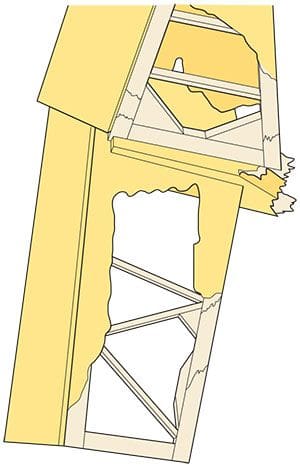 Fig. 4 – The completed repair. Note the triangular gussets and the brace on the leading edge of the tailplane.
BROKEN TAIL SURFACES
If damage to the tail surfaces is really bad, the quickest and simplest remedy is to remove said surfaces (which in ARTFs are often traditionally constructed) and use them as patterns to make new ones from solid sheet balsa.
If the surfaces are salvageable, the best way to repair them is to remove them so that you can work on a flat building board. However, this is time-consuming and not particularly easy, so the alternative in situ repair may be necessary. This, then, is a job for which bulldog clips will be handy as they can be used to both clamp the broken pieces together and hold them flat (Fig. 3).
Fins, meanwhile, normally break where they join the fuselage, as in Fig. 2. The answer here is to glue any broken bits back onto the fin and, when these have dried, glue the fin back into place. To make things secure, cut some gussets of the same thickness as the fin and glue them into place (Fig. 4) so that they support all the broken areas. Note the orientation of the grain as shown by the black lines, which is important in restoring the full strength of the fin.
Although tailplane breakage may occur further out from the fuselage, repairs take the same approach, using gussets to support joins or, if the break is not near a cross-member, fitting a doubler behind the join. Whatever you do, you must back up your repair with some additional support.
DAMAGED LEADING EDGES
Provided that the main spar has not been broken – something we’ll talk about next month – most damage to the leading edge of the wing is quite easy to put right.
It’s possible, for example, to make invisible repairs to leading edge sheeting that’s been holed by crashes or even plain careless handling. Start by removing the covering around the hole and cutting a rectangle of balsa wood slightly larger than the damaged area. This patch should be thicker than the leading edge sheet; I tend to use 3/32 sheet, although 1/8 is also fine. Lay the patch over the damage and mark around it with a fine pencil. Next, carefully sandpaper a shallow chamfer on all edges of the patch; a chamfer about 1/8“ wide will provide plenty of gluing area. With this, use a scalpel to cut away the damaged sheet to within about 1/8“ of the marked line. Then, reproducing a chamfer that matches your patch, very carefully carve the edges of the hole back to the line (Fig. 5).
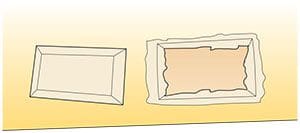 Fig. 5 – Matching chamfered edges on the hole and patch.
The repair piece should now fit the hole but sit slightly proud of the surface. If you’re happy with the fit, glue it in place and, when dry, sand the patch flush with the sheeting (Fig. 6). Once you’ve covered the repair, it’ll be virtually invisible and, more importantly, will be as strong as ever.
 Fig. 6 – Once glued into place, the patch can be sanded to blend perfectly with the surface of the wing.
If the leading edge has been crushed by an impact as in Fig. 7, the repairs are rather more involved but still not difficult. Once again, the crushed wood must be cut back to an undamaged area. It’s a good idea when doing this to cut either the underside or top side back further so that the upper and lower span-wise joints will be staggered. When happy, clean up the leading edge by trimming away any of the leading edge sheet that may be stuck to it (Fig. 8).
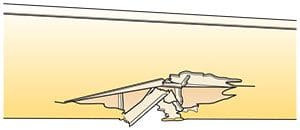 Fig. 7 – This is the sort of damage you get when you hit a tree.
The leading edge strip should be prepared to receive the repair piece by cutting it at a shallow angle; ideally, you want a chamfer that’s four times as long as the wood thickness, but you can get by with a little less (Fig. 9). You can then cut a piece of suitable size strip to fill the gap, making sure that it matches the chamfers to provide close-fitting joints.
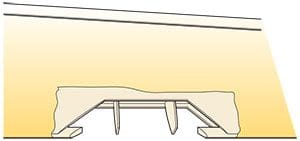 Fig. 8 – Repair starts by cutting back to sound wood and cleaning up (top side shown).
If there are any broken ribs, you can either glue them back together or make new ribs and glue these alongside the remaining stubs. After all, unless they’re supporting a major item such as the undercarriage, ribs are only tertiary structures used to hold the shape of the wing.
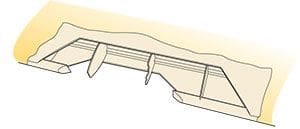 Fig. 9 – View from the underside. Note how the span-wise joints are staggered compared to the top sheeting.
Now cut some 1/2“ wide strips out of 1/16 sheet with the grain running across the narrow dimension. Once glued to the inner face of the leading edge sheeting, these joiners will underlap the edges of the cut-out areas and provide a supporting surface for the butt joint, i.e. between the replacement sheet you’re going to fit and the existing leading edge sheet (Fig. 10). It works, too: In the past I’ve used this technique when carrying out repairs to the pressure cabins on English Electric Canberras! Without the straps, gluing the new sheet to the edge of the old would not only be difficult, but totally useless in terms of strength.
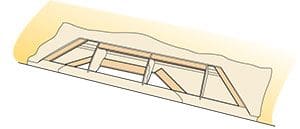 Fig. 10 – This is how things look once the leading edge has been repaired, and the edge joiners have been glued into place.
Now cut pieces of 1/16” sheet to fill the gaps in the leading edge sheet, again aiming for as accurate a fit as possible. These pieces should either overlap the leading edge, or be fitted up against it depending on the original method of construction. When gluing them into place, I find that small, short map pins are best for holding the sheet down while it dries. Then, once set, the patches can be trimmed and shaped to blend perfectly with the original sheet, and any small gaps made good with filler (Fig. 11).
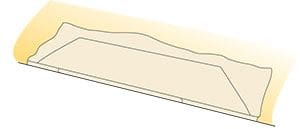 Fig. 11 – Note the staggered leading edge and sheeted joints.
FUSELAGE DAMAGE
Damage to the fuselage is usually relatively serious, especially in the area around the engine mounting, so we’ll look at ways to tackle this next time. However, it sometimes happens that a hard landing will break the fuselage behind the wing (Fig. 12) in a way that makes for a fairly straightforward repair.
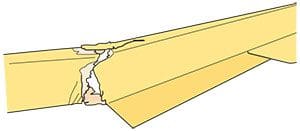 Fig. 12 – A clean break behind the wing makes a relatively easy repair.
All that’s required is to remove the bottom sheet or covering in the area of the break, carefully align the two parts of the fuselage, and glue them together with cyano’. If the break is rough and the halves don’t make solid contact, fill the crack with baking powder before applying the cyano’. This will fill any gaps and also set the glue off very quickly.
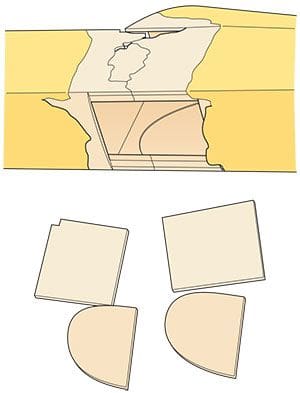 Fig. 13 – The curved pieces are in-fills of ply, necessary to raise the sides to the level of the doubler.
Once dry, make a doubler from 1/8 sheet and, if the break is close to an existing doubler, add extra material as required to bring the surfaces on both sides of the join level (Fig.13). That way, you can glue your new doubler to the inside of the fuselage and clamp everything up flat and tight. If, on the other hand, the break runs up the side of a former, use triangular wood on either side to hold the fuselage side to the former. When you’re satisfied with the repair, refit the bottom sheet (Fig. 14).
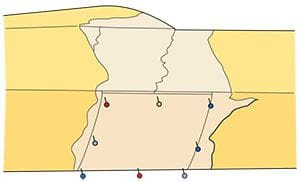 Fig. 14 – The completed repair ready for sanding and covering.
COVERING
There are two coverings in common use on ARTFs – normal film and a material resembling the old Fablon self-adhesive plastic sheet. In the case of regular film, you can repair this by applying simple patches. You don’t need a proper covering iron or heat gun; a small travel iron will do here. The second type of covering, however, doesn’t take kindly to heat, so the best material to use when patching it is Solartrim. Mind you, if you can’t colour match the original covering you’ll just have to live with the visible patch!
TOOLS AND MATERIALS
The tools you’ll need for these repairs are simple, indeed many are probably already in your workshop. Even if you had to buy them all, they don’t make much of a shopping list, and are an awful lot cheaper than a new ARTF!
A sharp knife: This is essential, indeed your best buy will be a scalpel and a packet of blades. Failing that, get yourself a good modelling knife.
A ruler: Steel rules make good cutting guides.
Pins: Buy yourself some map pins – the ones with the round plastic head about 1/8” in diameter and a 1/4” long – and a packet of dressmaker’s pins.
Clips and pegs: Bulldog clips are ideal for holding things in place, while clothes pegs will fit into restricted spaces and are handy for gripping smaller pieces.
Sandpaper: Medium and fine grades will do the job.
Travel iron: I’d suggest that you don’t use your wife’s iron – the adhesive from the film can stain it, which will put you at the top of the hit list!
Wood: If you want to stock up, buy sheets of 1/16, 3/32, 1/8 and 1/4 balsa, or just buy it as needed. Some hard 3/8 square or triangular strip will also be useful.
Aliphatic resin: This is better than cyano’ for repair jobs as the open time gives you a chance to manoeuvre parts into place. It also has better gap-filling properties.
Covering material: Buy as required.