
Right then, here’s the scenario. You’re a beginner, you’ve had a good few flights now and you’re doing well. Circuits seem easy, and you’ve even accomplished a nervy take-off. Your instructor decides to let you try a landing, and why not? It’s a calm day, after all. Anyway, the model clatters down and comes to a halt, thankfully undamaged. A first solo! The instructor is relieved and you’re pretty jubilant. So that’s it, then, landing is a doddle, ‘A’ Certificate here we come!
Six months on and you’ve long since left the buddy lead behind, got your ‘A’ and you now fly a low-wing sportster with a Spitfire on the workbench. You’re a safe-enough flyer but, as the airframe scars testify, good landings are hit and miss affairs. You’re not alone. Ask any beginner about their biggest challenge and the answer is nearly always the same… landing. Statistically speaking, most damage is inflicted when tyro pilots try to bring their models down to earth.
Take-off isn’t so much of a problem; bang open the throttle, add a touch of elevator soon after and keep the wings level – job done. Oh, and before you write in, that is, of course, a horrible generalisation. Whole articles, books even, could cover the subject of take-offs, and while some may fear the process, it’s true that fewer accidents occur during take-off. It’s getting the model down where the ‘fun’ begins.
Enjoy more RCM&E Magazine reading every month.
Click here to subscribe & save.
What one person calls a good landing the next man may describe as a disaster but, simply stated, a good landing should see the model safely down, undamaged, finishing at the point where intended, i.e. back from where you started, on the strip. The words ‘where intended’ are significant. Many clubs cut large areas of grass from which to operate their models and whilst getting back down can be relatively easy on a strip the size of four tennis courts, it’s fair to say that, unless local conditions dictate, the model should land where it’s taken off, coming to a halt neither significantly wide nor short of the take-off point. Of course, field conditions may vary and the wind can change – these factors are often at play – however the mark of a good pilot isn’t just about his ability to prop-hang or execute perfect rolling circles. No, a good pilot consistently demonstrates an ability to land his model safely, undamaged, in varying weather conditions, back to the point from where it started.
WHY?
You might ask why such accurate landings are important? Finishing up in the same field is good enough, surely? Well, apart from that glow of pride and satisfaction a good landing will bring, you’ll appreciate the reduction in bench repair time that comes by reliably completing the manoeuvre. The skills required generate confidence when progressing to the more complex aircraft you’ve always wanted, i.e. models that’ll need a bit more care or provide an increased workload at the landing stage – scale subjects, warbirds, jets, large gliders etc. Ask yourself this: do you celebrate a good landing? Do you feel relieved afterwards? You shouldn’t really, you know. Good landings should be second nature and as ordinary as a standard aileron turn.
FOR STARTERS
So where do you start? What’s the secret? Hitchhiker’s Guide fans may remember Arthur Dent learning to fly, where the trick was to jump and miss the ground. In a vaguely similar fashion, the best way of learning to land properly is not to try too hard! What I mean by that is, don’t start learning to land until you’re completely comfortable with your model and its handling. In this respect, then, there are a few things to do before you go looking for the ground:
Trim. Battling against the habits of an untrimmed model is the last thing you want to be doing when the ground gets closer. So, be honest, is your model trimmed? Not just a few beeps here and there, I mean really trimmed? Does the model climb notably when the throttle is advanced beyond 1/2 power? (It shouldn’t). Is the C of G setting safe? Does your engine idle reliably without the need for trim adjustment?
Know the stall. You need to know your model’s flying limitations, i.e. how the model reacts just before the stall and what to do when you spot this behaviour. Knowing this will improve your confidence all the way through the landing stages.
Fly low. Can you fly low? There’s no getting around the fact that you’ve got to bring a model down to within close proximity of the ground at the end of every flight, but how comfortable are you flying down there? It can be unnerving the first time but consider practicing some low flying. Your first landing will seem second nature if you’ve relentlessly practiced low passes (say 6 – 10ft high), low circuits and simulated landings (landing without the ‘touching the ground’ bit).
Who flies who? If you’re a beginner then, be honest, is the model flying you? Are you at the stage where you’re keeping it in the air but only having a modest say in where it goes? All beginners pass through this stage, we’ve all been there, but it’s not the time to attempt to land. Landing a model means you’ve got to make it return it to a designated spot, even if it seems to have ideas of its own.
Use the rudder. Learning to use the rudder early on will be a huge benefit when it comes to landing. A little blip of rudder can correct a poor approach trajectory and make sure the model remains heading into wind.
Master everything else first, i.e. take-offs, circuits etc. Landing a model is the most involving task a beginner faces, so it follows that it should be the last challenge before going solo.
Fly when it’s windy. Knowing how to cope in windy conditions is critical to a successful landing. Reserving your flying activities for calm, sunny days means you won’t fly very much, and if you don’t fly much then you won’t get the necessary practice and experience.
Don’t be afraid. The cure for nerves is practice, and plenty of it. If you’re nervous about landing then you probably haven’t practiced enough.
ON OR OFF?
Generally speaking, there are two accepted landing methods for fixed-wing power models: ‘cut and glide’ and ‘power on’.
The cut ’n’ glide method is just that; you drop the throttle to idle and glide the model down, all the time keeping the wings level. It’s a method that’s requires the pilot to judge the model’s rate of descent so as to arrive at the designated spot. Accordingly, it’s a method that leaves few alternatives when things don’t go to plan. Falling short of the runway will prompt the pilot to raise the nose in an attempt to extend the glide, which leaves his machine prone to stalling. You may get away with it when flying a trainer, but this method is far less likely to help when your Spitfire, or any model that’s not designed to be forgiving, is on approach. Full-size pilots who write R/C manuals always mention cut ‘n’ glide, and while it can work for some lighter models in calm conditions, how often is it calm when you go flying?
True, you have no option but to glide the model down if the engine cuts, and for good reason the manoeuvre forms part of the BMFA ‘A’ assessment. With experience you’ll learn to cut ’n’ glide models down effectively but, from the start, it’s best to master the most controlled and effective landing technique, the ‘power on’ method.
Maintaining power all the way home means you’re in control and can adjust the power to extend or reduce the approach. That way you can be sure of planting the model where intended and, more importantly, you’ll be able to manage the process when it’s windy.
DOING IT
Good instructors have a trick they use to help a beginner with their first landing. They’ll watch while you’re relentlessly practicing low circuits without problems and then throw in the suggestion that you simply finish the job. At this point circuit training and low passes will have become second nature, and at your instructor’s request you’ll do it before you’ve had time to worry.
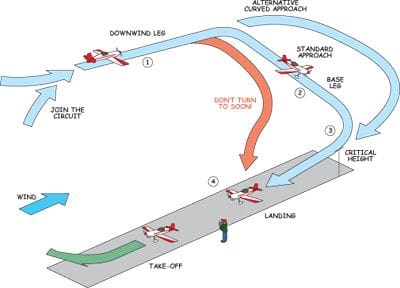
Let’s take a look at Fig.1 and a typical landing scenario from the practical aspect:
1. Joining the circuit
Some guides suggest flying a complete square circuit before landing, but it’s fine to join on the downwind leg so long as your speed and height are correct. Reduce the throttle a tad at this stage, but not too much for although the model seems to be moving quickly downwind, that’s just the block of air in which it’s travelling so power is required to maintain flight.
2. Final turns
Some would propose adding trim to adjust elevator and throttle here, but whilst some advanced models may need a tweak, basic trainers and sport models shouldn’t need any adjustment or, rather, they should already be trimmed and the engine adjusted so that it’s not necessary. The reason here is simple: you’ll fumble around trying to locate the trim pushers and instinctively take your eyes off the model for a second or two, which is bad – never let your eyes leave the aeroplane at the landing stage.
Don’t worry about the throttle too much through these turns as it’s lining the model up with the runway at the correct height that’s vital here; a good landing is dependant on this ability.
Turning too soon, leaving the model too high in the approach is the most common error, often because beginners don’t like to see their model getting smaller on the downwind leg and can’t resist the urge to get the model back, thereby making the turns sooner than necessary. The solution comes from the confidence gained by repeating those practice circuits and low passes.
Some prefer a long, curved, approach, especially warbird and jet pilots, since they can better see to judge their model’s approach speed. That’s fine, although beginners will probably prefer the more rigid sequence, perhaps even using a tree or ground object as a turning reference point.
3. Approach
Being too low in the final approach is a problem for cut ’n’ glide practitioners but not for those using throttle, as the model can be brought in by adding more power (remember, the engine controls the rate of descent, the elevator controls speed). Too high, though, and you may have no option but to push the nose down, which will increase the model’s speed at the moment when it probably doesn’t need it. You may have time to allow this speed to bleed off, but it’s more likely that you won’t and you’ll have to either abort and go around for another attempt or bring the model in at warp speed. With the latter, there’s every chance that you’ll overshoot and come to a halt in the outfield with a very high risk of damage.
4. Flare
This, the final bit of the landing jigsaw, is far easier if you’ve lined the model up nicely. Raising the nose to flare out slows or halts the rate of descent so the model meets mother earth in a gentle, survivable fashion. It’s easy to over-control at this stage, and flaring out too soon is another common error, one that can leave the model a few feet above the ground close to its stall, and too high to avoid damage when it drops to the deck. Your trainer’s forgiving design will probably come to your rescue, but you’ve got to nail it at this stage because a warbird won’t be so benevolent.
DON’T PANIC!
The trick to landing reliably is to give yourself enough time in the circuit and approach, don’t turn too soon, use that throttle to adjust the descent rate and, finally, not to flare too soon. Relax, practice makes perfect and, believe me, you’ll soon be wondering what all the fuss was about.
That’s the straightforward landing scenario, next month we’ll look at crosswinds and coping with airframes that are a little more demanding.


