
- This review was first published in 2006. Updates have since been introduced by the brushless electric Easy Glider Pro (reviewed Sept 2009 issue) but much of this review should be of interest.
Multiplex are enjoying somewhat of a renaissance in the UK at the moment, their efforts now seemingly focused on the foam side of their range rather than their more elite 'crunchy' kits. No doubt the lessons learned from the Twin Star (the world's best selling R/C ‘plane?) have determined their business model for the new millennium. It’s no surprise, then, that they've also thrown a good chunk of research and development budget at host of new kits for their expanding foam range. Top of this list for glider guiders is the Easy Glider and its flat-field sister, the Easy Glider Electric. These are fundamentally the same aircraft save for the geared Permax 6V 600-size motor and ancillary mounting paraphernalia.
Spanning a full 71" and beautifully moulded in shiny white Elapor foam, it's a fairly tough cookie. If you've never seen Elapor before, this material is best described as a cross between EPP and polystyrene, with the indestructible properties of EPP but at a greatly reduced weight. Formed by injection moulding, the surface of the model is rippled with injection points that modellers more picky than I may wish to sand back.
Enjoy more RCM&E Magazine reading every month.
Click here to subscribe & save.
STICKY MOMENT
To glue Elapor you must use cyanoacrylate adhesive and an activating catalyst or kicker; this is a major change in foam aeromodelling as 'old school' foamies such as the Twin Star would simply dissolve under a drop of cyano'. Fear not, this is certainly not the case with Elapor. The Easy Glider must be built as per instructions using a good medium to thick viscosity adhesive. I used Zap-A-Gap with a little ultra-thin 'Pink' ZAP for tacking up. You'll go through some kicker mind you, so best to lay your hands on an aerosol rather than those little pots with the brush in. Needless to say the build process is a stinky affair, so construction in a one-room bedsit is best avoided unless you can open the window really wide!
Epoxy just won't stick, and don't think that you can get away with user-friendly odourless cyano’ either – the foam-safe variety just won't adhere. The only suitable alternative mentioned in the usual Multiplex encyclopaedic instructions is a hot glue gun. (As a point of interest I used Evo-Stik contact adhesive on my Elapor Magister with very satisfying results. After many fuel-drenched flights it’s showing no sign of weakening. I’d definitely use it again on Elapor – ed.)

COMPREHENSIVE PACKAGE
The kit is supplied as comprehensively complete as you could wish. There's even a variant that comes truly almost ready for flight, with pre-installed servos and linkages. Multiplex have pitched this model at as many glider guiders as they could identify, and not only is the Easy Glider supplied with a tow hook for bungee and winch launching, you also get a towline with a pennant and the parts for a simple aerotow release using a Velcro strip on the underside of the nose. What a clever idea!
For a proper test to prove just how 'easy' the Easy Glider actually is, I decided to let my 7-year old son Daniel help with the build before giving him the model to fly up the slope. He already has the powered Easy Star from Multiplex, which he can manage quite well from the flat, but as a true glider guiding novice there really could be no harder test for a model pitched at the 'ab initio' flyer. Mind you, there was no way I was letting him near those cyano’ fumes, so he amused himself for the first part of the build by cutting out the decals from the very comprehensive self-adhesive sheet.
GET IT ON
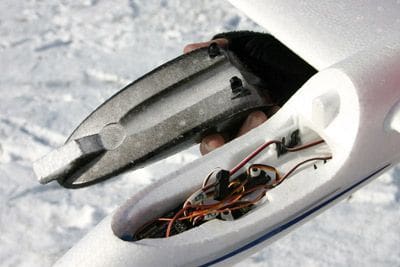
The build begins with the fitment of the control snakes into the pre-routed channels on the outside of the fuselage. A drop of thin cyano’ on the outers (with the inners removed so you don't glue them up) and a swift 'kick' has them in. The same goes for the receiver aerial tube, which runs in a channel along the underside of the fuselage. Before you know it you're looking for servos! Obviously Multiplex have moulded the model to suit their own gear, the fuselage-mounted rudder and elevator servos being somewhat larger than those in the wings. I found that Hitec HS85's fitted nicely into the fuselage (Hitec are now part of Multiplex), but you could use any similar servo with a little subliminal foam trimming.
The snake inners have a Z-bend pre-formed at the servo end; simply slip these inners through the tubes, connect them to the servo arms and you're ready to join the two fuselage halves together. This is simply a matter of spraying one half with kicker and coating the relevant mating parts of the other with thick cyano’. Bring them together accurately as you'll only have about 5 seconds before things begin to crackle and smoke – mind your eyes! This could possibly be the most cyano’ you'll ever set off in one go.
The canopy is supplied as a separate Elapor moulding and you can spray-paint it directly from an aerosol can with no fear of damage by the propellants – a few coats of gloss black Halfords acrylic does the job nicely enough. The canopy catches are friction-locking affairs that work well, up to a point. A moulded spigot at the canopy's front edge locks under the lip and also serves to assist the retention of the standard square NiCad pack required for the nose; the whole thing gets looser after a few fittings, though I doubt they'll slacken to the point where you'll lose the canopy.
Construction of the empennage is also an all-cyano affair, though you do need to add an additional hinge at the bottom of the rudder and cut along the ends of the control surfaces to free them up and let the 'living hinge' do its bit. This Elapor moulded hinge may not sit comfortably with some of the 'belt and braces' brigade, but rest assured, it's up to the job you're going to ask of it. Just don't over-wag it trying to see if it’ll crack, because if you force it, crack it surely will! The control horns are simply cyano’ glued to the control surfaces after fitting the collet connectors for the plain ends of the inner wire snakes. Ensure that all is square here by either completing the wing before fitting the tail or taping the joiner across the wing seat to provide a line to eye it all up against.
WING WALKING
Completion of the wing commences by freeing up the control surfaces and installing the servos and wiring in the moulded recesses that are again designed to take Multiplex items. Also of note is the fact that the recess designed to accommodate the servo and extension lead interface was in the wrong position for the E-flite S75 servos I had to hand.
The elegantly curved, two-piece wing is married across the centre by a rather large joiner-come-spar arrangement that looks like a carbon tube but is actually glass reinforced plastic. This massive 10mm diameter pipe pushes some 500mm into each wing half and provides the bulk of the wing’s strength. In short, it’s more than enough to prevent a very short round of applause (i.e. one wing clap) if you have an over-enthusiastic tow man! This tube cleverly doubles as the ballast holder, and once again Multiplex have shown great innovation by suggesting ballasting with (easily obtained) 8mm diameter threaded rod. Due to the thread profile this is slightly smaller than the internal diameter of the tubing. Smart, these Germans, eh? The holes for the wing joiner are formed by gluing in place (again with cyano’ and kicker) what Multiplex call a 'wing joiner cover'. In effect this is simply a capping piece that forms the bottom of the channel and hides the servo wiring.
On assembly the two wing halves have to be appended to the fuselage independently where their root profile interlocks onto the opposite wing; the friction fit provided by the fuselage sides is more than enough to stop them parting company at inopportune moments. In fact they're so tight when first pushed together, you need to be careful not to inflict any damage. Like the canopy fitment, they soon slacken off to a manageable level.
JUNIOR ON BOARD
Daniel was getting just a little bored by this point so I figured I'd better let him put the stickers on and waggle the transmitter sticks while I got the plugs into the receiver. With Mr. Overlander's finest, cheap 800mAh NiCad pack up front the Easy Glider needed just 57g (2oz) of lead in the nose to achieve the centre of gravity. This isn't on the spar / ballast tube as you might expect, but I reckon that if you did get it to balance here then the flight characteristics wouldn't too dissimilar. Such as it was, she was finished and ready to go for the next day.
WHITE OUT
"Hey, dad! Snow!"… "Fly or snowball fight? What do you think?"… "How about both?" Dan suggested. What a perfect day for photography, too. The wind was topping out at around 15mph a bit off the slope, and in the calm bits there was enough thermal activity to slermal (slope thermal) away a ballasted F3F racer to speck height behind the hill. With the sun on our backs and the bracing North Westerley up our nostrils Daniel's Easy Glider got a gentle push up the chuff and off she went. With an all-up weight of just 261/2oz (750g) I was surprised how easily an upwind position was achieved. I really did think this was one area where the Easy Glider would have struggled, but the big foamie shrugged it off as if it were a much more efficient machine.
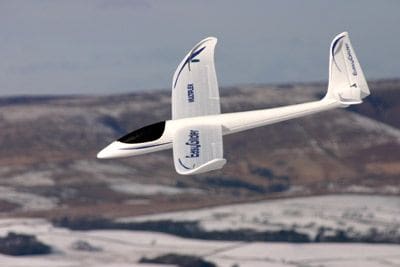
You know that feeling when something just seems 'right'? Well, I had that feeling from the off. Would love to say I didn't, but I can't! The flicked-up wing gives good stability and even with the tip ailerons and an educated guess at the correct differential, Dutch rolling was minimal through the turns. I felt it could be improved, though, so I flicked in the preset CAR (Coupled Aileron / Rudder) mix and the situation was much improved. The rudder is actually very powerful; with minimal weight to resist it and very low wing tip inertia the model really can be turned very tightly. Not in a racer bank ‘n’ yank kind of way, instead it has more of a 'can thermal on a tiny patch of Sparrow flatulence' feel to it.
The stall, for what it's worth, is totally benign. The only way I could achieve this properly without flicking the nose to vertical was to fly downwind with a fair handful of 'up' held in. Loops are a doddle if you let her dive a little first. There's no point in sticking the nose down forever as she just won't get any faster. Her glide is flat as an It Girl’s chest, and she carries just enough kinetic energy to fill a tiny Gucci handbag. Hardly a shock, considering its wing loading is just 5.9oz / sq. ft.
Rolls are slow enough to start you wondering if the model's ever going to get around them, even with the servo throws cranked up against the pot stops. On more than one occasion I had to boot in corresponding rudder to finish it off before she reached the bottom of the hill. Inverted flight is surprisingly easy at the suggested C of G, indeed very little down is required to hold straight and level, and it wasn't long before we were landing and launching her inverted… just because we could!
ACCIDENT DAMAGE
Suddenly, out of nowhere… Thwack!! "Thanks, mate! Kindly remove your combat wing from my little lad's model!”
The resultant spin lasted all of half a turn – no inertia, remember. Unfortunately the hitherto pristine Easy Glider now had a visible notch out of the starboard leading edge and was behaving very strangely. It soon became obvious that an aileron servo gear had been lost. Not only that, but the offending control surface was now sticking upwards at full deflection! With enough height to sort it out I found that by holding full left aileron the model was quite happy being steered around with just the rudder, unwittingly indicating that landing spoilerons would be virtually useless. In fact it remained so stable that my lad flew it like this for a few minutes before Dad took over again for some loops!
The landing was similarly uneventful, with the model sliding nicely along on the snow. Unfortunately that gave us another idea, and with the servo repaired it was time for touch and goes off the edge of the slope!

IN A NUTSHELL…
So there you have it. In a nutshell, if you're looking for your first slope or flat field glider and don't want much possibility of damage, don't fancy a flying wing and are looking to get into the air quickly, you really can do a lot worse. The model flies exceptionally well for what it is; it's totally viceless, quick to build and very, very sturdy. Regrettably if you're an experienced flier it is also extremely boring! However, my lad loves it, but remember – combat is not advised!
DATAFILE
Name: Easy Glider
Model type: ARTF foam soarer
Manufactured by: Multiplex
UK sales: Gordon Upton
Email: [email protected]
Street price: £68 (Easy Glider Pro March 2011)
Wingspan: 71'' (1.8m)
Fuselage length: 44'' (1.1m)
Wing area: 41/2sq. ft. (0.42 / dm2)
All-up weight: 261/2oz (750g)
Wing loading: 5.9oz / sq. ft. (18g / sq. m.)
Control functions: Aileron, elevator, rudder


