
- This review was published in RCM&E, June 2005. The model and others in VMAR's sport jet range can still sometimes be found.
I think we’d probably all agree that over recent years one of the fastest growing elements of this fine hobby of ours is the ARTF market. Eager manufacturers from the Far East, seemingly not content with the ARTF trainer and sport market, are now pretty well engulfing every aspect of modelling from indoor electric to large aerobatic and large scale. This is all good news for you and I, as it provides incredible choice and diversity in all types of ARTF model.
It’s a pretty safe bet that even the die-hard kit and plan builders amongst us have an ARTF of some description, acquired just because they couldn’t resist it! So, when the esteemed editor of this fine organ mentioned about a big box he had in his office I was eager to take a look. Having journeyed to RCM&E HQ I was greeted by a huge package standing on end, looking like a 6’ scale model of the Empire State Building and listing perilously towards the editor’s hot seat. “Glad you’ve arrived, Tone – it’s getting dangerous sitting here, how about making it safer and popping this box in the back of your car?”
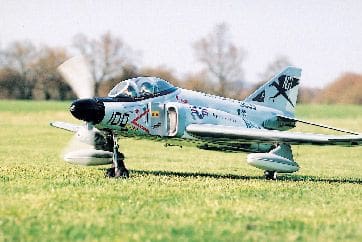
Between us we wrestled the offending item to the ground and slid off the protective cardboard packing to reveal the latest offering from VMAR. Well, imagine my delight at seeing the F-4 Phantom emerge, a particular favourite of mine… yum yum! An added bonus was that the model was finished in the grey of the US Navy, my preference to the alternative colour scheme of USAF green / brown camouflage. Although this is a scale model of a jet fighter, it’s conventionally powered by a .60 to .91 two-stroke engine turning a tractor prop’.
VMAR haven’t only picked what I think is a modeller’s favourite, they’ve also labelled it a ‘true’ ARTF. By this they’re implying there’s only the minimum amount of work to do (primarily installing the engine and associated plumbing, undercarriage, R/C and control linkages). On looking through the kit it would seem they could be right. Another bonus is that it’s made predominantly of balsa, using birch ply where additional strength is required – a great improvement over the brittle poplar-type wood that was used on earlier kits such as the Tucano. Identical to that featured on all recent VMAR designs, the covering material is a self-adhesive film (Polycote) that’s pre-coloured and detailed prior to application, the advantage being that the labels and lettering won’t peel off. Overall, and bearing in mind the Phantom is quite a complicated shape, the finish and scale appearance is very good.
Continuing my rummage through the box, the fuselage, which is squeezed in really tight, had some damage to the vac-formed tail cone. Apparently this is a common occurrence, so potential purchasers should take note and be prepared to check the kit for possible damage. In truth the damage was only slight, and once the dent had been smoothed out and the crack braced with cyano’ and balsa from inside, the repair became unnoticeable.
Enjoy more RCM&E Magazine reading every month.
Click here to subscribe & save.
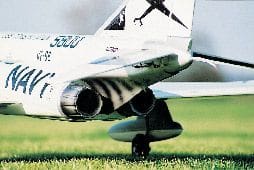
Beneath the fuselage were packed the wings, dummy wing tanks, tail, fin and a large bag of accessories and hardware that included a fixed undercarriage and wheels, aluminium spinner, fuel tank, pushrods, horns, links, various screws, nuts and bolts etc. In fact pretty well all you need, bar glue and fuel tubing. Unfortunately, however, the wing tanks were found to be for the USAF version, painted in green / brown. As our photographic deadline was looming there really wasn’t time to send off for a replacement set so I decided to apply a coat of Humbrol paint (No. 64) which did the job a treat. Again, be prepared to check the kit for consistency before you buy.
With any scale model, looks are everything. Although VMAR supply a fixed undercarriage system, easy adaptation for the use of retracts has been designed into the model. Needless to say I couldn’t bring myself to use the fixed gear, so it was duly scrapped and a set of standard Spring Air retracts purchased from Eurokits (Ripmax).
GET CRACKING!
As I mentioned earlier, VMAR refer to this as a true ARTF. However, you could get the impression from the 15-page manual that this model may still take some time to construct. In truth, if you’re a competent builder of kits or ARTFs then you could build this model without any instructions at all, as it’s not that complicated. So, rather than go into boring intricate detail of how to connect a servo to a pushrod (page 11 of the instructions!) I’ll concentrate on the subject totally overlooked… retractable undercarriage.
WALKING ON AIR
Retract bearers are provided within each wing panel, as are plastic vac-formed wheel wells. The routing of air tubing is fairly easy, so installation centres around drilling the mounting holes, screwing the retracts into position and connecting the air line. The fixed undercarriage legs and wheels can be reused, but you’ll need to cut each piano wire leg to the correct length in order that the retracted wheel will sit centrally in its well.
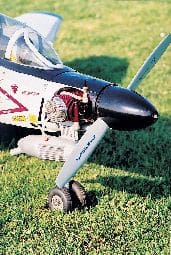
Installing the retractable nose leg is somewhat more complicated. The fixed system has the leg position forward of the engine bulkhead and clamped by the engine mount, whereas the retract unit needs to be located behind the bulkhead. There’s no mount provided to effect this, and to complicate things the internal fuselage sides are feathered into triangular section at the point where the retract unit needs to sit. Gaining better access into the nose compartment means removing the canopy and cockpit detail; I also removed the plastic wheel well by cutting the glue joint with a knife. To make the bearers two pieces of 6mm birch ply were used with the edges chamfered to match the profile of the triangular section and glued to each side of the fuselage, hard against the engine bulkhead. I’d suggest using the proprietary nose leg that’s supplied with the retract unit as this saves a lot of work trying to convert the existing fixed leg. To steer the retractable nose leg I used a separate servo mounted in the centre section of the model, hooked to a proprietary closed loop wire system. The air cylinder, valve and operating servo were all positioned in the fuselage centre section, which has copious amounts of room. Just be careful not to foul the aluminium wing tubes and wing retaining bolt holes with servos, pushrods etc.
So, that’s the difficult bit done; installing the engine (an Irvine .72), servos and whatever else remained, was a piece of cake with no real problems to report. A word of caution about the clevises, though. VMAR supply plastic items and I had to replace three of them simply because the fit was too loose on the threaded pushrod end – a good tug and they pulled off! Bearing in mind this a 10 lb model for up to a .91-size engine I would strongly question the use of plastic clevises – don’t compromise, use metal jobs throughout and bin the ones supplied. Also, turret-type links with grub screw retainers are included in the kit to connect the pushrods to the flying surface control horns. Again I’m not a fan of these, especially on a model of this size, so plenty of Loctite was used on all the grub screws.
Three evenings labour saw the model to completion – around 12 hours or so. Checking the C of G revealed her to be quite nose heavy, needing around 4oz of lead at the rear, so be prepared to add more tail weight if you select a larger or heavier engine. Alternatively, I suppose you could install a bigger, heavier battery pack at the rear to compensate. That way, at least, the weight would be working for a living.
PHANTOM FLYER
I’d heard on the grapevine that the Phantom’s flying characteristics wouldn’t disappoint, so I was eager to get out and fly her as soon as possible. I’d originally planned to carry out the test flight at the Hastings MFC site because of the large long runway and unobstructed flying area. However, the opportunity came earlier than planned at Headcorn Aerodrome in Kent, home of the Maidstone Model Flying Club. Although this site is more restricted due to full-size activity and an enclosing tree line, the ease instilled by the Phantom’s favourable flying reports didn’t give me any concerns. Also, having run up the Irvine .72 the week before and found it to be a real peach, I was pretty confident about reliability, too.
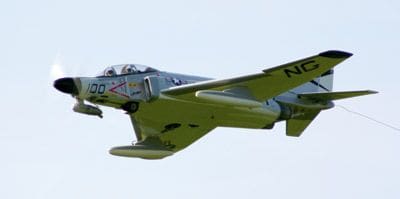
So, safety checks complete the Irvine was fired up and the Phantom taxied out. Ground handling was excellent, as you’d expect from a steerable trike undercarriage, so without further ado she was pointed into wind and the throttle opened progressively. The model accelerated quickly, and after some 30m elevator was applied, rotating the model smoothly into a 20° climb-out. Still holding up elevator she had to be turned sharp right to avoid the looming tree line some 100m away. Climbing steadily whilst in a sharp bank wasn’t the ideal way to get airborne, but the model felt comfortable, the power was more than adequate and the controlling surfaces seemed about right. Entering the downwind leg the engine was throttled back to around 50% to slow her down. There’s no doubt about it – the Phantom is quick, even with a mid-range engine up front, and she really does eat up the sky at an alarming rate… all the things you’d expect from a jet, really!
It took longer than you might expect to reduce the speed but by the upwind leg things had slowed enough to commence the trimming process. Just a few clicks of up elevator and a touch of right aileron saw her flying hands off. The first flight consisted of long, slow passes for the camera; these looked absolutely superb, especially with the wheels retracted and the drop tanks fitted. After some 8 minutes and the photography done it was time to bring her in. Landing a scale jet, even though prop’ driven, requires a long and fairly flat approach in order to bleed off any excess speed. Although the glide is quite fast the rate of descent is very controllable with use of elevator – so much so, you can pretty much choose your point of touch-down. And, once she’s down she stays down… no bounce, which is very reassuring. So, first flight over, and I wasn’t disappointed. Now it was time to really play…
HAVIN’ A BALL
For the second flight I took the model to the Hastings club field; its 100m runway just plays into the hands of this model – beating up the strip is what it does best! Big ailerons combined with the very effective elevator and rudder allow a good repertoire of jet-style manoeuvres, all of which need to be done smoothly and at speed. Rolls are very quick and quite axial, loops need to be entered at speed and kept big to avoid the model ‘falling off’ the top. Slowing right down to the stall revealed characteristic delta-like behaviour, where the wings just waggle a bit as the model starts to descend in a mush before the nose drops and speed is regained – all very predictable. Having assessed the stall I was now happy to bring the model into land at a much reduced pace. Again the descent was very controllable, the landing completed from touch-down to stop in around 30m.
WRAPPING UP
In assessing the performance from the .72 engine, I would suggest this as being the optimum size for the Phantom. It’s powerful enough and light enough to limit the additional weight needed to balance the aircraft. Installing a heavier .91, plus the additional ballast that you’d need, would, I’m sure, take the shine off the sparkle.
If there has to be a cautionary note I’d say this isn’t a model for small, restrictive flying sites. It’s a big ‘jet’ (almost 6’ long), so give it the space it deserves and you’ll love it.
DATAFILE
Name: F-4 Phantom II
Model type: Jet-style ARTF
Manufactured by: VMAR
UK distributor: MacGregor Industries
Wingspan: 59'' (1475mm)
Length: 67'' (1675mm)
Wing area: 800 sq. in. (0.55 sq. m)
All-up weight: 101/2 lb (4.8kg)
Wing loading: 301/2 oz / sq. ft. (9.3kg / sq. m)
Rec’d engine range: .60 – .91 two-stroke
Motor used: Irvine .72 two-stroke
Rec’d no. channels: 4 / 5 (using flaperon mix)
Control functions: Aileron, elevator, rudder, throttle and optional retracts


