Long, long ago in a time when wood glue didn’t foam and model aircraft kits were made from small boxes containing sticks of balsa wood, Chris Foss decided to take a step forwards from his popular glider plans range and make the heady move into kit production. This was way back in 1976, and the first model from the stable of this established R/C glider pilot was the Middle Phase. Available in two options, the model could be built either as a primary trainer for flat field work with bags of dihedral and just rudder and elevator for control, or alternatively with a flatter wing and ailerons as a first aileron trainer for the slope.
Eight years of successful sales later the kit received a minor update, the balsa fuselage sides being replaced with plywood and the fin moved forward of the tailplane. From that point on it remained essentially unchanged as the hobby progressed, which saw the decline of much UK model kit production and the arrival of imported ARTFs. Whilst so many UK kit manufacturers have disappeared, Chris Foss prevails. So popular was this little aircraft to become, so seminal a trainer for many slope pilots of a given generation, that 30 years on from its original release date the kit is still available.
30, AND ON!
As part of his 30-year celebrations, Chris offered a kit for a nostalgic appraisal to see how it stands up against the competition in 2006. I was honoured to be asked to dust off the Evo Stik Resin ‘W’ (you’re hard pressed to buy it now!) and trawl through the Skunkworks looking for my long-lost sanding block. Heck, I even had to buy some modelling pins!
The Middle Phase is not unknown to me. Mulling over my traditional ‘new model’ brew and studying the old instruction booklet intently, it dawned on me that this example would be the fifth Middle Phase that I’d either built in its entirety or had a hand in the construction of. Whilst my personal slope soaring arsenal passed this model by in favour of its bigger brother, the Chris Foss Phase 6, I’ve taught many to fly using the Middle Phase. As I studied the excellent diagrams of the instruction booklet and tittered at the adornment of imperial dimensions within, those previous builds all came flooding back. I even dug out a few old photographs taken on proper film cameras for the nostalgia rush!
Article continues below…
Enjoy more RCM&E Magazine reading every month.
Click here to subscribe & save.
BEST OF BRITISH
No doubt about it, you’d be hard pressed to find significantly better builders’ kits than those from Chris Foss. Careful wood selection, tidy packaging of the parts and the overall care and presentation you find on opening the picture-adorned box is right up there with the best of British. The whole thing has an engineered care about it. A friend of mine who’s been modelling for a few years and has only ever ‘built’ ARTF models shook his head as I relayed the wonder of working with pieces of wood… the quality speckled quarter grain… the brilliantly white flat sheets within the kit. I don’t think he’d ever held a piece of naked balsa in his hand before, never mind revelled in the ability to freehand mark a pencil centreline along the t.e. of a rudder blank before shaving wafer-thin slices off it with a hand-held razor plane. His only response was, “Why do you need all these grades of sandpaper?” Some people…
The obechi veneer covered white foam wings (can these be described as ‘traditional’ these days?) are beautifully straight, with a uniform colour to the skin. The strip wood stock for leading and trailing edges are arrow-like with no blemishes at all, with a matched density just begging to be sanded to shape. Various other small blocks and spruce strip-wood for longerons complete the remainder of the timber parts in the kit. Alongside these is some suitable hardware, a small plastic moulding for the front wing fairing and a simple, understated decal sheet.
DOWN ‘N’ DUSTY
Article continues below…
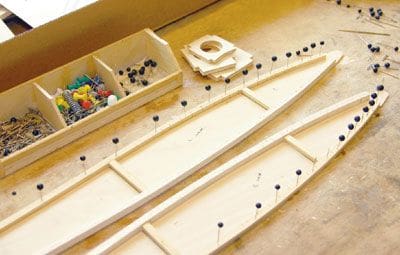
With sleeves rolled up and the Skunkworks heater taking the chill from the winter air, construction started with the fuselage and the joining of the plywood fuselage sides, requiring two pieces per side to be scarfed together at the mid point. With longerons fitted to form right and left sides, and put aside to cure (no cyano’ here, you know…), I took the opportunity to fit the leading edges and false trailing edges to the foam of the wing cores, holding things in place with low-tack masking tape as I went along.
The fuselage formers are die cut from a plywood sheet and fit nicely into place where mandated in the instruction booklet. Once I’d found my expandable two foot imperial ruler I was good to go. Constant reference must be made to the instructions as there are a selection of small parts to fit inside the fuselage before it’s closed, parts that you may otherwise miss. Perhaps the most obvious of these are the control snakes for the back end, one of which (for the elevator) must be anchored internally at the back of the fuselage side.
Pulling the two sides in straight and true was always a chore for me, especially when they’re under considerable tension around the nose block area, as here. A fruitless search for my old Sun Lane Engineering Company (SLEC) fuselage building jig meant that I’d have to bring the two halves together unaided; an ‘old skool’ building test to sort the men from the boys! Nevertheless, with patience even I managed to true it all up adequately under the collection of rubber bands, pins and tape strips that where now stopping the whole lot from pinging across the room or slipping out of alignment.
I decided to restrain the wings with rubber bands instead of a hold-down bolt, and I was pleased to note that the dowels lined up squarely through the holes I’d drilled earlier. Talking of alternative methods, there are obviously a number of modifications that experienced builders could bring to the table on this 30 year-old design. Modern radio gear is far smaller than the old house ‘brick’ Rx and dumpy DEAC batteries that were popular when the Middle Phase first hit the hills. I decided not to fit the front hatch, preferring instead to feed a small NiCad and smaller Rx through a widened hole in Former 2.
Using smaller servos meant that these could now fit under the wing seat, leaving the lines of the nose area untouched and less fiddly to build. This probably makes things stronger, too, with everything glued to everything else. I chose not to fit separate aileron servos in each wing half, favouring a more traditional single servo mounted in the middle as per the original design. But you might like to consider this popular tweak to give added benefits:
1. You won’t rip the servo through the fuselage sides when you prang it.
2. Modern radio gear can be used to provide spoileron mixing for shortened landing approaches.
Article continues below…
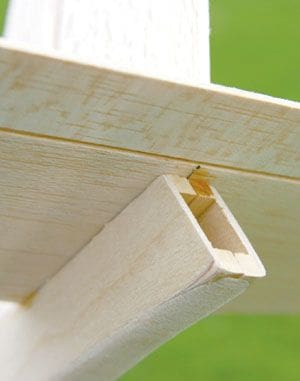
To complete the single servo solution I added the supplied aileron torque rods after slightly re-working the fixed centre-section at the wing seat. The tip blocks were then simply glued to the exposed foam at the end of the core.
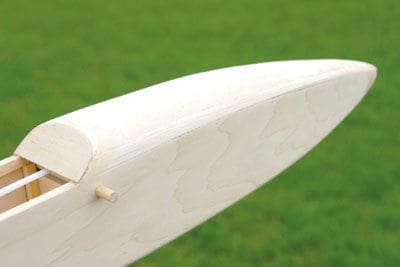
With the top decking added and the fuselage bottom fabricated from cross grain strips, it was time to start shaping and sanding. Not a task I particularly enjoy, but one I’m proud to say I’ve always been quite good at. The trick is not to be too shy on the corners. The build is accomplished in such a way as to permit removal of some of the plywood fuselage sides and on through into the longerons to achieve the desired section. After tackling the rough cuts with a razor plane it was time to further cut back with a heavy Perma-Grit block; an expensive but increasingly indispensable tool. Following this with a more traditional sanding block and two increasingly finer grades of paper gave a silky-smooth finish.
I find it’s much easier to obtain the right profile on the fuselage if you sand and rotate at the same time. With patience you can end up with a sculpture akin to a baseball bat, with even radii at each corner of the formers and a nose slipping into obscurity at the very tip of the hardwood nose block. A very therapeutic process if you take your time over it.
Extra care must be taken during final shaping of the wing leading and trailing edges as the obechi veneer is very thin and easily breached. Using just a rough cut-back with the razor plane and then straight onto the sandpaper block I allowed the profile to find itself with careful sanding, gradually coming around to the very front radius of the section. Do try to get this the same on both sides, whilst avoiding a ‘step’ where the balsa strip meets the wing core. The wing is then completed by joining the two panels at a slight dihedral angle followed by an epoxy bandage over the centre. When dry this will need a little flattening back with the sanding block and a coat of BalsaLoc adhesive to aid better sticking of the film covering.
COVER STORY
Article continues below…
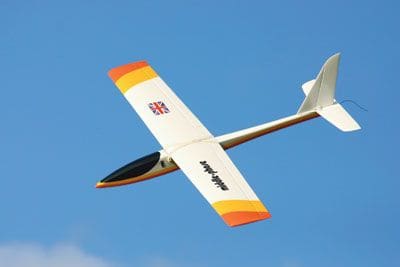
‘Ed Graham’s a kindly soul, who said that I could finish the Middle Phase in whatever colour scheme I liked… as long as it was the same as the one depicted on the box lid! Deep joy… had he forgotten that Chris Foss was an avid tissue coverer and painter back in the day? No… iron-on film for me, I’m afraid!
With a wonderful local model shop that stocks every roll of most covering materials (and will sell it to you half a metre at a time) I was able to determine that Profilm white, Solarfilm Cub yellow and Profilm orange were about as near as I was going to get to the box top and still get away without painting the model. A black Profilm canopy (rather than the stickers supplied with the kit) was easy to achieve, having not fitted the front hatch. A car parts shop came good with a Union Flag emblem, so with that I was ready to go.
I’m not going to elaborate on the covering process, although newer modellers should know that it doesn’t just magic itself on! Some poor sap at the factory where your ARTF was finished had to sit there cutting out two-dimensional pieces of covering before securing them to three-dimensional shapes with a hot appliance.
Film covering is quite a tricky job that takes years to master properly, but with care any meticulous first timer can make a reasonable effort. Just be sure to clean the steam iron afterwards, though. I was always getting a clip round the ear from mum when she’d left a red Solarfilm stripe on dad’s work shirts!
RE-CAP
So, a quick re-cap of the story so far. I’ve a film-covered Chris Foss Middle Phase (aileron trainer), the wings joined with around 2″ of dihedral under one tip rather than flat (my eight year-old son will be the ultimate benefactor of the model, and this will afford him some stability in the air). The front hatch was not fitted as designed but instead I slid a square, 4-cell 800mAh AA NiCad as far into the nose as it would go, followed by a JR R700 slimline Rx. Two micro servos were fitted into the fuselage, under the wing l.e. rather than in front of the former, driving rudder and elevator via two plastic snakes. A single HS80MG aileron servo was fitted to drive two strip ailerons from a central location in the wing via the supplied torque rods. The model was covered in heat-shrink film to reflect the box lid colours and it balanced with a small amount of lead in the nose alongside the battery. Job done! With a quick charge of the NiCad she was ready to go.
WAIT FOR IT
At this point a look outside confirmed that it was raining and blowing a gale. “Yes,” said a voice in my head, “but that’s never stopped you before.” True enough, in the past I’ve flown a Middle Phase off the Great Orme in 65mph winds, but since I’m getting old and fussy about getting a good soaking on the hillside, I decided to sit it out until the worst of it blew through.
No matter. What I can tell you in the meantime is that, having flown many Middle Phases, they do indeed make an excellent slope trainer. Alternatively, in these days of prolific electric-powered flight, why not consider the use of a brushless outrunner motor atop a wing-mounted pylon for some fun on the flat field? We used to do this in the olden days with a Davis Charlton diesel or early Cox glow motor… memories! At least today’s electric alternative is clean and efficient, and with Li-Po cells now commonplace it’s not restrictively heavy, either. The duration of the motor run would certainly be better, too! In the past I’ve both aerotowed and bungee-launched Middle Phases of both variants, and in all guises they perform well, often exceeding their remit as a ‘trainer’.
Mind you, it’s on the slopes where the Middle Phase has earned its stalwart reputation. When we did eventually get to fly the review example she flew exactly as I remembered, tracking straight and coping with a good amount of blow. A little quick on the elevator and a little sluggish on the ailerons for my tastes, but overall no great surprises. The controls are nicely harmonised and the rudder is perfectly adequate to fly stall turns and spins. With speed you can wring the odd snap roll out of her, with the familiar instant recovery upon neutralising the control surfaces. A well set-up Middle Phase will reward you with a modicum of aerobatic performance, and she particularly excels in looping flight and Cuban eight-type aerobatics.
Spoiled by CROW braking or spoilers on larger models I’ve always amused myself at how slippery the Middle Phase seems to be on landing. It isn’t of course, but when there’s nothing but the elevator to help slow things down you do forget how tricky it can be to plonk a model at the slope edge. Go back a bit to the laminar air and she’ll settle right in, with the banded-on wings sucking up any misjudged approach in inexperienced hands. On one particular day we had great fun doing ‘pop and drop’ landings, flying rapidly up the front of the slope to a stall overhead and then dropping down onto the lip of the hill. Always eminently controllable and easy to execute with the model’s low weight and lack of inertia, likening it to the slope soaring equivalent of a Shock Flyer!

The Middle Phase is seemingly unaffected by any mismatch in aileron differential arising from the use of a single servo. Rolls are very trainer-like, and inverted needs a bit of down to hold level. With an all-up weight of just 43oz she’ll do the light and scratchy stuff, too. I’ve never flown a Middle Phase that felt as though it needed ballast to fly adequately. I suppose if you were looking to progress beyond the limit of the Middle Phase you might consider a fuselage-mounted ballast box before you built your next model, just to get a feel for faster flight, but I’d wager it wouldn’t make too much difference in the greater scheme of things. Best to leave be and cruise around the sky, flinging her about with abandon and fondly experiencing the pedigree of the model whilst doffing your cap the way we used to in the olden days!
The Middle Phase is available from any respectable model shop that knows a good thing when they see it. Expect to pay as little as £69 for the aileron version, maybe £5 less for the flat field job.
DATAFILE
Name: Middle Phase
Aircraft type: Primary / advanced slope soarer trainer
Available from: Direct or from selected retailers
Street price: Primary £64; Advanced £69
Wingspan: 61” (1549mm)
Fuselage length: 42” (1066mm)
Wing area: 440sq. in.
All-up weight: 2 lb 11oz
Wing loading: 14oz / sq. ft.
Control functions: Primary: elevator, rudder
Advanced: aileron, elevator and rudder


