
- Editors note – The Mini ShowTime 4D is becoming hard to find in the shops but we have published this review as Chris’ well written account should help those building and flying similar models.
What’s in the box?
Well, the first thing that strikes you upon opening the box is how far ARTF models have come since they first took hold of our hobby some years ago. The covering was almost immaculate apart from a small crease on the trailing edge of the rudder and after laying all the components out on the bench I marvelled at the build quality achieved by E-Flite. Smooth, light and perfectly laser-cut ply and balsa parts are combined to produce a very high quality kit that is practically already complete!
The main components that are included in the kit are the fuselage, which has two removable hatches (one for the battery on the top and one for the receiver underneath the wing), the two wing panels, which plug into the fuselage by use of a carbon fibre tube spar, the tail surfaces, SFGs, cowling, canopy, under carriage and accessories.
Apart from the obvious glues and tools necessary for the construction of the kit, the additional items used to complete the model were as follows:
- E-flite Park 480 920 Kv brushless outrunner motor
- Robotbirds Pro-40A Brushless ESC
- APC 12×6 thin electric prop
- 4x JP EnErG micro 7.5g servos
- Century micro 6ch receiver
- FlightPower EVO20 1800mah 11.1v (LiPoly) battery
Enjoy more RCM&E Magazine reading every month.
Click here to subscribe & save.
 The kit is very complete in the usual E-flite fashion
The Build
As already mentioned, The Mini ShowTime 4D really is ‘Almost Ready to Fly’ and it only took me a few evenings to assemble. It’s highly reasonable to assume those experienced builders among us could start assembling in the morning and, by late afternoon, could be down the field putting it through its paces.
The build is a relatively simple affair; with most of the major work already done, there’s little to catch you out here. The instructions are easy to understand yet informative and the accompanying pictures and illustrations are excellent.
The wings only require the aileron and servo installation before sliding on to the carbon fibre tube and mating to the fuselage. Ply tabs halfway down the wing roots protrude into the fuselage where they are located and bolted in with socket head screws and washers accessed through the hatch underneath. Having removable wings like this is certainly a bonus, especially for a model this small and makes transporting to the flying site even easier.
The tail feathers for this bird are simply slotted on and glued in place with CA and small carbon fibre braces are used to stiffen the tail with great effect.
All the control surfaces on the Mini ShowTime 4D are of considerable size and showed promise of putting the aircraft through some extreme 3D manoeuvres.
The installation of the undercarriage was mostly trouble free except when it came to attaching the wheels themselves. The US gauge bolts supplied seemed to thread easily when tightened so I replaced them with some trusty M3 hex bolts and accompanying nylock nuts. Problem solved!
The kit comes with a pair of superbly moulded and painted wheel pants that really finish it off well. They are amply reinforced where they are clamped to the leg by the bolt axle and a small screw above is tightened to the leg in order to stop them spinning with the wheels. In my eyes, these little touches go a long way and E-Flite should be applauded for not scrimping on such small but worthy issues.
After only a couple of hours the Mini ShowTime looks like a complete aeroplane, aesthetically only lacking in the cowling and canopy. Before the former can be screwed on, the motor and ESC must be installed, however this is no big issue.
The motor box protruding from the bulkhead has blind nuts pre-installed and the recommended E-Flite out-runner with its radial mount bolts on in minutes.
There is enough space on the box that the ESC can be cable-tied to it and kept within airflow to help cooling.
With a thin bead of epoxy resin, the canopy is secured in place and the aircraft is complete leaving only the final fitting of radio gear.
All the surfaces are directly controlled with short links, so the rudder and elevator servos are located outside on the aft fuselage. With minimal play this system works very well, even in the case of the rudder, which is more commonly seen with the tried and tested closed-loop cable system in 3D/Aerobatic models.
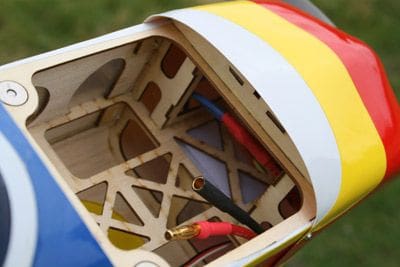
The battery, attached by Velcro, straps onto a plate in the forward fuselage made accessible by a cover which slides under the cowling and snaps closed by use of a magnet. Whilst this is a clean and simple idea, I found that the tolerances were so fine and the magnet so strong that some days it’s quite difficult to remove with the smooth clear plastic tongue at the back, making battery changing occasionally a little frustrating!
With the receiver connected up, everything programmed in to the transmitter and the lower hatch bolted on for hopefully the last time it’s ready to get the Mini ShowTime airborne.
Pre-Flight
First point of call before flying any new model is to check the Centre of Gravity. The manual recommends a starting C of G location 115mm (4 1/2″) back, measured from the centre of the leading edge of the wing next to the fuselage. I found my initial C of G reading approximately 95mm (3 3/4″), though this was with a FlightPower 3S 1800mAh battery pack at the most forward position on the battery tray as possible and with this room for manoeuvre in mind, proceed to test fly the aircraft slightly nose heavy.
Subsequently, the battery has been moved further back to the most aft position on the tray in order to achieve the most desirable balance for 3D flight.
Flying
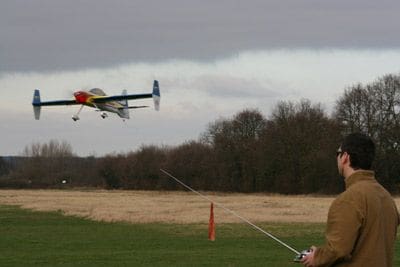
Although the Mini ShowTime boasts a rather nice looking set of undercarriage, they are only best suited to tightly cut grass or hard runways and for the flying site I usually fly at, hand launches are the order of the day.
That said, I have had the pleasure of taking off from the ground on a few occasions and it was rather uneventful, tracking straight with only minor rudder inputs, lifting off in a few metres.
Once airborne, the aircraft rapidly accelerates on full power and reducing back to 1/3rd throttle is ample for cruising around and flying circuits or even performing tight reversals. The aircraft tracks very well at both high and low speeds and vertical performance with the stock power system on my 1800mAh is impressive, but not blistering. I expect that using the recommended 2100mAh battery may improve this to some degree but at the time of writing have been unable to prove this in practice.
The motor combination with the APC 12 x 6E propeller gives the aircraft an almost perfect blend of thrust and speed. The aircraft also stalls at a very low airspeed with only a slight drop of the nose, whereby recovery is achieved with a small amount of back pressure and increase in throttle.
Landing the Mini ShowTime is also a rather simple event and although the U/C isn’t best suited for taking off with the length of grass at my site, it lands easily without tipping over. You can bring the aircraft in at a very slow airspeed because of the generous stall margin and set her down ‘three point’ every time and to a great deal of pilot satisfaction.
One thing that must be observed at this point is the conditions in which the Mini ShowTime likes to fly in. A slight breeze or dead calm is ideal due to its light construction, although I have flown in windier conditions on occasion and to the aircraft’s credit, I was surprised at how well it put up with it. However, it’s not a great deal of fun, risks damage and you’re better saving it for a better suited day when you can get the most out of it…
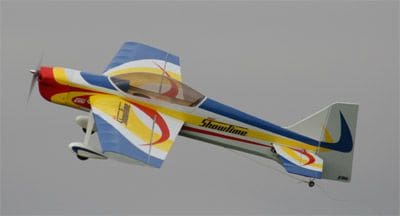
 Visually perhaps, one of those you either love or hate
Aerobatics and 3D
Now this is where the good times start, aerobatics with the Mini ShowTime are almost effortless and a great deal of fun. It rolls almost perfectly axially requiring no differential and loops can be pulled very tight before it tries to ‘screw-out’. I programmed in a switch-able elevator/flap mix and with this on you can almost flip the aircraft on its back repeatedly.
Ailerons 2 1/2″ (64mm) – Up & Down
Elevator 2 1/4″ (57mm) – Up & Down
After some testing and adjustment I found -40% exponential on all surfaces gave me the right control and I felt confident to put the Mini ShowTime through some 3D manoeuvres.
With these high throws, snap rolls were very quick with full aileron and generous amounts of rudder and elevator. Owing to the low mass of the aircraft there is very little momentum observed in these high energy manoeuvres and recovery has never proved a problem. Spins are much the same, easy to perform and recover, though if you want to achieve an F3A spin (non-forced) entry you might have trouble getting it to stall and drop a wing it is so stable!
I found flat spins to be marginally easier inverted than the right way up, but it performed them both very well along with satisfactory blenders.
Prop-hanging the Mini ShowTime is easily done and it’s behaviour throughout is predictably good. Although not in excess of power, the first 5 minutes of a flight with an 1800mAh pack gives you some opportunity to play like a helicopter. Entry into the hover is smooth, though the wings rock slightly if you pull too hard. With my throws, control is very good and you can easily recover from the messiest flops.
High Alpha flying with the Mini ShowTime is good and can be achieved with a very slow airspeed; however it does exhibit some wing rocking, especially when turning. On the other hand, inverted High Alpha is practically perfect! Similar results were garnered when trying a Parachute. In level flight, with max elevator the tendency was for the aircraft to wing rock and continually change direction, and corrections with the rudder sometimes induced a flick roll. However, inverted parachutes are a lot of fun and have none of these quirks.
Perhaps this aircraft was built upside-down!
Rolling circles, knife-edge flight, flat ‘control-line’ turns and even knife-edge loops are possible with this great little aircraft and most with little or no mixing to help it along its way.
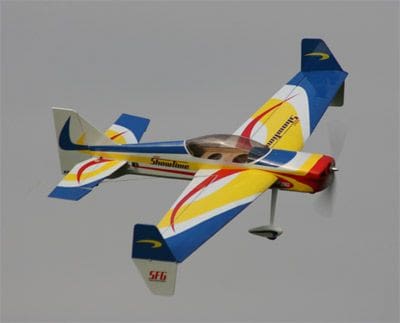
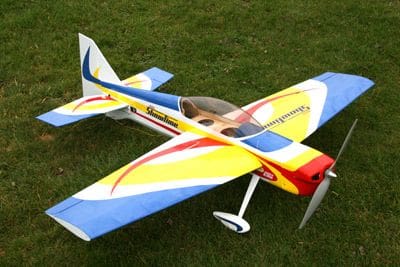
 She’s certainly a better looking aeroplane with out the SFGs
Side Force Generators (SFG)
At this juncture I must point out that during these manoeuvres; the SFGs were not attached to the aircraft. The Mini ShowTime turns into quite a different aircraft with these bolted on.
As can be expected, the roll rate is significantly reduced and the extra drag and weight makes it fly a little slower. On first impressions it almost looked as though the aircraft was flying on a cushion of air and floated around the sky.
With the SFGs attached it enabled knife-edge flight and rudder turns to be flown significantly easier. Landing proved a little trickier however due to the minimal clearance they have with the ground. After flying many flights with and without SFGs attached it became clear to see what benefits they brought to the aircraft and by having the option E-Flite have ensured that the Mini ShowTime can be personalised to the individual pilots needs. However, for my style of flying where I like to have sharp controls and the option to perform any manoeuvre well, rather than just a handful spectacularly, I prefer to leave them in the car.
Conclusion
This aircraft is a great example and possibly a benchmark in what can be achieved from a 3D ARTF park flyer. It is superbly constructed with a spectacular finish and ticks all the boxes from a pilot’s point of view in my opinion. The flying characteristics are crossed between a well harmonised shock-flyer and a .40 sized aerobatic model.
It boasts some features usually only found in aircraft much larger, such as two piece plug in wings and the kit comes with some quality hardware.
The Mini ShowTime is by no means a model for beginner pilots, but for those of you that have some experience with sports models and feel like you’re in the need of a small package of affordable fun that is more substantial than a shock-flyer and boasts the aesthetics and flying characteristics of an aircraft much larger, then I highly recommend you take a look at this little gem.
Pros:
Well manufactured
Quick and easy to build
Stunning film finish
Plug in two piece wings
Removable Side Force Generators
Highly manoeuvrable
Light weight
Cons:
SFGs won’t suit many pilots’ needs
Tight fitting battery cover
Spec Sheet:
Wingspan: 43 in (1090mm)
Overall Length: 42 in (1065mm)
Wing Area: 414 sq in (26.7 sq sm)
Flying Weight: 26 – 29 oz (795 – 820g)
Motor Size: Park 480
Radio: 6-channel (for proper mixing and dual rate capabilities)


