
We’ve looked at a number of stick-pumping manoeuvres so I hope you’ve been out there practising and are ready for another challenge!
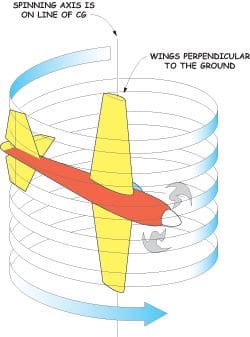
I thought we could finish off our look at spinning manoeuvres with yet another version… knife-edge. Here again we’ll experience differences in perfection of execution depending on the model and set-up. The first time I saw this manoeuvre (then called the ‘Hanno Screw’) it was performed by aerobatic maestro Hanno Prettner, multiple F3A World Champion of the ‘70s and ‘80s, flying an EZ P-51 Mustang at Sandown. I was 14 years old at the time, it was my first trip to Sandown and I watched excitedly from the crowd line with my father. I remember, even now, how the model leapt off those trusty planks of makeshift runway and immediately seemed very pitch sensitive, overpowered and very light on its feet.
Before our very eyes the four-stroke powered Mustang began to descend from a great height and, before it was clearly visible, I just knew it was doing some sort of spin from the noise of the engine, but jeez, was it dropping quick! ‘Twas the Hanno Screw (see diagram). The model was on its side, wings perpendicular to the ground, with the nose and tail rapidly spinning around the C of G. It was like there was a wire running from wing tip to wing tip through the C of G and someone had flicked the back end with a finger. The descent rate was frightening, and this was accentuated even more by the snap into a negative spin at the end, which put the brakes on in big style… wow!
Enjoy more RCM&E Magazine reading every month.
Click here to subscribe & save.
Nowadays it’s not uncommon to see this manoeuvre, although not usually with the fuselage quite so parallel to the ground; that clearly required a rearward C of G and a short-coupled model. Prettner’s choice of model for that demonstration seemed unusual at the time in comparison to his usual F3A style models, though in hindsight it was a clear and clever choice. Equally clear is the reason for the rearward C of G.
Most models will make some sort of attempt at this manoeuvre but to make it easier you’ll need lots of authority from elevator, rudder and power, or a very short-coupled aircraft. Above all, don’t underestimate what an altitude-eater this is and make sure you start high.
Since this is all about model attitude and control input timing, entry can be very tricky and you certainly mustn’t be disheartened if you end up in a flat spin; the control inputs are very similar.
When you’re in the manoeuvre you’ll most likely have a half to full throttle setting, full down elevator, full top rudder and possibly up to full aileron in the same direction as the rudder. The angle of the fuselage relative to the ground will be dictated by the amount of rudder authority you have and the C of G position. Remember, the model will be doing a sort of flat spin on its side so the rudder will act as an elevator and (as we’ve discussed), moving the C of G aft makes for a flatter spin.
Be happy with a wing angle relative to the ground of 45° or more. 60 – 70° is good, whilst getting towards perpendicular (90°) is truly impressive, though you’ll no doubt have to compromise the performance of the model in normal flight.
Getting a swift and axial rotation about the C of G is more the focus initially than the ‘angle of dangle!’ The model should rotate around the C of G, not fly in a tight side-on bunt around the wheels!
To exit this spin either convert it to a negative spin by swapping the rudder direction and dropping power, or drop power, centre sticks and fly out. So, being in it is easy, getting out is easy, but what about the hard part, entry? Well, that varies quite a lot, depending on the model.
GOING IN
I generally find that entry at low power is best, applying rudder first followed immediately by elevator, then power and aileron if required. Do this by either popping the model on its side at the entry point or pushing down elevator like the blender and then applying the controls quickly in this sequence. You’ll know when you’re in one, and generally once in it’s not hard to remain so, just hold the sticks and watch. If it fails it will fail in the first turn, so go around and try it again. As I’ve said this isn’t an exact science, and some models enter easier than others. Don’t be surprised if you do it once and then can’t repeat it – at least you’ll have proved the model is capable, all you need do then is find that sweet spot on entry.
Some aircraft will happily enter the knife-edge spin from a regular one – try it, the worst that can happen is that it flies out of the spin or goes flat. To enter from a regular spin you’re switching rudder direction and adding power. Conversely, remember that going from the normal spin to a flat spin is switching aileron direction and adding power! See, it’s not so technical – experimentation is the key!
SNAP HAPPY
If your head isn’t still in a spin from that one, let’s look at a figure that’s a cousin of the spin – the snap roll. Also known as the flick roll, there are two ways to perform this manoeuvre: with full control and with no control! The snap will come up in later issues as, much like most manoeuvres in the aerobatic book, it can be used and combined in different ways to achieve a variety of effects, which are limited only by your imagination… in theory!
The snap roll is basically a single spin positioned along a straight flight path, usually performed with some degree of forward speed / power. Let’s take a look at an example.
You’re travelling along at half power in a straight line from left to right, intending to do a snap roll to the left at the centre point. Five feet from the intended snap point a flurry of control inputs are thrown, sticks then centred almost immediately and you’re back on a horizontal trajectory heading out to the right of the field… what happened? Well, you threw in left spin controls, let go and then got back on the gas! Let’s break it down.
To begin, drop the power to idle instantly. Immediately apply full up elevator, full left rudder and aileron. Almost as soon as you begin, at about 3/4 of the way around the snap, release all controls and re-apply power. Use any controls necessary to fly it back on track.
The chances are that on the first attempt you’ll do a little more or a little less than a single snap roll, so give yourself some height and prepare to fly out. Practice and you’ll get to know instinctively when to centre the sticks, flying back on track after the manoeuvre will be almost done for you.
NEGATIVE THOUGHTS
That covers the positive snap, now how about negative? To be on the safe side, enter the negative from inverted in a similar flight path to before. Go through the same process as before, but using negative spin controls – down elevator and opposite aileron to rudder. Psychologically this is harder and scarier because you finish upside-down, as if starting that way wasn’t bad enough! Almost any model will do the snap roll in either direction; it’s the speed of entry that facilitates it. Keep practising that and you’ll improve in a short space of time.
CONTROLLED OR OTHERWISE
Earlier I mentioned controlled and uncontrolled snaps. So what exactly did I mean? Anyone who has flown large models will have an understanding as these aircraft perform slower, which usually makes things easier, i.e. you can make control adjustments throughout a manoeuvre and time things more accurately. For example, judging when to stop a large scale aerobatic model from spinning is usually easier than a feisty little sports aerobatic job. Spins and snap rolls, positive and negative, change from being uncontrolled to controlled when you dictate how quickly they happen and what shape they are.
How quick? Forward speed undoubtedly has an influence, which you can control before entry, but in general the more control input on the surfaces the tighter and more aggressive the spin, hence the snap is faster and less controlled. When you throw the sticks to their extremes it’s like hitting the ‘snap’ switch, which is a feature on many transmitters these days (and one that I’m not a fan of!) Reduce the amount of throw and the snap gets slower and possibly bigger.
What shape? Yes, you can subtly change the shape of the snap roll. Rudder and elevator dictate how round the ‘ball’ is, i.e. the imaginary shape that the outer points of the model draw as they go through the manoeuvre. Aileron dictates how much roll there is. Rudder and elevator may not be acting in equal proportion and so more or less of these controls combined may influence the shape and the exit attitude. Use less of these controls and more aileron and you get a sort of spasm roll rather than a traditional snap. This is the direction that many F3A pilots have taken as this reduces the chances of flight path deviation – a style not always favoured by the judges!


