
- As far as we’re aware this model is no longer distributed in the UK but the review is reproduced on the basis that readers may find unsold stock or source from abroad – Ed.
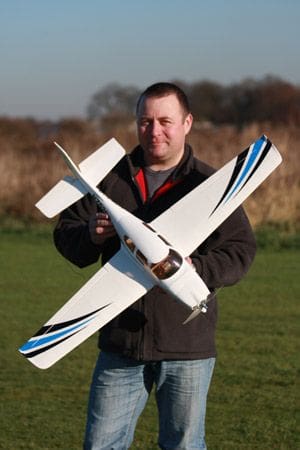
Protech’s version of the model is aimed at the intermediate pilot and I’d say that anyone comfortable with a low wing aileron trainer should be fine with it so long as they realise that it can get very small rather quickly and takes a little care when handling on the ground.
The SR-22 is one of a range of park fly models from Protech and the parts arrive well packed and protected in a decent box. It doesn’t take long to have it all unpacked and the build underway. The instructions are well written and take you through each stage of the assembly with adequate photographs to clarify the more technical area of the build. Any person with only an ARTF or two under their belt would be able to easily put it together.
Enjoy more RCM&E Magazine reading every month.
Click here to subscribe & save.
With the Hinges cyano’d in place, two aileron servos are fitted and hooked up using with the provided linkages and horns. Little 9 gram 1kg/cm servos are suggested throughout and most makes will fit easily with only a slight amount of trimming required. I used Hitec HS55’s.
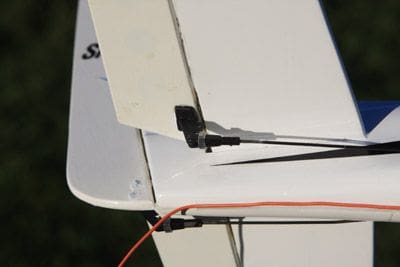
The wings were a slightly loose fit on the wing tube but a wrap of Sellotape diamond tape on the tube snuggled things up sufficiently. The stabiliser needed a bit of adjustment with a file to enable correct alignment with the wing, once aligned and having carefully removed the covering from the gluing area it was glued in place. Once tweaked the elevator and rudder control surfaces also require hinging and with the linkages and horns fitted in the same way, as on the wings, the model quickly takes shape. The rudder and elevator servos are then installed, centred properly to avoid differential throw and connected up to the linkages to await the rest of the radio gear.
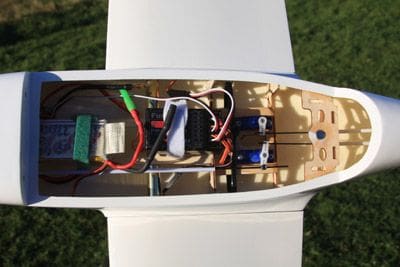 There’s plenty of room inside for a model of this size
Back to the build and care must also be taken when gluing the canopy retention magnets in. Don’t just glue them in the recesses provided as they may end up being too far apart, especially if your canopy is a little long like mine. Glue one magnet in first and let it cure then cover it with cling film or tape before gluing the second one in (making sure it’s the correct polarity) and hold the canopy in place while the second magnet cures fully. This will give you the strongest retention with your magnets very close together.
The supplied battery tray is only supported at each end, so I added a couple of vertical bits of scrap balsa underneath as this is likely to flex and crack the trays glue joints on even the smoothest landing. The receiver is mounted on the rear of the battery tray behind the battery with a simple Velcro strap.
The trim is factory applied to the wings but a decal sheet is supplied for the fuselage and spats and they apply easily. Control throws are given for a safe starting point and a conservative balance position is easily achieved without having to shuffle things around once all the equipment is installed.
A Logic RC Fusion 2829/10 1210kv brushless motor was supplied for the review which is listed as a 133 Watt rating on 3s LiPo’s with a 7×5” prop. A Fusion brushless 18 Amp ESC was also supplied to complement the motor and programming and setup of these was straight forward. I certainly found it simpler to do than some others I have used.
With 12 Amps being drawn on the recommended 7×5 prop and a static 12250rpm, I was a little concerned that we would be a bit underpowered as the prop wash didn’t feel that great on the bench.
With a ready to fly weight of 2lbs (1 kg) and input power of 130 Watts I was prepared to give it a go but expected performance to be in the ‘scale like’ area rather than ‘fully aerobatic’.
It was soon apparent that a Rise-Off-Ground take off on our grass strip was simply out of the question with this power setup. Even the light headwind did not help. There was simply not enough thrust from the little 7×5 prop to get her rolling at anything like take off speed. A hand launch was definitely needed and a good strong launch into wind from a club mate ensured and she was nicely away. You should note that the model’s wide fuselage makes her tricky to hold for a hand launch if you plan of doing this yourself.
After a couple of full power circuits for safety I found I needed just a couple of clicks of trim here and there to get her hands off straight and level. Throttling back to cruise speed at about half power just needed another click of up to maintain circuit height for some flying shots. Tight low turns were needed for some close ups as the model is quite compact but you can easily feel when you are getting close to the stall as it starts to get a bit squirrely, letting you know to ease off a little.
Control response is good with very quick rolls possible if you turn up the throws above the suggested starting points. The little rudder provides more response than you might expect but does also roll couple into the turn a bit. No doubt due to the fair amount of dihedral on the wing.
Pitch control is very effective at the suggested balance point which is safely nose heavy as almost a quarter stick of down is needed for inverted flight. This is with the Li-Po fully forward against the firewall and there is plenty of scope to move it rearwards a bit at a time especially if you also relocate the receiver as well.
I’d estimated I should get around 11 minutes of full throttle from my 2200mAh flight pack and had used less than half of the battery capacity when the timer went off at 12 minutes of mixed throttle flight. I wouldn’t be surprised if you could get close to 30 minutes of airtime if you wanted to.
Now the bad news. The first landing saw the nose leg shear cleanly off at the filed out grub screw position as soon as the wheels kissed the grass. I had suspected this would be a weak point when assembling the model but was surprised at how easily the noseleg broke. A replacement was soon fashioned from piano wire back in the workshop ready for the next outing but you should take into consideration the poor quality wire used for the undercarriage as I know it to be an issue on another similar model from the Protech range too.
Anyway, when fixed and ready for the second outing it was time to consider this minimal take-off power.
With the grunt from the setup on the little prop being adequate in flight it was time to try to a bigger prop and see if we could get off the grass unassisted.
Trying an 8×4” still draws around the same amps and rpm but provides more thrust at the expense of a little top-speed. With an 8mph breeze a ROG on medium length grass was fine and achieved surprisingly easily. Conscious that I shouldn’t stray too far from the recommended maximum props sizes given for the Fusion motor supplied, I do intend to try an 8×5” and 8×6” prop but I’ll see what they draw on the ground first. That said the 8×4” gave an adequate performance with no noticeable difference in the air to the smaller 7×5.
Further flights have been uneventful and the undercarriage remains intact. I’ve since also changed over to Spektrum 2.4GHz radio without any problems running it on the BEC either.
I’ve got to say that after my initial suspicions that this model would be underpowered and the problem with the weak and poorly fitting undercarriage, I was starting to have doubts about whether I would be able to enjoy it.

The Protech Park Fly models should be available at many a good model shop. The SR-22 retails at around £79.99 depending on where you’re looking. The full specification is as follows:
Wingspan: 930mm
Length: 720mm
Wing Area: 13.2dm²
Weight: 1020g
Article Tags:


