- Editors note – As far as I’m aware Belgian distributor Protech does not currently (Jan 2010) have a UK distributor. This model has previously been available in the UK however and so this review is produced on the basis that some readers may find an old kit or source an example from abroad.
The full size Staudacher was designed (unsurprisingly!) by American Jon Staudacher and only 20 were ever built, each one being modified slightly from the last, but all sharing the rare combination of carbon fibre and wood; something it shares with recent offerings from high profile manufacturers. As it was originally designed as America’s answer to the then, dominating, Russian Sukhoi, any model of it surely promises good aerobatic performance. This particular example features control surfaces similar to that of the real one, promising, if not an all-out 3D model, certainly an impressive scale aerobatic performance.
IMPRESSIONS
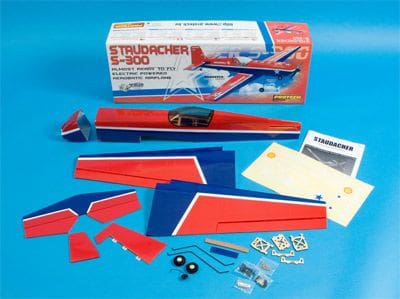
Opening the box you are presented with a selection of nicely made and finished components, much like all modern ARTF’s. A couple of things that are immediately apparent; the wings are joined by a good old-fashioned wing joiner to provide the dihedral and the ailerons seem small by today’s standards, as do the other surfaces – clearly not intended to be a 3D model perhaps? A quick ‘dry’ assembly proved that everything lined up correctly; enthusiasm suitably built up – on with the build.
First off, the instruction booklet, the pictures are clear enough, but not in colour – the written side answers any questions a builder of moderate skill might have about the process. This said, I did make a few deviations from the instructions – instead of using the suggested 7.5g servos on the rudder and elevator, I went for Hitec micro servos – in this case an 82MGs and 85BBs, although these were simply what I had to hand. Perhaps the ideal would be 65HBs, keeping weight down and torque up.
Article continues below…
Enjoy more RCM&E Magazine reading every month.
Click here to subscribe & save.
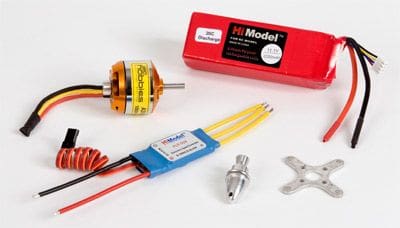
BRC Hobbies provided a A2814/8T motor (which was bigger than the instructions but much closer to what I would have chosen for this model based on the spec), twinned with a HiModel 33-amp ESC. As for battery power, a HiModel 2250mAh 3s 20C Li-Po was provided, which proved during flight tests to hold up well against other, more expensive brands. Incidentally I used an 11×8 APC-E prop although anything in the range between that and a 9×6 APC-E would work fine.
With all the items to hand, nothing else to do but get on and do it! This is a fairly simple process, but at times ended up being a bit fiddly. The main point you should be aware of is that it is advisable you open up some holes at the back of the fuselage to allow air to go over the ESC and Li-Po. With my set up, this was more a case of keeping the BEC cool as the four servos were working quite hard. While there were a couple of sticky moments during the build, this was nothing out of the ordinary and just removing the film from the fin and tailplane to allow for a good bond.
There were a couple of really nice features I noticed during the build. The first is the intricate motor mount – don’t be tempted to cut any bits off if it doesn’t fit properly, it takes a good ten minutes of calm thought to puzzle it out; but you get there in the end! The hardware provided was also of good quality, I especially liked the control horns, which were very easy to mount correctly.
The overall impression was that a lot of thought had gone into the model with my only gripe being that of battery replacement, as whilst the hatch does give you access to the flight pack, it’s an uncomfortably small amount of space to undo a velcro retaining strap, disconnecting the battery from the ESC, and then remove it. I felt it was safer for the model if this was only done when removing the wing (which is not a long process). This was the only reason I opted for screws to hold the underside hatch on, rather than the quick release method supplied. Oh, and I set the C of G onto the main spar, as per the instructions. Now onto the interesting bit – flying!
FLYING
Once a good flying day and a day when ace photographer Ben Dean was actually free coincided, I wasted no time in prepping the model for its initial flights. Given the amount of power, or rather over-powering this model had, I was hoping it would stand up to the rigorous test it was about to get! After the static shots, it was time to commit aviation. Placing the model on the ground and opening the power halfway produced an acceleration – this little model really wanted to be in the air. It had a tendency to balloon, although a small amount of down elevator trim sorted it out. Taking it three mistakes high as a safety net, I tested the stall, I’m happy to say that nothing untoward happened here, with the model gently dropping its nose to start flying again.
My earlier worries of the structural integrity given the powerful motor used were unfounded, as although the vertical climb was truly immense, at no point was there any unwanted flexing of the model, whatever the flight path. Attempting some general pattern type aerobatics showed good characteristics – the model tracked very straight and true and rolled very axially as well, needing minimal input to maintain a good line; therefore the point rolls as well as slow rolls were very controllable, down in part to the model’s good knife-edge ability. Whilst not being 100% pure, it is still very manageable in both directions.
Even without any mixing, complex manoeuvres such as rebound rolling circuits were well within the model’s abilities although, as with any model, their neatness would improve with calmer weather and if more time was spent setting the model up. Snaps stopped as soon as the sticks were neutralised and spins were very controllable, stopping in a similar fashion to the snaps, however I think entering their flatter variant from a blender might be pushing your luck.

Article continues below…
All this said and done, I had no complaints from a scale aerobatic point of view. Despite the model clearly not being intended for such antics, I felt it ‘prudent’ to attempt some mild 3D manoeuvres. Harriers presented a bit of a challenge, with evident wing rock, although doing them inverted improved matters significantly. Changing from upright or inverted harriers into rolling harriers was a good move, the model was far happier like this, even if the roll rate was a bit lively. A quick attempt at prop-hanging showed that the comparatively huge 11×8 APC-E prop was enough to send the model spinning around in a rather uncontrollable torque roll, due to the small tail surfaces not having the adequate authority to control it.
One thing that I think is important to note is that whilst being marketed as a park flyer, I think that the only park suitable to fly it in would be Yellowstone National Park! Simply because this little model does take up a surprising amount of airspace. I would certainly suggest that you get to grips with it first at your normal flying site before moving to anywhere more exposed to the public, or somewhere more enclosed. However, as a good chuck about model it is certainly very good and, I think, would be a good candidate as a scale aerobatic practice machine.
Another pleasant surprise was how well the undercarriage stood up. Both the mounting system and mounting area were well engineered.. That said, the wire doesn’t lend itself to the scale look that the rest of the model possess, although some simple of balsa fairings coupled with some film would probably make a good deal of difference. I didn’t bother with such an adjustment here, but may well do at a later date to achieve a better looking model.
DATAFILE
Name – Studacher
Manufacturer – Pro Models
www.protech.be
Wingspan – 42″
Fuselage length – 36″
Weight – 24oz (manufacturer’s figure)
Functions – Rudder, ailerons, elevator, throttle (via ESC)
Power train – BRC Hobbies A2814/8T motor (which was bigger than the instructions but much closer to what I would have chosen for this model based on the specs), HiModel 33-amp ESC. HiModel 2250mAh 3s 20C Li-Po.
Article continues below…


